![[Datsun 1200 encyclopedia]](/wiki/upload/wiki.png)
| Revision as of 02:07, 30 June 2012 ddgonzal (Talk | contribs) <- Previous diff |
Current revision ddgonzal (Talk | contribs) |
||
| Line 1: | Line 1: | ||
| - | [[Category:Engine Mechanical]][[Category:Engine Electrical System]] | ||
| How to Install a Distributor on A-series Engine | How to Install a Distributor on A-series Engine | ||
| Line 7: | Line 6: | ||
| # Engage handbrake on & block the wheels | # Engage handbrake on & block the wheels | ||
| # Put transmission in neutral | # Put transmission in neutral | ||
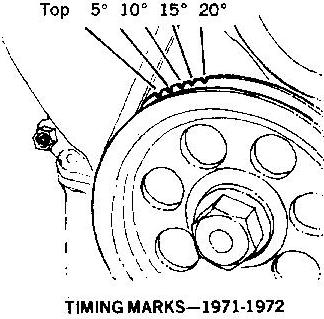
| - | # turn engine by carefully turning fan clockwise, until the timing marks line up (5 degrees BDTC). If the fan belt slips, it's too loose (tighten it!)<br>[http://datsun1200.com/modules/myalbum/photo.php?lid=724 http://datsun1200.com/modules/myalbum/photos/724.JPG]<br>[http://datsun1200.com/modules/myalbum/photo.php?lid=730 http://datsun1200.com/modules/myalbum/photos/730.JPG] | + | # turn engine by carefully turning fan clockwise, until the timing marks line up (5 degrees BDTC). If the fan belt slips, it's too loose (tighten it!)<br>{{Album|724|JPG}}<br>{{Album|730}} |
| # Check to see if it is TDC or BDC. Note where on the cap the #1 plug wire is. Then remove cap. If the rotor is pointing to #1, it is TDC. If it is pointing to #4, rotate the engine another 360 degrees. | # Check to see if it is TDC or BDC. Note where on the cap the #1 plug wire is. Then remove cap. If the rotor is pointing to #1, it is TDC. If it is pointing to #4, rotate the engine another 360 degrees. | ||
| # Remove the vacuum advance hose, low-voltage wire | # Remove the vacuum advance hose, low-voltage wire | ||
| Line 13: | Line 12: | ||
| = Distributor Installation = | = Distributor Installation = | ||
| - | |||
| == Preparation == | == Preparation == | ||
| Before you insert the new distributor: | Before you insert the new distributor: | ||
| # Clean the shaft on the new distributor of any dirt or dust | # Clean the shaft on the new distributor of any dirt or dust | ||
| # Put some clean motor oil on the gear | # Put some clean motor oil on the gear | ||
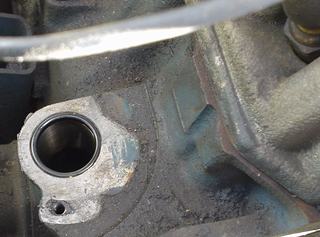
| - | # Be careful not to cut or dislodge the seal that's in the hole | + | # Be careful not to cut or dislodge the O-ring seal that's in the hole. Use one seal, either the one in the engine or the one of the distributor. Remove the extra seal |
| - | [http://datsun1200.com/modules/myalbum/photo.php?lid=3519 http://datsun1200.com/modules/myalbum/photos/3519.jpg] | + | Note the rubber o-ring seal in the distributor bore |
| - | <br>Note the rubber o-ring seal in the distributor bore. | + | <br>{{Album|3519}} |
| == Fitting == | == Fitting == | ||
| Next, insert the new distributor, carefully lowering it into the bore. | Next, insert the new distributor, carefully lowering it into the bore. | ||
| # keep the vacuum advance pointing toward the front of the car | # keep the vacuum advance pointing toward the front of the car | ||
| - | # turn the rotor to point at the #1 terminal of the cap. This is about 2 o'clock (if Noon if the front of the car). There is a straight line on the side of the distributor body indicating the Number One position<br>[http://datsun1200.com/modules/myalbum/photo.php?lid=245 http://datsun1200.com/modules/myalbum/photos/thumbs/245.jpg]<br>A12 distributor orientation | + | # turn the rotor to point at the #1 terminal of the cap. This is about 2 o'clock (if Noon if the front of the car). There is a straight line on the side of the distributor body indicating the Number One position<br>{{Album|245}}<br>A12 distributor orientation |
| # You'll have to rotate the rotor back to about 4 O'clock before inserting it, as it will rotate around as the gears mesh. Don't worry if it takes 10 or 20 tries to get everything lined up | # You'll have to rotate the rotor back to about 4 O'clock before inserting it, as it will rotate around as the gears mesh. Don't worry if it takes 10 or 20 tries to get everything lined up | ||
| # Assuming the timing marks are still at 5 degrees BTDC, rotate housing to line up rotor: | # Assuming the timing marks are still at 5 degrees BTDC, rotate housing to line up rotor: | ||
| #* For a points-type distributor, rotate the housing until it just sparks (key on, cap off) | #* For a points-type distributor, rotate the housing until it just sparks (key on, cap off) | ||
| #* For electronic ignition, line up the iron ring teeth (pickup) with the rotor (reluctor) teeth -- line it up exactly | #* For electronic ignition, line up the iron ring teeth (pickup) with the rotor (reluctor) teeth -- line it up exactly | ||
| - | # Double check: | + | # After distributor is in the engine, double check: |
| #* Rotor pointing at Number One wire | #* Rotor pointing at Number One wire | ||
| #* Points just beginning to open, or Electronic: teeth inside distributor lined up perfectly | #* Points just beginning to open, or Electronic: teeth inside distributor lined up perfectly | ||
| Line 38: | Line 36: | ||
| # Hook up the vacuum advance hose | # Hook up the vacuum advance hose | ||
| - | = Distributor Timing = | + | = Spark Timing = |
| - | Finally, when you are ready to start the engine you will want to immediate check the timing. See [[Ignition Timing]] for the procedure. | + | Finally, before you are ready to start the engine you will want to check the spark ignition timing. See [[Ignition Timing]] for the procedure. |
| + | [[Category:Engine Mechanical]][[Category:Engine Electrical System]]{{End}} | ||
Current revision
How to Install a Distributor on A-series Engine
NOTE: If your distributor is already installed, see: Ignition Timing.
Contents |
[edit]
Distributor Removal
- Engage handbrake on & block the wheels
- Put transmission in neutral
- turn engine by carefully turning fan clockwise, until the timing marks line up (5 degrees BDTC). If the fan belt slips, it's too loose (tighten it!)

- Check to see if it is TDC or BDC. Note where on the cap the #1 plug wire is. Then remove cap. If the rotor is pointing to #1, it is TDC. If it is pointing to #4, rotate the engine another 360 degrees.
- Remove the vacuum advance hose, low-voltage wire
- Remove the timing adjust bolt (under front of distributor) then pull distributor straight up and out
[edit]
Distributor Installation
[edit]
Preparation
Before you insert the new distributor:
- Clean the shaft on the new distributor of any dirt or dust
- Put some clean motor oil on the gear
- Be careful not to cut or dislodge the O-ring seal that's in the hole. Use one seal, either the one in the engine or the one of the distributor. Remove the extra seal
Note the rubber o-ring seal in the distributor bore
[edit]
Fitting
Next, insert the new distributor, carefully lowering it into the bore.
- keep the vacuum advance pointing toward the front of the car
- turn the rotor to point at the #1 terminal of the cap. This is about 2 o'clock (if Noon if the front of the car). There is a straight line on the side of the distributor body indicating the Number One position
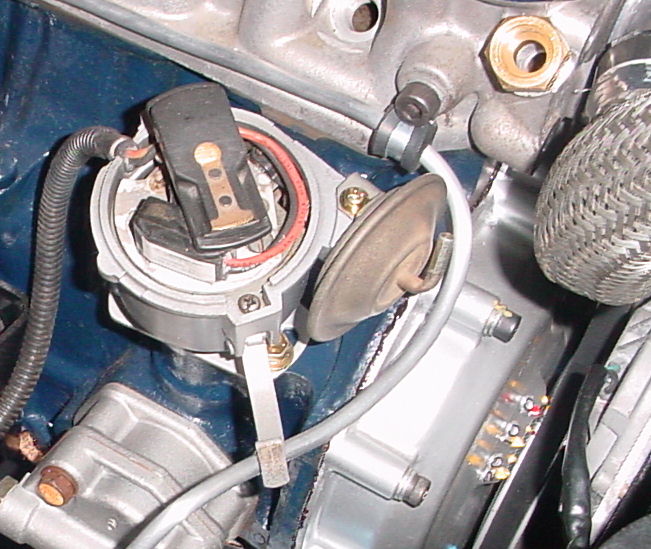
A12 distributor orientation - You'll have to rotate the rotor back to about 4 O'clock before inserting it, as it will rotate around as the gears mesh. Don't worry if it takes 10 or 20 tries to get everything lined up
- Assuming the timing marks are still at 5 degrees BTDC, rotate housing to line up rotor:
- For a points-type distributor, rotate the housing until it just sparks (key on, cap off)
- For electronic ignition, line up the iron ring teeth (pickup) with the rotor (reluctor) teeth -- line it up exactly
- After distributor is in the engine, double check:
- Rotor pointing at Number One wire
- Points just beginning to open, or Electronic: teeth inside distributor lined up perfectly
- timing marks on crankshaft lined up (5 degrees BTC)
- Bolt the distributor down
- Hook up the vacuum advance hose
[edit]
Spark Timing
Finally, before you are ready to start the engine you will want to check the spark ignition timing. See Ignition Timing for the procedure.
¤