![[Datsun 1200 encyclopedia]](/wiki/upload/wiki.png)
| Revision as of 06:36, 21 November 2009 ddgonzal (Talk | contribs) <- Previous diff |
Revision as of 03:08, 15 September 2016 ddgonzal (Talk | contribs) Next diff -> |
||
| Line 1: | Line 1: | ||
| This article is about the [[Carburetor Overview|stock Hitachi carb]], model Hitachi DCG-306 (manual choke) and DGH-306 (auto choke). However, much of the following generally applies to other standard venturi carbs like [[Weber|Weber]] carbs. But it doesn't discuss SU-type carbs like the [[Hitachi Twin Carb|Hitachi Sidedraft Carburetors]] used on the 1200 GX models. | This article is about the [[Carburetor Overview|stock Hitachi carb]], model Hitachi DCG-306 (manual choke) and DGH-306 (auto choke). However, much of the following generally applies to other standard venturi carbs like [[Weber|Weber]] carbs. But it doesn't discuss SU-type carbs like the [[Hitachi Twin Carb|Hitachi Sidedraft Carburetors]] used on the 1200 GX models. | ||
| + | {{Template:Hitachi_306}} | ||
| + | |||
| + | = Overview = | ||
| A prime focus of this article is: how to avoid buying parts you don't need. Instead, find the problem and fix it, or replace only what's actually bad. It's likely you can solve most problems without spending money replacing any parts. Rarely do cap, rotor, plugs, etc. need replacing, or even a new carb or rebuild kit be required. Even with used parts it should still run smooth. The points and condensor are the most likely to go bad, and a dwell meter will help tell the story there. | A prime focus of this article is: how to avoid buying parts you don't need. Instead, find the problem and fix it, or replace only what's actually bad. It's likely you can solve most problems without spending money replacing any parts. Rarely do cap, rotor, plugs, etc. need replacing, or even a new carb or rebuild kit be required. Even with used parts it should still run smooth. The points and condensor are the most likely to go bad, and a dwell meter will help tell the story there. | ||
| - | == Where do I get a repair manual? == | + | = Where do I get a repair manual? = |
| * [http://www.ebay.com eBay], usually for less that $10 USD. NOTE: Clymer, Chilton, etc general repair books include detailed carburetor info | * [http://www.ebay.com eBay], usually for less that $10 USD. NOTE: Clymer, Chilton, etc general repair books include detailed carburetor info | ||
| * new, a Chilton manual is around $15 USD, try [http://www.amazon.com Amazon.com] | * new, a Chilton manual is around $15 USD, try [http://www.amazon.com Amazon.com] | ||
| Line 9: | Line 12: | ||
| * For a non-stock carburetor, there are books specifically for Weber, SU, etc carburetors | * For a non-stock carburetor, there are books specifically for Weber, SU, etc carburetors | ||
| + | IMPORTANT: High fuel pump pressure can cause a high float, so perform the [[Fuel pump pressure test]] first -- before taking the carb apart to adjust the Float Level. | ||
| + | |||
| + | = What to Check First - Float Level = | ||
| + | '''Easy Tip! - check Float Level'''. An extra-nice feature of the Hitachi is the float glass site-level. When running, look through the float glass and ensure the level of the fuel is right. It should be within 1 mm of the center line of the glass. | ||
| + | |||
| + | Fuel-level site glass | ||
| + | <br>{{Album|2215}} | ||
| + | |||
| + | There is a dot in the center of the glass. With engine running, the fuel level should be very close to the centerline of the glass. | ||
| - | == What to Check First - Float Level == | + | {{Album|7792}} |
| - | '''Easy Tip! - check Float Level'''. An extra-nice feature of the Hitachi is the float glass site-level. When running, look through the float glass and ensure the level of the fuel is right. It should be near the center line of the glass. If not, you'll need to take the carb apart to adjust the float level. | + | |
| + | If it's higher or lower than 1mm from the dot, you need to adjust the float level as your first carb-adjustment step. | ||
| * If it's too high, the carb can flood and/or run rich | * If it's too high, the carb can flood and/or run rich | ||
| Line 17: | Line 30: | ||
| * This can be adjusted independent of the other steps | * This can be adjusted independent of the other steps | ||
| - | [http://datsun1200.com/modules/myalbum/photo.php?lid=2215 http://datsun1200.com/modules/myalbum/photos/2215.jpg] | + | Instructions for changing the float level are below in the '''Float Level''' section. |
| - | <br>Fuel-level site glass | + | |
| - | There is a dot in the center of the glass. With engine running, the fuel level should be very close to the centerline of the glass. If it's high or low, you need to adjust the float level as your first carb-adjustment step. | + | CAUTION: Float level is the foundation of the carburetor |
| - | + | tuning. All other adjustments will be incorrect if the | |
| - | [http://datsun1200.com/modules/myalbum/photo.php?lid=7792 http://datsun1200.com/modules/myalbum/photos/7792.jpg] | + | float level is incorrect. Check this first! |
| - | <hr>Check Fuel-level site glass. Instructions are below in the '''Float Level''' section. | + | |
| - | + | ||
| - | IMPORTANT: High fuel pump pressure can cause a high float, so perform the [[Fuel pump pressure test]] first -- before taking the carb apart to adjust the Float Level. | + | |
| - | == Engine Compression == | + | = Engine Compression = |
| If your engine has bad compression, you'll probably want to repair that first. | If your engine has bad compression, you'll probably want to repair that first. | ||
| * If the compression is evenly low, you should be able to make your carb run better by continuing with the carb adjustment | * If the compression is evenly low, you should be able to make your carb run better by continuing with the carb adjustment | ||
| Line 36: | Line 45: | ||
| Each cylinder should be between 110-150 lbs pressure. Some variation is OK, but all cylinders should be within 25 lbs of each other. '''If one cylinder is 90 psi or below''' suspect bad rings or a burnt valve. In this case, adjusting the carb probably won't fix all the problems. | Each cylinder should be between 110-150 lbs pressure. Some variation is OK, but all cylinders should be within 25 lbs of each other. '''If one cylinder is 90 psi or below''' suspect bad rings or a burnt valve. In this case, adjusting the carb probably won't fix all the problems. | ||
| - | == Engine Timing == | + | = Engine Timing = |
| Before touching the carburetor, '''make sure your engine [[Ignition Timing]] is right'''. This is the foundation of adjusting the carburetor. If this is off, adjusting the carburetor may not make the engine run any better. Also, timing problems might appear to be carb problems, so do this first to make sure. | Before touching the carburetor, '''make sure your engine [[Ignition Timing]] is right'''. This is the foundation of adjusting the carburetor. If this is off, adjusting the carburetor may not make the engine run any better. Also, timing problems might appear to be carb problems, so do this first to make sure. | ||
| '''Step 2: Perform [[Ignition Timing]] adjustment'''. | '''Step 2: Perform [[Ignition Timing]] adjustment'''. | ||
| - | == Check for Vacuum Leaks == | + | = Check for Vacuum Leaks = |
| Wait a minute! When do I get to adjust the carburetor? | Wait a minute! When do I get to adjust the carburetor? | ||
| Good question, but remember: '''Vacuum Leaks are your Worst Enemy''' -- they are a ''most common problem'' causing bad carburetor performance, if not ''the'' most common problem. So spend some important time on finding vacuum leaks. | Good question, but remember: '''Vacuum Leaks are your Worst Enemy''' -- they are a ''most common problem'' causing bad carburetor performance, if not ''the'' most common problem. So spend some important time on finding vacuum leaks. | ||
| - | Some people call vacuum leaks "air leaks". | + | See main article: [[Vacuum Leaks]] |
| - | Leaking intake gaskets and carb gaskets are '''not''' the most common problems. More often: | + | = Engine Off Inspection = |
| - | * broken hose ends | + | |
| - | * leaking vacuum motors (diaphragms) | + | |
| - | + | ||
| - | + | ||
| - | The '''vacuum motors''' are: | + | |
| - | * Vacuum Advance | + | |
| - | * Choke Pull-off (automatic choke models) | + | |
| - | * Air Cleaner heat-flap Motor (some engines) | + | |
| - | * Carburetor Dashpot (some engines) | + | |
| - | * EGR Valve (newer engines) | + | |
| - | * on the carb: | + | |
| - | ** choke vacuum break (choke pull-off) | + | |
| - | ** [http://datsun1200.com/modules/myalbum/photo.php?lid=1008 http://datsun1200.com/modules/myalbum/photos/thumbs/1008.jpg] | + | |
| - | ** Throttle opener | + | |
| - | ** Dashpot | + | |
| - | + | ||
| - | + | ||
| - | NOTE: Only a few of the vacuum devices are actually powered at idle. The others only activate at certain temperatures or other conditions. So we will concentrate on other tests first. | + | |
| - | + | ||
| - | The next section will show how to look for vacuum leaks. | + | |
| - | + | ||
| - | == Engine Off Inspection == | + | |
| Perform these steps before starting the engine. | Perform these steps before starting the engine. | ||
| - | === Examine Hoses === | + | == Examine Hoses == |
| Examine carefully all the vacuum hoses on the engine, especially the ends of each hose. Cut off cracked ends and refasten. This will fix or help prevent vacuum leaks at the hose ends. | Examine carefully all the vacuum hoses on the engine, especially the ends of each hose. Cut off cracked ends and refasten. This will fix or help prevent vacuum leaks at the hose ends. | ||
| - | ===Check the Play on the Throttle Shaft === | + | == Check the Play on the Throttle Shaft == |
| With old carbs, this is also a critical wear spot. When buying a used carb, this is the most important thing to look for.''' | With old carbs, this is also a critical wear spot. When buying a used carb, this is the most important thing to look for.''' | ||
| Line 83: | Line 70: | ||
| * If it's loose, it needs to be drilled and bushings put in. See [[Carburetor Repair 2]]. | * If it's loose, it needs to be drilled and bushings put in. See [[Carburetor Repair 2]]. | ||
| - | === Accelerator Pump Test === | + | == Visual Inspection == |
| - | [http://datsun1200.com/modules/myalbum/photo.php?lid=2214 http://datsun1200.com/modules/myalbum/photos/thumbs/2214.jpg] | + | * Inspect all hoses for signs of cracking (especially at the ends of the hoses) or burning/melting. Replace any that are suspect. |
| + | * Check for free movement of the [[Heat Riser]]. If it is stuck, it can cause the engine to run poorly -- or even not at all! (depending at which position it is stuck)<br>{{Album|22835}} | ||
| + | * Ensure the secondary air flap moves freely. Move this lever up with your finger, and it should drop back down. If it moves stiffly or not at all, the carb will only work on its primary barrel!<br>{{Album|22834}} | ||
| + | |||
| + | == Accelerator Pump Test == | ||
| + | {{Album|2214}} | ||
| Here's how the accelerator is supposed to work, whenever you open the throttle (depress the accelerator pedal): | Here's how the accelerator is supposed to work, whenever you open the throttle (depress the accelerator pedal): | ||
| Line 91: | Line 83: | ||
| * if the accelerator pump (plunger) isn't working, the carb will idle, but not accelerate to a higher speed very well (if at all) | * if the accelerator pump (plunger) isn't working, the carb will idle, but not accelerate to a higher speed very well (if at all) | ||
| * if the accelerator pump is only partially working (only squirts a small stream), when accelerating the engine will 'hesitate', 'buck' or backfire | * if the accelerator pump is only partially working (only squirts a small stream), when accelerating the engine will 'hesitate', 'buck' or backfire | ||
| - | |||
| TIP: Old carbs from the 60s and 70s had leather pump gaskets, which dry up if fuel isn't kept in the carb. Sometimes when starting a carb that hasn't run in years, letting it sit a few days will let the seal expand, but other times it needs replacing. | TIP: Old carbs from the 60s and 70s had leather pump gaskets, which dry up if fuel isn't kept in the carb. Sometimes when starting a carb that hasn't run in years, letting it sit a few days will let the seal expand, but other times it needs replacing. | ||
| - | |||
| Here's how inspect the accelerator pump: | Here's how inspect the accelerator pump: | ||
| Line 104: | Line 94: | ||
| * If none is seen, or if it's intermittent, replace the accelerator pump inside the carb (see Internal Inspection section) | * If none is seen, or if it's intermittent, replace the accelerator pump inside the carb (see Internal Inspection section) | ||
| - | === Vacuum Motor Testing - Engine Off === | + | == Slow Jets Loose? == |
| - | Here are some ways to check for vacuum leaks in the vacuum motors (diaphragms) with the engine off: | + | There is also another slow on the opposite side. These must not be loose. Make sure they are finger-tight. |
| + | <br>{{Album|24283}} | ||
| - | ==== Use Your Finger Method ==== | + | == Vacuum Motor Testing - Engine Off == |
| - | [http://datsun1200.com/modules/myalbum/photo.php?lid=2211 http://datsun1200.com/modules/myalbum/photos/thumbs/2211.jpg] | + | Here's your second chance to find those pesky vacuum leaks. Carb adjustments won't fix the problem until you perform this careful procedure. |
| - | Test each diaphragm. Here's an example using the '''choke pull-off''' | + | {{SeeMainArticle!|Vacuum Leaks}} |
| - | # Pull the hose off the '''choke pull-off''' | + | |
| - | #: [http://datsun1200.com/modules/myalbum/photo.php?lid=2213 http://datsun1200.com/modules/myalbum/photos/thumbs/2213.jpg] | + | |
| - | # Use a screwdriver to push on the rod coming out of the pull-off | + | |
| - | # Cover the port with your finger | + | |
| - | # Let go of the screwdriver. The rod should stay pushed in | + | |
| - | # Take your finger off. | + | |
| - | The rod should stay or maybe move back just a little. | + | == Choke Test Engine Cold == |
| - | * If it moves all the way back, the diaphragm is leaking. Plug the hose until you can replace the pull-off (it only works when the engine is cold anyways -- if bad, it causes the engine to "chug" after first starting it) | + | See main article [[Choke Operation and Adjustment]] |
| - | Repeat for these diaphragms: | + | = Engine Idling Tests = |
| - | * [[Throttle opener]] | + | |
| - | * [[Distributor Vacuum Advance]] | + | |
| - | * [[Carburetor dashpot]] (some engines) | + | |
| - | * [[EGR Valve]] (newer engines starting with B210). CAUTION: This gets very hot, so only test with engine Cold!. With some EGR valves, you can push the diaphragm with your finger. With others you cannot. Alternative: You can plug the valve to see if the engine drives better. For a non-street engine, plug it permanently; it is for emissions only and affects performance negatively | + | |
| - | * [[Carburetor dashpot]] (some engines) | + | |
| - | + | ||
| - | NOTE: Newer carbs/engines/distributors may have even more diaphragms to check: | + | |
| - | * Distributor retard. Test in same way as Vacuum advance. For a non-street engine, plug it permanently, as it degrades performance | + | |
| - | * Other [[Emission controls]] | + | |
| - | + | ||
| - | ===== Air Cleaner Motor ===== | + | |
| - | Some engines have an [[Air Cleaner Motor]]. If needed, this part can be replaced OR can be left plugged. This is the hot-air flap, and is only strictly necessary in cold climates (temps close to freezing) to prevent carburetor frost-up. | + | |
| - | <br>[http://datsun1200.com/modules/myalbum/photo.php?lid=1005 http://datsun1200.com/modules/myalbum/photos/thumbs/1005.jpg]Air Cleaner Hot Air Valve | + | |
| - | + | ||
| - | It is ''very'' common for the Air Cleaner Motor to leak. You can push up on this after removing the hot air tube and check and see if it holds vacuum. This part is only needed in cold-weather operation, to keep the carb from icing over. | + | |
| - | + | ||
| - | Alternative test: check on a warmer day that this is closing (some cold air is entering, not all hot). Plug the hose if it is not working correctly. The flap should not open all the way until 122 degrees Farenheit. | + | |
| - | + | ||
| - | ==== Vacuum Gun Method ==== | + | |
| - | Use a [[Vacuum gun|vacuum-making hand gun]]. It will come with instructions and costs around $50 USD. This is the easiest, most accurate and best way to do it. Basically, you pull the hose off the vacuum motor, connect the gun, and squeeze the trigger. A built-in vacuum gauge will tell you if vacuum is holding. | + | |
| - | + | ||
| - | + | ||
| - | You can also test small emissions parts with this tool. Some parts are designed to hold a partial vacuum (a repair manual will have more details on testing these parts). | + | |
| - | + | ||
| - | # Push on the motor's rod or diaphragm with your finger or a screwdriver. | + | |
| - | # Use another finger on the port to block the hose | + | |
| - | # While still blocking the hose, release the shaft or diaphragm | + | |
| - | + | ||
| - | + | ||
| - | * With your finger covering the port, the motor should stay fully or partly in position. This part is good. | + | |
| - | * If it immediately moves back to normal, it's leaking. Replace the part. Some parts can be blocked off (put a golf tee in the hose) | + | |
| - | + | ||
| - | Parts that can be blocked temporarily and still get good performance include: | + | |
| - | * EGR valve. Replace the bad part to help maintain low emissions | + | |
| - | * Distributor advance. It will run slightly jerky blocked, but it is better than leaking | + | |
| - | + | ||
| - | + | ||
| - | === Choke Test Engine Cold === | + | |
| - | See the [[Choke Operation]] page. | + | |
| - | + | ||
| - | == Engine Idling Tests == | + | |
| Start the engine and let it idle. We will now check for vacuum leaks. Only a few of the vacuum devices are actually powered at idle. The others only activate at certain temperatures or other conditions. So these are some you can test at idle. | Start the engine and let it idle. We will now check for vacuum leaks. Only a few of the vacuum devices are actually powered at idle. The others only activate at certain temperatures or other conditions. So these are some you can test at idle. | ||
| - | === Float Level Inspection === | + | == Float Level Inspection == |
| If the float level is incorrect, you will need to partially disassemble the carburetor. See [[Float Level Adjustment]] page. | If the float level is incorrect, you will need to partially disassemble the carburetor. See [[Float Level Adjustment]] page. | ||
| - | === Vacuum Testing - Choke Pull-Off === | + | == Vacuum Testing - Choke Pull-Off == |
| Temporarily disconnect and plug the hoses that go to the choke pull-off to see if it makes a difference. Just put a golf-tee or something to tightly plug the end of the hose. '''If the engine idles''' faster with host intact, but slower with the hose plugged, it indicates a leak). | Temporarily disconnect and plug the hoses that go to the choke pull-off to see if it makes a difference. Just put a golf-tee or something to tightly plug the end of the hose. '''If the engine idles''' faster with host intact, but slower with the hose plugged, it indicates a leak). | ||
| - | [http://datsun1200.com/modules/myalbum/photo.php?lid=1008 http://datsun1200.com/modules/myalbum/photos/thumbs/1008.jpg] choke and throttle vacuum motors | + | choke and throttle vacuum motors |
| + | <br>{{Album|1008}} | ||
| - | === PCV Valve Test === | + | == PCV Valve Test == |
| - | Plug temporarily the hose going into the [[PCV valve]] (in the manifold, just under the carb) to see if the engine slows way down -- more than a little. This hose is difficult to get off, though if it isn't too stiff, you might be able to squeeze it shut with pliers. If it does lower the idle speed significantly, remove and clean (or replace) the PCV valve. | + | Plug temporarily the hose going into the [[PCV]] valve (in the manifold, just under the carb) to see if the engine slows way down -- more than a little. This hose is difficult to get off, though if it isn't too stiff, you might be able to squeeze it shut with pliers. If it does lower the idle speed significantly, remove and clean (or replace) the PCV valve. |
| - | === Leak Test - Gasket Junctions === | + | == Leak Test - Gasket Junctions == |
| If no leaks have shown up yet, spray the carb-manifold junction and the intake manifold-head junction with WD40 -- if is smooths out while spraying a particular spot, tighten the bolts or replace the gasket. The idea here is that the oil temporarily plugs the leak and you can hear the engine run differently. | If no leaks have shown up yet, spray the carb-manifold junction and the intake manifold-head junction with WD40 -- if is smooths out while spraying a particular spot, tighten the bolts or replace the gasket. The idea here is that the oil temporarily plugs the leak and you can hear the engine run differently. | ||
| CAUTION: Don't over-torque the bolts. That won't help, and potentially can break the bolt off. | CAUTION: Don't over-torque the bolts. That won't help, and potentially can break the bolt off. | ||
| - | ==== LPG Vacuum Leak Test ==== | + | === LPG Vacuum Leak Test === |
| - | Professional mechanics check for vacuum leaks by using a bit of LPG. (thanks to [http://datsun1200.com/modules/newbb/viewtopic.php?topic_id=6719&forum=1 Matt]) | + | Professional mechanics check for vacuum leaks by using a bit of LPG. (thanks to [http://datsun1200.com/modules/newbb/viewtopic.php?post_id=11947#forumpost11947 Matt]) |
| # Find a small LPG (Liquified Petroleum Gas, I'm not sure what you'll have) cylinder from a camping stove and fit it with a flexible tube (5/16 fuel hose will do) | # Find a small LPG (Liquified Petroleum Gas, I'm not sure what you'll have) cylinder from a camping stove and fit it with a flexible tube (5/16 fuel hose will do) | ||
| Line 191: | Line 136: | ||
| # If putting gas into the carb smoothed the running but no air leaks are found then it is probably a jetting or other carb set up problem. | # If putting gas into the carb smoothed the running but no air leaks are found then it is probably a jetting or other carb set up problem. | ||
| - | === Anti-dieseling solenoid valve === | + | == Anti-dieseling solenoid valve == |
| - | 1973 and newer carbs may have an [[Anti-dieseling solenoid]]. | + | 1973 and newer carbs may have an [[Anti-dieseling solenoid]]. |
| - | <br>[http://datsun1200.com/modules/myalbum/photo.php?lid=1006 http://datsun1200.com/modules/myalbum/photos/thumbs/1006.jpg]Anti-dieseling valve | + | |
| + | Anti-dieseling valve | ||
| + | <br>{{Album|1006}} | ||
| If this isn't working right: | If this isn't working right: | ||
| Line 203: | Line 150: | ||
| # Turn key to IGN (not Start) | # Turn key to IGN (not Start) | ||
| # Listen carefully, while you connect wires together. You should hear a 'click' when connecting. Try it several times. | # Listen carefully, while you connect wires together. You should hear a 'click' when connecting. Try it several times. | ||
| - | |||
| If no click is heard, replace the valve. | If no click is heard, replace the valve. | ||
| - | === Choke Operation - Engine Warm === | + | == Choke Operation - Engine Warm == |
| See the [[Choke Operation and Adjustment]] page. | See the [[Choke Operation and Adjustment]] page. | ||
| - | + | == Idle Speed and Mixture Adjustment == | |
| - | === Idle Speed and Mixture Adjustment === | + | |
| NOTE: Idle speed must be adjusted with engine fully warmed, choke butterfly fully open. Take off air cleaner lid and confirm the choke is fully open before proceeding. | NOTE: Idle speed must be adjusted with engine fully warmed, choke butterfly fully open. Take off air cleaner lid and confirm the choke is fully open before proceeding. | ||
| # Adjust curb idle speed. [[Carburetor Specifications]] vary, but any stock A-series engine should idle fine at 750 rpm | # Adjust curb idle speed. [[Carburetor Specifications]] vary, but any stock A-series engine should idle fine at 750 rpm | ||
| Line 217: | Line 162: | ||
| #* Adjust idle to 800 rpm | #* Adjust idle to 800 rpm | ||
| #* turn mixture screw in (clockwise) to lean the mixture down to 750 rpm | #* turn mixture screw in (clockwise) to lean the mixture down to 750 rpm | ||
| - | #* Just learning? To get a 'feel' for this adjustment, turn the screw by half turns clockwise and anticlockwise till you hear the engine speed up and slow down. Then fine turn with 1/4 turns. Do this repeatedly until you are confident of the results | + | #* Just learning? To get a 'feel' for this adjustment, turn the screw by half turns clockwise and anticlockwise till you hear the engine speed up and slow down. Then fine turn with 1/4 turns. Do this repeatedly until you are confident of the results<br>{{Album|2217}} |
| + | * Fast Idle: this is part of the choke adjustment, and isn't done with the engine warm. See the Choke section | ||
| - | [http://datsun1200.com/modules/myalbum/photo.php?lid=2217 http://datsun1200.com/modules/myalbum/photos/thumbs/2217.jpg]idle adjustments | + | [[Category:Fuel System]]{{End}} |
| - | + | ||
| - | * Fast Idle: this is part of the choke adjustment, and isn't done with the engine warm. See the Choke section | + | |
Revision as of 03:08, 15 September 2016
This article is about the stock Hitachi carb, model Hitachi DCG-306 (manual choke) and DGH-306 (auto choke). However, much of the following generally applies to other standard venturi carbs like Weber carbs. But it doesn't discuss SU-type carbs like the Hitachi Sidedraft Carburetors used on the 1200 GX models.
Contents |
Overview
A prime focus of this article is: how to avoid buying parts you don't need. Instead, find the problem and fix it, or replace only what's actually bad. It's likely you can solve most problems without spending money replacing any parts. Rarely do cap, rotor, plugs, etc. need replacing, or even a new carb or rebuild kit be required. Even with used parts it should still run smooth. The points and condensor are the most likely to go bad, and a dwell meter will help tell the story there.
Where do I get a repair manual?
- eBay, usually for less that $10 USD. NOTE: Clymer, Chilton, etc general repair books include detailed carburetor info
- new, a Chilton manual is around $15 USD, try Amazon.com
- public library
- For a non-stock carburetor, there are books specifically for Weber, SU, etc carburetors
IMPORTANT: High fuel pump pressure can cause a high float, so perform the Fuel pump pressure test first -- before taking the carb apart to adjust the Float Level.
What to Check First - Float Level
Easy Tip! - check Float Level. An extra-nice feature of the Hitachi is the float glass site-level. When running, look through the float glass and ensure the level of the fuel is right. It should be within 1 mm of the center line of the glass.
Fuel-level site glass
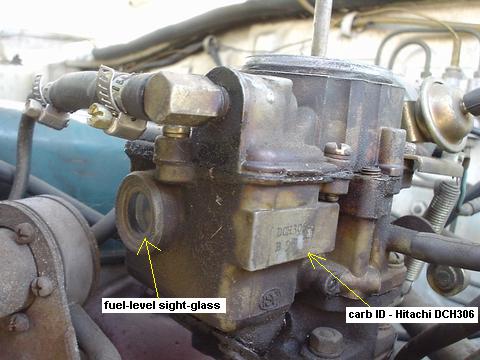
There is a dot in the center of the glass. With engine running, the fuel level should be very close to the centerline of the glass.
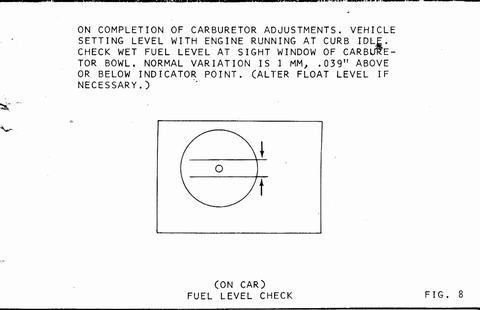
If it's higher or lower than 1mm from the dot, you need to adjust the float level as your first carb-adjustment step.
- If it's too high, the carb can flood and/or run rich
- If it's too low, it can run lean, hesitate (flat spot) or even run out of fuel on hard cornering!
- This can be adjusted independent of the other steps
Instructions for changing the float level are below in the Float Level section.
CAUTION: Float level is the foundation of the carburetor
tuning. All other adjustments will be incorrect if the
float level is incorrect. Check this first!
Engine Compression
If your engine has bad compression, you'll probably want to repair that first.
- If the compression is evenly low, you should be able to make your carb run better by continuing with the carb adjustment
- If only one or two cylinders have low compression, it won't help to adjust the carburetor. You must perform engine repair.
Step 1: Perform Engine compression test.
Each cylinder should be between 110-150 lbs pressure. Some variation is OK, but all cylinders should be within 25 lbs of each other. If one cylinder is 90 psi or below suspect bad rings or a burnt valve. In this case, adjusting the carb probably won't fix all the problems.
Engine Timing
Before touching the carburetor, make sure your engine Ignition Timing is right. This is the foundation of adjusting the carburetor. If this is off, adjusting the carburetor may not make the engine run any better. Also, timing problems might appear to be carb problems, so do this first to make sure.
Step 2: Perform Ignition Timing adjustment.
Check for Vacuum Leaks
Wait a minute! When do I get to adjust the carburetor?
Good question, but remember: Vacuum Leaks are your Worst Enemy -- they are a most common problem causing bad carburetor performance, if not the most common problem. So spend some important time on finding vacuum leaks.
See main article: Vacuum Leaks
Engine Off Inspection
Perform these steps before starting the engine.
Examine Hoses
Examine carefully all the vacuum hoses on the engine, especially the ends of each hose. Cut off cracked ends and refasten. This will fix or help prevent vacuum leaks at the hose ends.
Check the Play on the Throttle Shaft
With old carbs, this is also a critical wear spot. When buying a used carb, this is the most important thing to look for.
Wiggle the throttle shaft from side to side (90 degrees to the shaft). Wear is common with old carbs. It should feel tight with no discernible play. A worn shaft makes a vacuum leak: the engine idle rough, even to the point of killing the engine at stops and it can not be tuned to idle correctly.
- It should be tight, and if so no worries
- If it's loose, it needs to be drilled and bushings put in. See Carburetor Repair 2.
Visual Inspection
- Inspect all hoses for signs of cracking (especially at the ends of the hoses) or burning/melting. Replace any that are suspect.
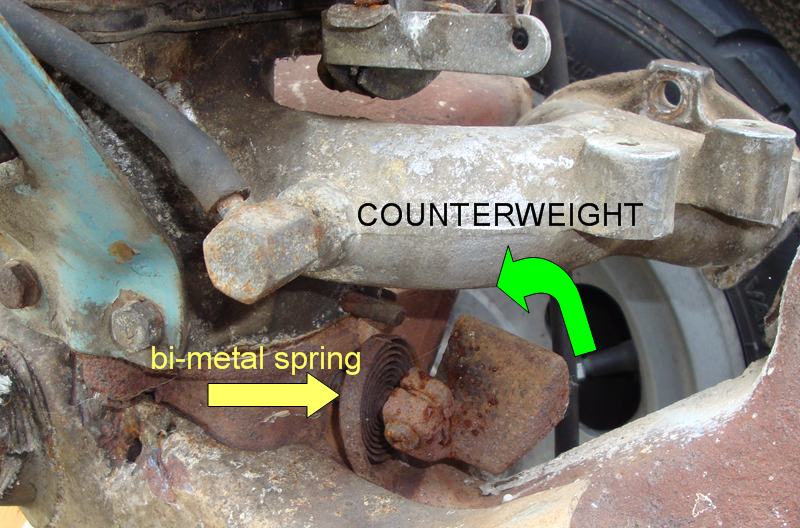
- Check for free movement of the Heat Riser. If it is stuck, it can cause the engine to run poorly -- or even not at all! (depending at which position it is stuck)
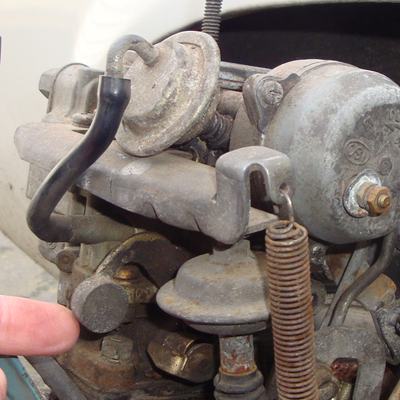
- Ensure the secondary air flap moves freely. Move this lever up with your finger, and it should drop back down. If it moves stiffly or not at all, the carb will only work on its primary barrel!
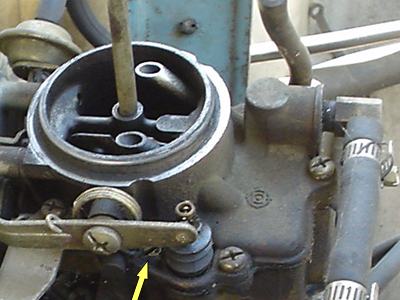
Accelerator Pump Test
Here's how the accelerator is supposed to work, whenever you open the throttle (depress the accelerator pedal):
- a little fuel is squirted direct into the carburetor throttle bores (running or not)
- if you do this too many times before starting the engine, you will "flood" the engine and it won't start until you let it sit for a while (give it time to let the fuel evaporate)
- if the accelerator pump (plunger) isn't working, the carb will idle, but not accelerate to a higher speed very well (if at all)
- if the accelerator pump is only partially working (only squirts a small stream), when accelerating the engine will 'hesitate', 'buck' or backfire
TIP: Old carbs from the 60s and 70s had leather pump gaskets, which dry up if fuel isn't kept in the carb. Sometimes when starting a carb that hasn't run in years, letting it sit a few days will let the seal expand, but other times it needs replacing.
Here's how inspect the accelerator pump:
- With engine off, take the air cleaner off
- Hold the choke open and look down into the carburetor
- Turn the throttle shaft or have someone "floor" the accelerator pedal
- You should see a definite smooth squirt of fuel from near the top of the throttle bore down into the bore
- If none is seen, or if it's intermittent, replace the accelerator pump inside the carb (see Internal Inspection section)
Slow Jets Loose?
There is also another slow on the opposite side. These must not be loose. Make sure they are finger-tight.
Vacuum Motor Testing - Engine Off
Here's your second chance to find those pesky vacuum leaks. Carb adjustments won't fix the problem until you perform this careful procedure.
Choke Test Engine Cold
See main article Choke Operation and Adjustment
Engine Idling Tests
Start the engine and let it idle. We will now check for vacuum leaks. Only a few of the vacuum devices are actually powered at idle. The others only activate at certain temperatures or other conditions. So these are some you can test at idle.
Float Level Inspection
If the float level is incorrect, you will need to partially disassemble the carburetor. See Float Level Adjustment page.
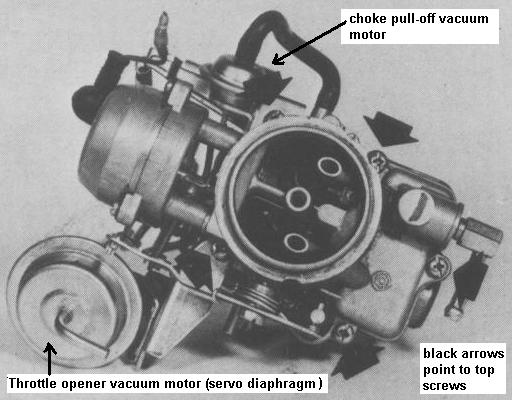
Vacuum Testing - Choke Pull-Off
Temporarily disconnect and plug the hoses that go to the choke pull-off to see if it makes a difference. Just put a golf-tee or something to tightly plug the end of the hose. If the engine idles faster with host intact, but slower with the hose plugged, it indicates a leak).
choke and throttle vacuum motors
PCV Valve Test
Plug temporarily the hose going into the PCV valve (in the manifold, just under the carb) to see if the engine slows way down -- more than a little. This hose is difficult to get off, though if it isn't too stiff, you might be able to squeeze it shut with pliers. If it does lower the idle speed significantly, remove and clean (or replace) the PCV valve.
Leak Test - Gasket Junctions
If no leaks have shown up yet, spray the carb-manifold junction and the intake manifold-head junction with WD40 -- if is smooths out while spraying a particular spot, tighten the bolts or replace the gasket. The idea here is that the oil temporarily plugs the leak and you can hear the engine run differently.
CAUTION: Don't over-torque the bolts. That won't help, and potentially can break the bolt off.
LPG Vacuum Leak Test
Professional mechanics check for vacuum leaks by using a bit of LPG. (thanks to Matt)
- Find a small LPG (Liquified Petroleum Gas, I'm not sure what you'll have) cylinder from a camping stove and fit it with a flexible tube (5/16 fuel hose will do)
- Start the engine and get it idling, then drift a small amount of gas in the carb opening.
- If the engine running smoothes out with additional gas you have got an air leak.
- Now slowly drift gas around the manifold to head surface, carb to manifold, carb etc.
- If as you do this the engine smoothes out that area is where the leak is.
- If putting gas into the carb smoothed the running but no air leaks are found then it is probably a jetting or other carb set up problem.
Anti-dieseling solenoid valve
1973 and newer carbs may have an Anti-dieseling solenoid.
Anti-dieseling valve
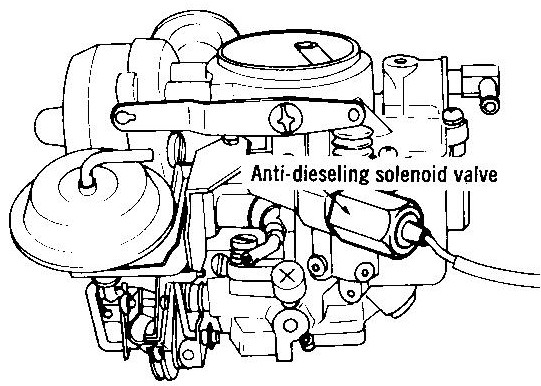
If this isn't working right:
- Engine won't idle, but drives good otherwise
This valve has one electric wire.
Make sure it's getting power when the ignition is on (engine running or not running, it should have power):
- Disconnect the wire connector
- Turn key to IGN (not Start)
- Listen carefully, while you connect wires together. You should hear a 'click' when connecting. Try it several times.
If no click is heard, replace the valve.
Choke Operation - Engine Warm
See the Choke Operation and Adjustment page.
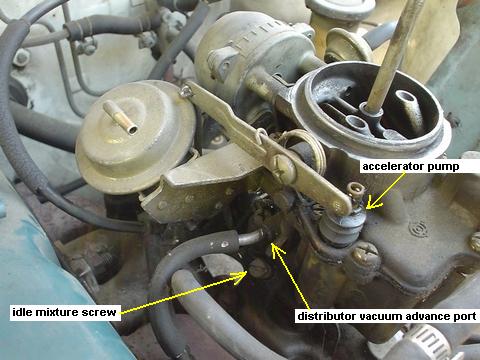
Idle Speed and Mixture Adjustment
NOTE: Idle speed must be adjusted with engine fully warmed, choke butterfly fully open. Take off air cleaner lid and confirm the choke is fully open before proceeding.
- Adjust curb idle speed. Carburetor Specifications vary, but any stock A-series engine should idle fine at 750 rpm
- Mixture adjustment. Specs vary, but this will make any stock A-engine run nice:
- Adjust idle to 800 rpm
- turn mixture screw in (clockwise) to lean the mixture down to 750 rpm
- Just learning? To get a 'feel' for this adjustment, turn the screw by half turns clockwise and anticlockwise till you hear the engine speed up and slow down. Then fine turn with 1/4 turns. Do this repeatedly until you are confident of the results
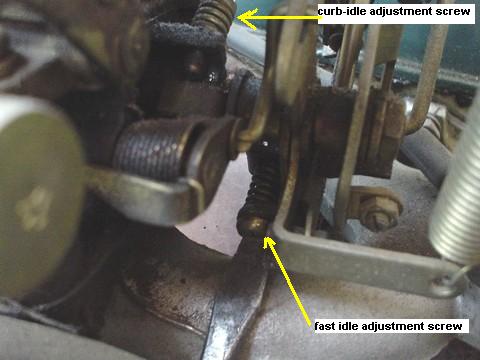
- Fast Idle: this is part of the choke adjustment, and isn't done with the engine warm. See the Choke section