![[Datsun 1200 encyclopedia]](/wiki/upload/wiki.png)
| Revision as of 23:54, 15 June 2011 ddgonzal (Talk | contribs) (->Instructions) <- Previous diff |
Revision as of 01:58, 16 June 2011 ddgonzal (Talk | contribs) Next diff -> |
||
| Line 1: | Line 1: | ||
| - | Obtain an electronic distributor from an E15(E?)/N12 [[wikipedia:Nissan Pulsar|Nissan Pulsar]]. Fit a drive gear from an A series distributor, drill a new hole in the shaft, grind, file and drill the housing. Plug it in. Cost is about $65 AUD for a used distributor from the wreckers. | + | Obtain an electronic distributor from an E15 engine such as from an N12 [[wikipedia:Nissan Pulsar|Nissan Pulsar]]. Fit a drive gear from an A series distributor, drill a new hole in the shaft, grind, file and drill the housing. Plug it in. Cost is about $65 AUD for a used distributor from the wreckers. |
| - | == Instructions == | + | = Instructions = |
| # remove gear from A-series distributor and fit to the E-series distributor | # remove gear from A-series distributor and fit to the E-series distributor | ||
| # Modify housing clamp-down | # Modify housing clamp-down | ||
| Line 7: | Line 7: | ||
| # Wire it up and enjoy maintainence free driving (no more yearly points changing) | # Wire it up and enjoy maintainence free driving (no more yearly points changing) | ||
| - | === Gear Changeover === | + | == Gear Changeover == |
| + | E15 doesn't use a gear, but is otherwise nearly identical to A15 distributor: | ||
| + | <br>[http://datsun1200.com/modules/myalbum/photo.php?lid=4537 http://ddgonzal.members.winisp.net/getThumb.aspx?width=400&uri=http://datsun1200.com/uploads/photos/4537.jpg] | ||
| + | |||
| + | |||
| + | |||
| Top one is from converted E15, while lower is from A10/A12. | Top one is from converted E15, while lower is from A10/A12. | ||
| - | <br>[http://datsun1200.com/modules/myalbum/photo.php?lid=3948 http://datsun1200.com/uploads/photos/3948.jpg] | + | <br>[http://datsun1200.com/modules/myalbum/photo.php?lid=3948 http://ddgonzal.members.winisp.net/getThumb.aspx?width=256&uri=http://datsun1200.com/uploads/photos/3948.jpg] |
| <br>The E15 has been converted for A series. Note that it is fractionally longer that the A series when comparing shafts. | <br>The E15 has been converted for A series. Note that it is fractionally longer that the A series when comparing shafts. | ||
| Line 24: | Line 29: | ||
| (Use the leftover roll pin) and ensure it sits above the bottom surface of the plate. | (Use the leftover roll pin) and ensure it sits above the bottom surface of the plate. | ||
| Alternativly, use a small (3mm) bolt and lock nut to keep the adjuster plate in place, at high revs the roll pin could loosen. | Alternativly, use a small (3mm) bolt and lock nut to keep the adjuster plate in place, at high revs the roll pin could loosen. | ||
| + | |||
| + | [http://datsun1200.com/modules/myalbum/photo.php?lid=4604 http://datsun1200.com/uploads/thumbs/4604.jpg] | ||
| [http://datsun1200.com/modules/myalbum/photo.php?lid=3955 http://datsun1200.com/uploads/thumbs/3955.jpg] | [http://datsun1200.com/modules/myalbum/photo.php?lid=3955 http://datsun1200.com/uploads/thumbs/3955.jpg] | ||
| - | === Mounting Flange === | + | |
| + | == Mounting Flange == | ||
| The E-series distributor has a large cast bracket that won't fit against the A-series block. Simple mod is to stops it fouling on the head. | The E-series distributor has a large cast bracket that won't fit against the A-series block. Simple mod is to stops it fouling on the head. | ||
| + | [http://datsun1200.com/modules/myalbum/photo.php?lid=3955 http://datsun1200.com/uploads/photos/3955.jpg] | ||
| - | HACKSAW METHOD | + | |
| - | <br>One way is grind the original bracket part off so it won't foul on the block. Fit a Datsun A-series bracket onto the distributor. | + | The distributor securing bolt on post-1973 A-series engines is in about the 11 o'clock position [when viewed from the side]. If the E-series distributor was bolted straight in, the canister would hit the block, but the pre-1974 block has this bolt in about the 4 o'clock position. This would place the canister facing near to the opposite position, away from the block. |
| + | |||
| + | So it depends on whether you have an early or late A12. | ||
| + | |||
| + | === Modded Bracket Method === | ||
| + | <br>[http://datsun1200.com/modules/myalbum/photo.php?lid=3952 http://datsun1200.com/uploads/photos/3952.jpg] | ||
| + | |||
| + | |||
| + | === Hacksaw Method === | ||
| + | One way is grind the original bracket part off so it won't foul on the block. Fit a Datsun A-series bracket onto the distributor. | ||
| Optional: use an original dizzy bracket from an Austin A-series. | Optional: use an original dizzy bracket from an Austin A-series. | ||
| - | CUSTOM BRACKET | + | [http://datsun1200.com/modules/myalbum/photo.php?lid=4605 http://datsun1200.com/uploads/thumbs/4605.jpg] [http://datsun1200.com/modules/myalbum/photo.php?lid=4606 http://datsun1200.com/uploads/thumbs/4606.jpg] [http://datsun1200.com/modules/myalbum/photo.php?lid=4607 http://datsun1200.com/uploads/thumbs/4607.jpg] |
| - | <br>Make up a special bracket to mount it | + | |
| + | |||
| + | === Custom Bracket Method === | ||
| + | Make up a special bracket to mount it | ||
| [http://datsun1200.com/modules/myalbum/photo.php?lid=12819 http://ddgonzal.members.winisp.net/getThumb.aspx?width=400&uri=http://datsun1200.com/uploads/photos/12819.jpg] | [http://datsun1200.com/modules/myalbum/photo.php?lid=12819 http://ddgonzal.members.winisp.net/getThumb.aspx?width=400&uri=http://datsun1200.com/uploads/photos/12819.jpg] | ||
| - | === Installation === | + | == Installation == |
| Install the new distributor (see [[Distributor Installation]]. Use the old adjuster plate as a spacer. This is necessary as the hole on the gear sits higher than the hole on the shaft. Thus drilling a new hole on the shaft means the gear is further down the shaft (The distance between the two holes can be measured to be approximately the same as the thickness of the spacer plate. | Install the new distributor (see [[Distributor Installation]]. Use the old adjuster plate as a spacer. This is necessary as the hole on the gear sits higher than the hole on the shaft. Thus drilling a new hole on the shaft means the gear is further down the shaft (The distance between the two holes can be measured to be approximately the same as the thickness of the spacer plate. | ||
| Line 66: | Line 87: | ||
| Is it reasonable to expect a (slight) increase in power? | Is it reasonable to expect a (slight) increase in power? | ||
| - | == beattie == | + | = beattie = |
| [http://datsun1200.com/modules/myalbum/photo.php?lid=11188 http://datsun1200.com/uploads/thumbs/11188.jpg] beattie's E15E distributor | [http://datsun1200.com/modules/myalbum/photo.php?lid=11188 http://datsun1200.com/uploads/thumbs/11188.jpg] beattie's E15E distributor | ||
| * with Top-weights | * with Top-weights | ||
| Line 86: | Line 107: | ||
| Mitsubishi 4G15? | Mitsubishi 4G15? | ||
| - | == Models == | + | = Models = |
| - | === D4R83 === | + | == D4R83 == |
| [http://datsun1200.com/modules/myalbum/photo.php?lid=20215 http://datsun1200.com/uploads/photos/thumbs/20215.jpg] | [http://datsun1200.com/modules/myalbum/photo.php?lid=20215 http://datsun1200.com/uploads/photos/thumbs/20215.jpg] | ||
| D4R83-30 Shaft | D4R83-30 Shaft | ||
| Line 148: | Line 169: | ||
| [http://datsun1200.com/modules/myalbum/photo.php?lid=12819 http://datsun1200.com/uploads/thumbs/12819.jpg] E15 from N12 Pulsar | [http://datsun1200.com/modules/myalbum/photo.php?lid=12819 http://datsun1200.com/uploads/thumbs/12819.jpg] E15 from N12 Pulsar | ||
| - | |||
| - | |||
| [[Category:Engine Electrical System]] | [[Category:Engine Electrical System]] | ||
| [[Category:Engine Modifications Ignition]] | [[Category:Engine Modifications Ignition]] | ||
Revision as of 01:58, 16 June 2011
Obtain an electronic distributor from an E15 engine such as from an N12 Nissan Pulsar. Fit a drive gear from an A series distributor, drill a new hole in the shaft, grind, file and drill the housing. Plug it in. Cost is about $65 AUD for a used distributor from the wreckers.
Contents |
Instructions
- remove gear from A-series distributor and fit to the E-series distributor
- Modify housing clamp-down
- Insert distributor with correct timing. See Distributor Installation
- Wire it up and enjoy maintainence free driving (no more yearly points changing)
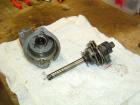
Gear Changeover
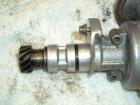
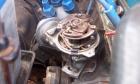
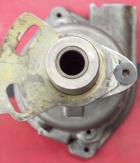
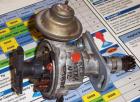
E15 doesn't use a gear, but is otherwise nearly identical to A15 distributor:

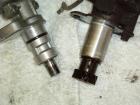
Top one is from converted E15, while lower is from A10/A12.

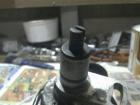
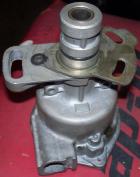
The E15 has been converted for A series. Note that it is fractionally longer that the A series when comparing shafts.
Using a 3mm pin punch, remove the roll pin from an A-series distributor. Remove the gear from the shaft. Do the same for the retaining ring on the E-series distributor. Fit the A-series gear onto the E-series distributor shaft. Before drilling a new hole for the roll pin, ensure there is sufficient end float at the top of the gear. (Use a shim or similar when drilling). The clearance required is minimal but is needed to ensure the distributor spins freely. What is the spec for this clearance on the original distributor?
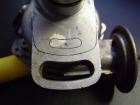
For the adjuster bracket unscrew and remove the plate from the A-series distributor. Install onto the E-series and mark it with a scribe on the original alloy (part of the housing) adjuster bracket.
One method for fixing the adjuster plate is to drill and pin it to the housing. (Use the leftover roll pin) and ensure it sits above the bottom surface of the plate. Alternativly, use a small (3mm) bolt and lock nut to keep the adjuster plate in place, at high revs the roll pin could loosen.

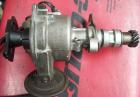
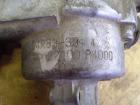
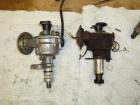
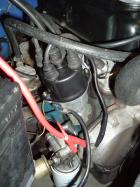
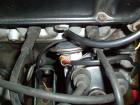
Mounting Flange
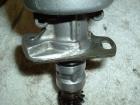
The E-series distributor has a large cast bracket that won't fit against the A-series block. Simple mod is to stops it fouling on the head.

The distributor securing bolt on post-1973 A-series engines is in about the 11 o'clock position [when viewed from the side]. If the E-series distributor was bolted straight in, the canister would hit the block, but the pre-1974 block has this bolt in about the 4 o'clock position. This would place the canister facing near to the opposite position, away from the block.
So it depends on whether you have an early or late A12.
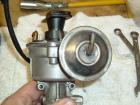
Modded Bracket Method

Hacksaw Method
One way is grind the original bracket part off so it won't foul on the block. Fit a Datsun A-series bracket onto the distributor.
Optional: use an original dizzy bracket from an Austin A-series.
Custom Bracket Method
Make up a special bracket to mount it

Installation
Install the new distributor (see Distributor Installation. Use the old adjuster plate as a spacer. This is necessary as the hole on the gear sits higher than the hole on the shaft. Thus drilling a new hole on the shaft means the gear is further down the shaft (The distance between the two holes can be measured to be approximately the same as the thickness of the spacer plate.
Wiring
A-series wiring colours mentioned are from an A15 (1980 Sunny). Should be the same for A12/A14 models.
- Black/White wire to POSITIVE coil connector
- Blue wire to NEGATIVE coil connector.
The original white wire which connects from the negative? side of the coil to the points is not used and can be removed.
The black wire from the tab on the vacuum diaphragm can also be left off. The same applies to the black wire from the positive? side of the coil to the body (via a capacitor) Need to check 120Y diagrams to confirm they are just for noise suppression.
Use the Pulsar coil or a performance coil.
Works with resistor bypassed (shorted). Is this correct as per original Pulsar setup? Confirm with N12? wiring diagram.
Has anyone dynoed the different configurations? Is it reasonable to expect a (slight) increase in power?
beattie
 beattie's E15E distributor
- with Top-weights
- similar to circa 1983 Mazda 626 GC (AU)
- Cap is taller than the usual E15
Cap and rotor: The "standard" E15 rotor is the conventional style, same style as the A-series that is. This E15E Distributor has a round item that is fastened to the top plate where the centrifugal weights are and covers them completely. So the cap needs to be taller then the "standard" E15 item!
I don't understand this bit but I'm leaving it in until I clarify it.
Part numbers are
- CAP-BOSCH GM554
- ROTOR-BOSCH GM555

Need to confirm alternate sources for distributor. Mitsubishi 4G15?
Models
D4R83
 D4R83-30 Shaft
 D4R83-36 Shaft
 D4R83-36 Unit
22100-P4000 D4R83-39 5505
22100-P4000 D4R83-39 4702

Part Numbers
22162-15M01 CAP ASSY-DISTRIBUTOR
22162-15M02 CAP ASSY-DISTRIBUTOR
22162-15M03 CAP ASSY-DISTRIBUTOR
22162-15M04 CAP ASSY-DISTRIBUTOR
22162-52A01 CAP ASSY-DISTRIBUTOR
** Master Pro 2-4870A
** BWD C708
** Beck/Arnley 174-6861
** ACDelco E303E
CAP & ROTOR KIT
* Bosch 06089
Fits these USA models
** 1982 Datsun 310 (N10) E15
** 1983 Datsun Pulsar (N12) E16
** 1983-1986 Datsun Pulsar NX (KN13) E16
** 1982-1986 Datsun Sentra (B11) E15S,E16
** 1983-1984 Subaru Brat 1800,1800 Turbo
N10 E15S USA, N12 E16S USA, B11 E15S+E16S
22157-H9560 ROTOR-HEAD
** Master Pro 2-3774
** BWD D575
** BWD D680 "Nascar"
Fits:
* 1976 Accord
* 1975-1975 Civic
* Many Datsun. See B-210_Electronic_Distributor_Swap#Rotor
22163-15M00 STATOR [Sheet metal type]
22115-15M00 SIGNAL ROTO ASSY [Reluctor]
22136-21M00, 22136-D4700 PLATE ASSY-BREAKER
22159-15M00 HARNESS ASSY-DISTRIBUTOR [Wiring]
22108-15M00 SHAFT ASSY [weight & spring shaft]
22020-15M00,22020-15M20 TRANSISTOR IGNITION UNIT
22109-W0560 WEIGHT-GOVERNOR 79-83 Z/E/CA/A Engine
22132-21M00 CAM SET
Variations
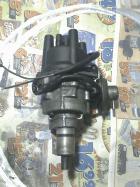
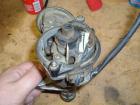
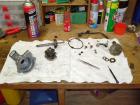
 E15 from N12 Pulsar