![[Datsun 1200 encyclopedia]](/wiki/upload/wiki.png)
The Hitachi LR series of internally-regulated Alternator was first fitted to North American B210 for the 1978 Model year. It weighs about 2-1/2 pounds more than a stock Datsun 1200 35A model and about 1 pound more than an externally regulated 50A Hitachi. The LR160 60 amp model is physically identical, and was first used around 1983.
Contents |
Physical Specifications
The LR150/LR160 came on newer A-series engines.

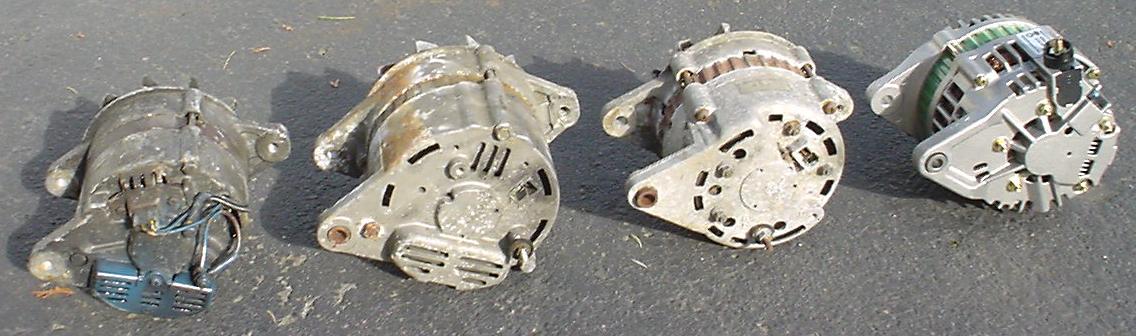
- LR160 - 60A, second from left
- Engine-mounting side is 80 mm (~3-3/16") in between ears, same as stock Datsun 1200
- 10.5mm diameter mount holes
- front flange (bolt ears) 13mm thick
- Adjuster ear 175mm (~6-7/8") across. The stock 1200 unit is smaller at 156mm (~6-1/8") from the mount ear.
- So you may need a late A12 adjuster and fan belt
- threaded for M8x1.25 bolt
- About 129mm diameter.
- Fan belt center: 29mm from front bolt face
- Pulley diameter: 69mm
Wiring
B310
The Hitachi LR150 (50A) was used in 1978-1982 B310 North America version. Here is the factory wiring diagram portion:
[Direct scan of 1980 B310 wiring diagram for North America. It is a color diagram.
Notice the I.C Alternator T-connector head is connected directly to A/BAT terminal (unswitched battery voltage).
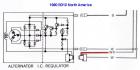
B - Black wire. Earth/Ground
W - thick White wire. BAT+ via Fusible Link
W - thin White wire in T-connector head. BAT+
WR - White/Red in T-connector stem. To dash 'CHG' Lamp
Notice that the I.C Alternator T-connector head is connected to A/BAT terminal (unswitched battery voltage). The splice occurs in the wiring harness.
L - Lamp (stem of T) -> To dash lamp
S - Sense (head of T) -> to BAT+
Fitting To Early 1200
If you install an LR alternator with internal-regulator on a 1200:
- disconnect the voltage regulator
- On the B110 regulator harness that goes down to the engine, connect WB wire of connector to WR wire of connector:
- WR <--> WB
-
 wiring jumper
- Logically, you are connecting the "L" (Lamp) of new alternator to "L" (Lamp) of the wiring harness which is connected to the IGN switch. Be sure to use the original Datsun 1200 wiring harnesses as the "L" wire color WR is a switched source in the harness. Only one jumper wire is needed.
Some prefer two wires, which works on a 1200, 1200 with auto-choke, and with other Datsuns:
- Jump W to Y wires
- Jump WR to WB wires
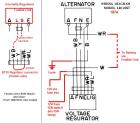
wiring diagram:
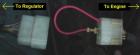
 Store-bought version ($30) of jumper wire
You can buy one mail-order from Bprojects. Endo will take care of you, send an email to Bprojects.
![]()
Price: 5,250yen (about $52 USD)
Wiring Explanation
CAUTION: if you jump W to B it will spark, begin to melt and then blow the Fusible Link. Possibly too with other wire combos too depending on if the key is on or off. In any case it should not cause a fire if the Fuses and Fusible Link are all in place. Older Datsun 510 & 521 may not use a Fusible Link, so be sure to connect the right wires.
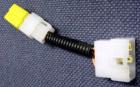
Voltage Regulator connector
* White: battery feed
* Yellow: Nuetral (of original FN alternator)
* White/Red: Lamp (dash CHG or IGN light)
* White/Black: Field (of original FN alternator)
In the conversion:
- Yellow goes to S terminal of LS alternator, so jumper connects Sense to battery
- WB goes to L terminal of LS alternator, so jumper connects Lamp to dash lamp
You can double-check all this with a voltmeter.
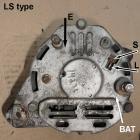
The original 35A alternator should have FN terminals

The Internally Regulated alternator should have LS terminals (but same T-connector as FN types)
Automatic Choke
NOTE: If your Datsun was factory-equipped with Automatic Choke, a second jumper is needed. See above.
Alternate method of wiring the choke: With LR alternator: On the carburetor, unplug the electric choke. Make a new jumper wire from the choke to the ballast resistor (12V side). The downside of this is the choke starts warming as soon as KEY is ON, whether the engine starts or not. If you have trouble starting the engine, in cold weather you may never get it started, because the choke begins to open.
Original Wiring
The wiring harness for Datsun 1200 auto choke with LT-series alternator, for example, the 1973 1200 USA, the choke relay is connected to Ground. See Alternator_Wiring#Automatic_Choke_Relay
 1200 relay, normally open. Alternator output will close the relay, activating the choke heater.
The wiring harness for B310 with LR-series alternator, the choke relay is connected to IGN
 B310 relay - normally closed. IGN switch will activate the relay, deactivating choke heater. Then alternator output will de-activate the relay, causing the choke heater to power up.
The Choke Relay is wired oppositely different on LT-series and LR-series applications. However, since both are triggered by the Lamp/Nuetral wire, either alternator will work with either wiring harness/relay combination (old harness/old relay OR new harness/new relay).
Troubleshooting
1. Check the Voltage at the alternator. Between the BAT terminal and the E terminal (earth/ground) there should be the same V as at the battery. If not, you got a wiring problem.
2. The S terminal should be 12V hot when key is turned to IGN
NOTE: on the B310 with this, S is hot all the time
either way will work
3. The L terminal (Lamp) should be:
- 0V when key is turned OFF
- 12V (more or less) when key is turnd ON
Because the L terminal is the exciter, if your CHG lamp is burned out, the Hitachi LR won't charge.
Engine Won't Shut Off
If wired incorrectly, the engine will keep running when you turn the key off.
Regulator Still Plugged In
The FN wiring is different from LS wiring. So if you leave the external regulator still plugged in, the wires are incorrect.
It won't cause overcharging, since the LR is internally regulated.
L-S
Lamp: stem of Tee
Sense: head of Tee
F-N
Field: stem of Tee
Nuetral: head of Tee
If the external regulator is left plugged in:
- the Nuetral line of regulator will be connected to the Sense terminal
- the Field output of regulator will be connected to the Lamp input/output terminal
Parts
B122 Hitachi LR135 (35A) : See LR135
B210 1978, B310 50 amp Hitachi LR150
- 23100-H7703 B310 0381-
- replaces 23100-H7702 B310 0580-0281
- replaces 23100-H7701 B310 0978-0480
- replaces 23100-H7700 B210 0877-, B310 -0878
- BOSCH AL238X, AL241X $71.99 at RockAuto.com
- BBB PRECISON 14255
- REMY 14185
- BECK/ARNLEY 1860266
- ACDELCO 321-1265 {#10463708}
Diode assembly
- Nissan 23230-W7101 or 23230-P2501 DIODE ASSEMBLY
- AIRTEX 2D3071
LR160 60 Amp
- 23100-W5807 Hitachi LR160, replaces 23100-W5805, 23100-W5806
- BOSCH AL241X
- BBB PRECISON 14587
- ACDELCO 3341661 {60 AMP #19134654}
- REMY 14301
Sources
LR150
- Datsun 200SX (1978 - 1979)
- Datsun B210 1978
- Datsun 210 (1979 - 1982)
- Datsun 310 (1979 - 1982)
- Datsun 510 (1978 - 1981)
- Datsun 720 PICKUP (1981 - 1985)
LR160
- Datsun 200SX (1978 - 1983)
- Datsun 310 (1979 - 1981)
- Datsun 310 DELUXE 1982
- Datsun 310 GX (1980 - 1982)
- Datsun 510 (1978 - 1981)
- Datsun 720 PICKUP (1981 - 1985)
- NISSAN PULSAR 1983
- NISSAN PULSAR NX (1983 - 1986)
- NISSAN PULSAR NX TURBO 1983
Brushes
Brush Assembly LR150 (B210 from 0877)
- 23135-P2500 BRUSH ASSY LR150
- 23133-P2501 BRUSH REGULATOR ASSY LR150 replaces 23133-P2500
- Includes IC regulator
- STANDARD MOTOR PRODUCTS Part # VR592
-

Regulator
B210 1978 Internal IC Regulator (requires soldering)
- 23215-P2501 IC REGULATOR ASSY LR150 0877- replaces 23215-P2500
- STANDARD MOTOR PRODUCTS Part # VR162
-

Others
Round I-L-S connector
- may fit stock adjuster bracket (156mm mounting)
- Use with 4mm spacer (extra washers) on engine rear mount bolt
Hitachi LR160-723
- 1990-1993 Nissan Pickup
Hitachi LR150-704
- 1989-1992 Isuzu Amigo
- 1988-1992 Isuzu Pickup
- 1991-1992 Isuzu Rodeo
- 1987-1991 Isuzu Trooper 2.3
Hitachi LR150-718
- NOTE: 175mm mounting
- 1989-1992 Isuzu Amigo
- 1988-1992 Isuzu Pickup
- 1991-1992 Isuzu Rodeo
Squared-Round S-L connector
Hitachi LR170-734B/739B/745 (about 1/2 kilo heaver that LR160)
- NOTE: 175mm mounting
- NOTE: 8.5 mm (smaller) mounting holes
- NOTE: Large 77m pulley
- 1990-1995 Nissan Pathfinder
- 1990-1995 Nissan Pickup