![[Datsun 1200 encyclopedia]](/wiki/upload/wiki.png)
| Revision as of 17:00, 24 October 2009 ddgonzal (Talk | contribs) <- Previous diff |
Revision as of 10:38, 16 December 2012 ddgonzal (Talk | contribs) (->S13 brakes on B210 disc-brake Struts) Next diff -> |
||
| Line 40: | Line 40: | ||
| Reference: [http://datsun1200.com/modules/newbb/viewtopic.php?topic_id=10003&forum=1 Dropped my 1200 onto its new S13 front suspension] | Reference: [http://datsun1200.com/modules/newbb/viewtopic.php?topic_id=10003&forum=1 Dropped my 1200 onto its new S13 front suspension] | ||
| - | = S13 brakes on B210 disc-brake Struts = | + | = S13 brakes on 120Y disc-brake Struts = |
| + | 120Y is A12-powered B210. It uses different struts than A14-powered B210. | ||
| + | |||
| The Silvia S13, S14 centre bore is 68mm and the 1200 hub is 70mm at the disk seat. But the Silvia disk has a huge backspacing compared to the 1200 disk. Perhaps 2mm need to be machined off? custom adaptor plates for the caliper are also needed. | The Silvia S13, S14 centre bore is 68mm and the 1200 hub is 70mm at the disk seat. But the Silvia disk has a huge backspacing compared to the 1200 disk. Perhaps 2mm need to be machined off? custom adaptor plates for the caliper are also needed. | ||
Revision as of 10:38, 16 December 2012
The Nissan S13 strut assembly has been used on Datsun 1200s, to gain larger brakes and an different assortment of Strut Inserts (shock absorbers). If you only want the good brakes of the S13, consider putting the S13 brakes on B210 struts.
S13: 1989-1993 Nissan Silvia (aka 200SX in USA and Europe)
For more information on struts swaps, including other choices, see main article: Strut swaps.
Parts Needed
- S13 lower control arms
- Strut, spindle, hub, rotor and brake caliper assembly
- S13 coilovers (aftermarket parts)
- S13 outer tie rod ends
- Another 1200 driver's side inner tie rod end
- R31 radius rods
R31: Nissan Skyline
Radius rods: Tension rods/Caster rods/Castor rods
It has extra track and thanks to drilling out the crossmember and moving the control arms out a bit more (optional for this swap...) it is running a deg or two neg camber. This will result in so much extra track that you can run FWD-style (negative offset) rims. Depending on the application you may be able to use wheels as small as 13 inch. S13's used two sizes of rotor during production, CA engined cars use the smaller of the two.
Be careful about which coilovers you get. Some will fit easilty. With others, you may have to massage/cut away the outer skin that surrounds the rear shock tower to get the upper springs mounts and spring to fit in.
Instructions
- Redrill your crossmember to accept the s13 control arm bolts. The hole at the back of the xmember will be bigger than the front one because of the design of the bolts.
- When you bolt the arms in you will need to put a small spacer/washer to make them fit as they are slightly slimmer than a 1200 one.
- Machine the 1200 tie rods to have the outer thread machined to accept the s13 outer tie rod ends
- Replace your B110 passenger side inner tie rod end with your extra driver's side tie rod end. This is so that the tie rods turn in the correct direction when used in conjunction with the s13 outer ends.
- The shox will need the 1200 upper spring platform on them so that they can bolt into the top of the strut tower. So just change them with the s13 ones. Easy. The bottom of the shock will go onto your s13 spindle which is already in place.
- Fit the R31 radius rods. The two bolts that come with the rods are 8mm from memory and are too small for the S13 control arm. So the holes on the radius rod will need to be drilled to accept 10mm bolts and obviously after doing this you will need to exchange the 8mm bolts for 10mm ones.
Reference: Dropped my 1200 onto its new S13 front suspension
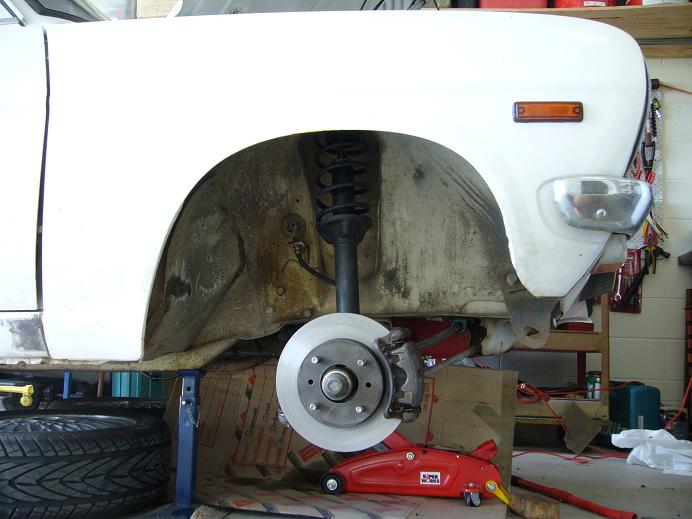
S13 brakes on 120Y disc-brake Struts
120Y is A12-powered B210. It uses different struts than A14-powered B210.
The Silvia S13, S14 centre bore is 68mm and the 1200 hub is 70mm at the disk seat. But the Silvia disk has a huge backspacing compared to the 1200 disk. Perhaps 2mm need to be machined off? custom adaptor plates for the caliper are also needed.
You need an adaptor plate for the the calipers.
You may need to swap the struts right-to-left and left-to-right to clear the steering arms. Also, mount the calipers INBOARD for better weight distribution.
'78 120y struts discs and calipers cos they're an aussie assembled PBR product.
i aslo swapped the struts left to right to clear the steering arms once i put silvia rotors and calipers in place. low1000
Optional: use Hilux 4-pot calipers, which only involve the elongation of one bolt hole with a round file and then bolt straight up over 180SX discs. These are similar to MK63 calipers but are cast iron instead of alloy.
Wise words from Bundy351 I am running 120y struts in my 1200 ute. On these struts I have a Kev Rowley Brake adaptor plate (about $100 for the pair) Rotors, calipers, calliper bolts (2 per caliper) and wheel studs from a 1989 nissan silvia. You also need the flexi brake hose (mine came off a 1995 corolla cause thats all I could find). Very simple conversion.
- MACHINE THE OUTER DIAMETER OF THE HUBS DOWN SO THE ROTOR WILL SLIDE OVER IT (150mm FROM MEMORY BUT I HAVE HAD ALLOT OF RUM SINCE I DID CONVERSION) PREFERABLY USE A LATHE BUT YOU CAN USE A GRINDER.
- KNOCK OUT 120Y STUDS AND BANG IN SILVIA ONES
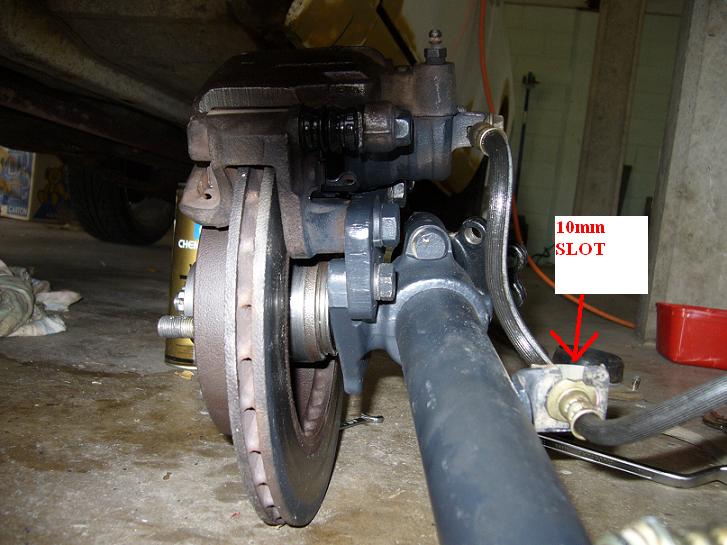
- CUT A 10mm SLOT IN THE HOSE MOUNT ON THE STRUT TUBE (LITTLE METAL TAB THE BRAKE HOSE SITS IN)
- BOLT BRACKETS TO STRUTS
- SLIDE ROTORS ON
- BOLT CALIPERS ON WITH PADS
- CONNECT HOSES
- BLEED
- RE-FIT WHEELS
- TEST DRIVE
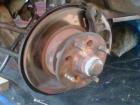
WHERE TO CUT THE 10mm SLOT
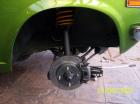
WHAT THE BRACKET LOOKS LIKE
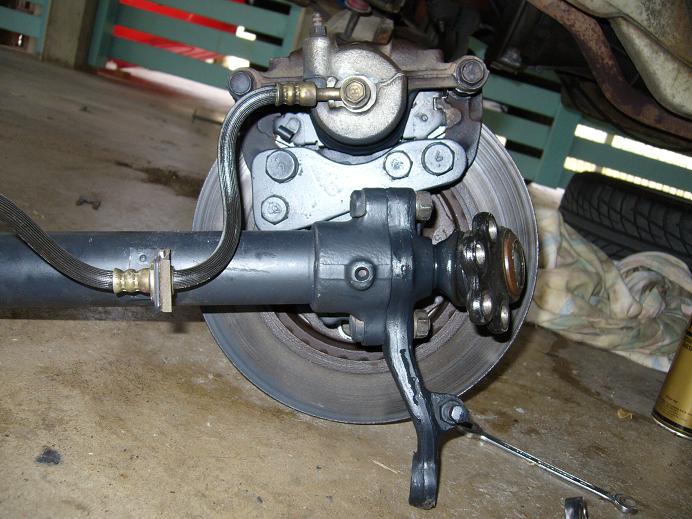
FINISHED PRODUCT