![[Datsun 1200 encyclopedia]](/wiki/upload/wiki.png)
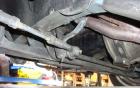
The Datsun 1200 uses a tradition recirculating-ball Steering Gearbox with behind-the axle linkage.
Also see Steering Gearbox
Contents |
Terminology
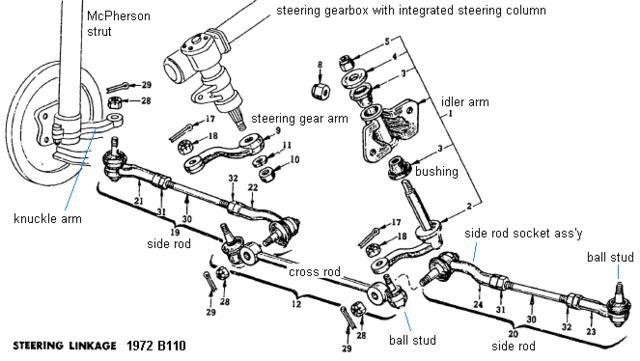
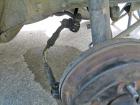
- 1. Idler Arm. This bolts to the subframe rail on opposite side from the steering gearbox
- 9. Steering Gear Arm, a.k.a. "Pitman arm"
- 19,20. Side Rod, a.k.a. "tie rod". Left and right hand differ
- 12. Cross Rod, a.k.a. "drag link" or "center link"
- 21, 22, 23, 24. Side Rod Socket Ass'y a.k.a. "tie rod ends". There are four separate parts with left and right-hand threads. Each "socket" has a "ball stud", which is similar to a Ball Joint.
The six ball studs have a Filler Plug on the bottom of each. Replace it with a grease fitting and fill it during each periodic "lube, oil and filter".
Power Steering
Separating Ball-stud from Linkage
Separating the Steering Linkage for tie-rods, cross-rod, steering arm, knuckle arms or ball joints. To separate a rod-end/balljoint/ballstud, use one of these methods:
- Pickle fork and hammer
- Tierod-end joint puller
- Two-hammer method
- Prybar and hammer
CAUTION
Never hammer on the threaded portion!
Datsun recommended the two-hammer method. Pickle fork is perhaps easiest but may damage the joint boot. Puller method is very nice.
WARNING
Heating forged steering components is a VERY large no-no
Steering Gearbox Arm
Use the hammer methods or a gear puller.
Do not place a piece of pipe or wood on the steering rod and smack it hard with a big hammer. This can bruise/dent the worm in the steering box and compromise the box's smooth operation.
Two Hammer Method
- Remove the cotter pin & loosen the castle nut as far as the end of the ball-stud. This will hold the part from dropping all the way when the joint is popped apart.
- Hold a large hammer (e.g. 8# sledge) against one side of the part with the hole, and smack the other side with a 2nd hammer. The joint will pop out of the hole.
The first hammer is to absorb the blow so the part doesn't move.
NOTE: You have to smack it very hard while holding the stationary hammer at the same time AND not hit any other body or suspension parts. To make it easier, have an assistant hold the stationary hammer.
Sometimes people are not successful, usually because the hammer blow is not square to the stud axis and the energy is lost. But it will come out, regardless of condition, age, what-have-you, when done correctly. This is the method master mechanics use.
Pickle Fork
NOTE: Pickle fork may damage the joint boot. Great way to remove old bad parts, but the other methods are suggested for reusing the parts.
Pickle fork (wedge) fits many sizes of joints. For a Datsun, a medium size pickle fork is about right.
- Remove the cotter pin & castle nut
- Insert the fork between the two parts
- Whack the hammer very hard with big hammer. Use at least an 8# sledge. Better is a 12# or 16# hammer.
TIP: If possible, insert the hammer inline with the steering linkage, so that your hammer blow doesn't deflect the linkage sideways. Moving the steering wheel first will help line up the linkage to where you can hit it straight on.
Ball Stud Puller
You can use any small gear puller. A puller fits only certain sizes, but doesn't damage the grease covers. If using a generic puller, make sure the shaft when turned does not damage the ballstud threads.
Purpose-made ballstud puller:

- Remove the cotter pin & loosen the castle nut as far as the end of the ball-stud.
- Insert puller into correct position
- Turn puller nut with wrench or socket until the joint pops apart
- Remove castle nut fully
Lever and Hammer
- remove the split pin and nut
- Insert the lever (prybar, crowbar, etc.) to apply a medium pressure on the two pieces, as if prying them apart. But the leverage is only to apply pressure, NOT to actually separate them.
- While keeping pressure on the parts, using two hammers, hit opposite sides of the hole simultaneously. You don't need to use Big Hammers.
What you are doing is deforming the hole out of round for just a second which breaks the tapers bond from being jammed together, this will spit the ball stud off. You dont need to pound very hard, just keep tapping away.
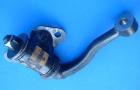
Idler Arm
RHD
Idler Arm RHD

48530-H1000 ASSY-IDLER STEERING [RHD]
LHD
Idler Arm LHD
* 48530-H1600 ASSY-IDLER STEERING [LHD]
* http://www.rockauto.com/catalog/x,carcode,1208483,pgname,Steering
* TRW 18778 through 7/72
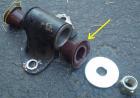
Bushing
Same RHD and LHD -- Idler Arm Bushing
- 48544-H1000 BUSH-IDLER
- Beck/Arnley 1013851 (2 per idler arm) at http://rockauto.com
- Mitsubishi/Chrysler 1983-1993 various models
- Nissan B110, B310, S110, 1979-1981 S130, A10, 1980-1982 720, 1977-1980 810
Idler Arm Repair Kit (2 bushes, washers & lock nut)
- Raybestos 4501067
- ACDelco 45C1067 or 88911321 $8.41
ステアリング アイドラ アーム
Cross Rod
The Cross Rod is also known as center link or drag link.
RHD
- 48560-H1000 ROD ASS'Y-CROSS JDM B110, B120 (all years)
- RHD B110 top, B210 bottom:
-
- B210 RHD bar can be used on B110 RHD
RHD measurements
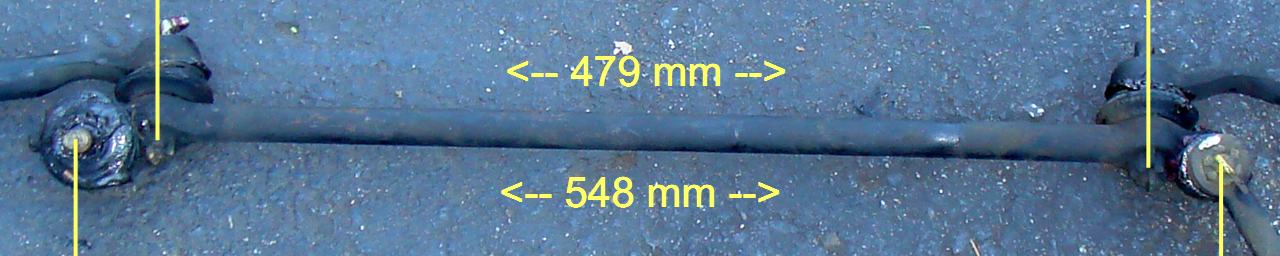
548 mm & 479 mm
B10
48545-18001 BUSHING-idler shaft
PB110
48560-H2500 ROD ASS'Y-CROSS PB110, PB210
B210
48560-H5025 ROD ASS'Y cross steering RHD JDM
 RHD B210 bottom, B110 top:

 B210 has a kink for clearance
B310 (and A10)
48560-W5025 ROD ASSY-CROSS JDM B310, A10

LHD
B110
- 48560-H1600 ASSY-CROSS ROD STEERING USA B110
- ACDelco 45B1035 or 88911087 $99.97
- http://www.rockauto.com/catalog/x,carcode,1208483,pgname,Steering
-

B210
- 48560-H6200 ASSY-CROSS ROD LHD USA
-

B310
- 48560-W5725 ROD ASSY-CROSS,STEERING North America B310, A10
-

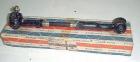
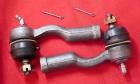
Side Rods
Side Rod also known as Tie Rod, consists of a threaded shaft and two ball-socket "ends".
Side Rod Ends also known as Tie Rod Ends
Inspect, and replace if bent or if ball-joint is loose
B110, B120 [NOTE: B210 differs]
- 48510-H1025 ROD ASSY-SIDE RH 7210- $134.33 USD
- supercedes 48510-H1002 ROD KIT-side (R.H.) (from '72-10)
- 48630-H1025 ROD ASSY-SIDE LH 7210- $134.33 USD
- supercedes 48630-H1002 ROD KIT-side (L.H.) (from '72-10)
- 48510-H1001 ROD ASS'Y-side (R.H.) (up to '72-9) $80.28 USD
- 01227-00011 NUT (4) -8503 [also B210]
- 01227-00091 NUT (4) 8504-
- 08921-32010 PIN-cotter (4) [also B210]
PB110
- 48510-A0600 ROD ASS'Y-side (R.H.) (up to '72-10)
- 48630-A0600 ROD ASS'Y-side (L.H.) (up to '72-10)
- 48510-U0100 ROD ASS'Y-side (R.H.) (from '72-11)
- 48630-U0100 ROD ASS'Y-side (L.H.) (from '72-11)
- 01272-00031 NUT (4) PB110 or 89-11042-1
- 08901-32510 PIN-cotter (4) PB110, PB210
PB210
- 48510-H5800 ROD ASS'Y-side (R.H.)
- 48630-H5800 ROD ASS'Y-side (L.H.)
- 01227-00061 NUT (4) PB210
- 08901-32510 PIN-cotter (4) PB110, PB210
NOTE: Cotter pin & Nut are same as used with Steering Gear Arm & Idler Arm (total 6 per car)
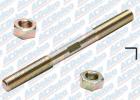
Side Rod Bar
Aka Tie Rod End Adjusting Sleeve, Tie Rod Adjuster, or Steering Linkage Adjuster. The flat in the middle is for a wrench to hold it stationary while you thread on the ends. The ends are left- and right-threaded.
B110/B120 - RHT M14 x 1.5 by LHT M14 x 1.5
- 48512-H1001 BAR-SIDE ROD (up to '72-9) (2)
- ACDELCO 45A6021
- GM 88910767
- Raybestos 4251021
- 012-1100011 / 01211-00011 NUT-lock, side rod (R.H.) (2) $1.10 USD [08911-3441A]
- 012-1100021 / 01211-00021 NUT-lock, side rod (L.H.) (2) $1.60 USD
- 48512-A0600 BAR-SIDE ROD (2) PB110 $8.33 USD
- 48512-H5800 BAR-SIDE ROD (2) PB210 $6.27 USD
TRW/MOOG ES458S
* 48512-H1001
* 48512-H5800
* 48512-A0600
6.625" Length
510/610/710/S110/HB210.USA
Raybestos 4251021
DEEZA NIJ604
NOTE: Bar is not listed as a separate part in later catalogs (after 1975)
Side Rods
Stud thread: M10, with 17mm hex castle nut
Inner thread: M14
cone: 1/10
Hole in the cross rod goes from 11m to 13mm and is 11.5mm thick
Inner Ends
Inner ends are curved
67 mm high
180 mm long
M14 inner thread
M10 stud thread
Inner RIGHT
- 48521-H1001 ASSY-SOCKET SIDE ROD RH INNER
- McQuay-Noriss ES2620X
- Raybestos 4011324
- ACDELCO 45A0324 or 88910158
Inner LEFT
- 48641-H1001 ASSY-SOCKET SIDE ROD LH INNER
- Raybestos 4011327
- ACDELCO 45A0327 or 88910161
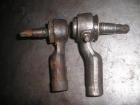
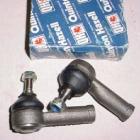
Outer Ends
Outer ends are straight, and have LH and RH threads.
67 mm high
79 mm long
M14 inner thread
M10 stud thread
Outer RIGHT - FEMALE RHT M12 x 1.5 x 79mm long
- 48520-H1001 ASSY-SOCKET SIDE ROD RH OUTER $59.80 USD
- 555 SE-4091R
- TRW ES488L -0772
- Raybestos 4011167
- ACDelco 45A0167 or 88910001 $18.94
Outer LEFT - FEMALE LHT M12 x 1.5 x 79mm long
- 48640-H1001 ASSY-SOCKET SIDE ROD LH OUTER $59.80 USD
- 555 SE-4091L
- TRW ES488R -0772
- Raybestos 4011168
- ACDelco 45A0168 or 88910002 $18.95
PB110/PB210/LB210/510/610/710/S10/C120 - M14 x 1.5 x 110mm long
- 48520-U0100 SOCKET ASS'Y-side rod outer (R.H.) (from '72-11) PB110, PB210 $57.33 USD
- superceded 48520-A0600 SOCKET ASS'Y-side rod outer (R.H.) (up to '72-10) PB110
- 48640-U0100 SOCKET ASS'Y-side rod outer (L.H.) PB210 $57.33 USD
- NOTE: PB110 L.H. not listed.