![[Datsun 1200 encyclopedia]](/wiki/upload/wiki.png)
Engine ignition timing (distributor timing) is the foundation of any tune-up. It is generally the first step you need to perform as all other tune-up and carburetor adjustments depend on ignition timing being correct.
If you have the distributor out of the engine, see Installing Distributor.
Contents |
Overview
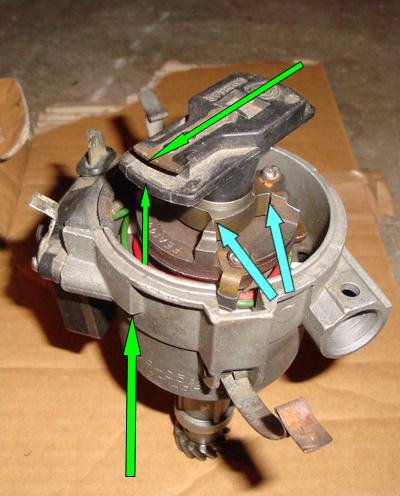
The stock Datsun 1200 distributor orientation

vacuum advance pointing almost straight forward
General Procedure
- Check the gap on the plugs then put them back in. Spec is 0.028-0.032 for the A12. I recommend 0.035 for the smoothest idle.
- Set the point-gap or dwell. Use a dwell meter if at all possible as it is much more accurate than the points gap, Set dwell 49 to 55 degrees. If the points are brand new, a feeler gauge can be used to set the gap to 0.018-0.021 in. Incorrect Dwell can cause rough running, as does bad points. For example, it might only run at high idle, and not very smooth at that.
- Double-check the timing. Spec is 5 degrees for the US A12 and should be safe for any A12 engine. This must be done after setting the dwell -- because changing the dwell affects the timing, but not vice-versa.

NOTE: If you use the older pully with
the newer cover, then you could get
really weird timing readings
Ignition Timing Specifications
North America
| static timing | 5 degrees BTDC |
| point gap (new points) | 0.018-0.021 in |
| dwell (new or used points) | 49-55 degrees |
| Spark plug gap | 0.28-0.32 in |
Firing Order
Almost all inline 4s have a firing order of 1-3-4-2 -- and certainly all Datsun fours.
NOTE: If the distributor is out of the
engine, see Installing Distributor
First locate #1.

The direction of rotation (Yellow arrow) is always opposite the direction that vacuum advance points (green arrow) -- for all engines, not just Datsuns.
Next, following the direction of rotation (Yellow arrow), count off 1-3-4-2.
Here is the 1974-up distributor:
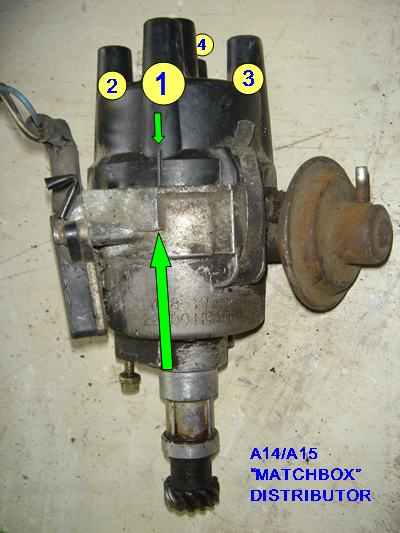
1974-up alignment:
Setting Dwell
If your 1200 still has the factory contact points (if you haven't convereted to Electronic Ignition) you must set the dwell for perfect tune. To accurately check the contact points Dwell angle, use a dwell meter. This is far more accurate than simply setting the points-gap.
From the 1973 Factory Service Manual:
- Dwell angle: 49-55 degrees
- Point gap: 0.45 to 0.55 mm (18-22 thousands inch)
NOTE: The same specifications are used for B10, B210 and B310 with contact-point ignition as well.
The gap should be checked every 3,000 miles (5k) as part of a Tune-up.
USA 1972 Owners manual (see page 36 for points-gap details):


Be sure that the contact surfaces are clean and not burned.
The correct gap of 0.018 to 0.022 in (0.45 to 0.55 mm)
should be checked with a feeler gauge.

Dwell-Tachometer
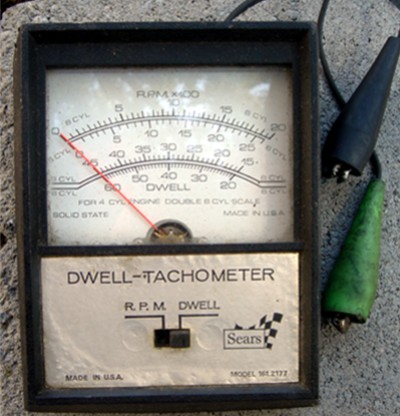
Older style (analog) Dwell-Tachometer
- New points are gap-set to 0.018-0.021 inch. In a pinch you can use an old-fashioned matchbook cover, which is typically 20 thousands of an inch thick.
- Check the dwell
- Readjust the gap until it reads 49-55 degrees
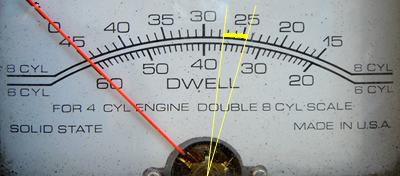
NOTE: On this type of scale with only 8- and 6-cylinder, 4-cylinder reading is DOUBLE 8-cylinder scale.
Be patient when setting the dwell. You may need to slight re-adust the gap and re-check the dwell many times before it is 'right on'. This involves starting and stopping the engine multiple times. But it will be worth it when your 1200 purrs like a lion.
Intial Timing Setting
- turn engine off. Set parking brake. Put transmission in neutral
- turn engine by carefully turning fan clockwise, until the timing marks line up (5 degrees BDTC). If the fan belt slips, it's too loose (tighten it!)
-
- Pull cap off distributor. Is the rotor pointing at the Number 1 spark plug wire? Good. If it is pointing at #4, rotate the engine one more turn until the marks line up again
- pull coil wire from cap. Lay atop the engine or strut tower, with the metal lead 1/4 inch from bare metal
- turn engine to IGN (do not start it). Distributor cap is removed
- Loosen the distributor hold down bolt slightly. Be careful not to rotate the distributor.
- Rotate housing clockwise slightly until points appear closed
- Rotate housing anti-clockwise -- slowly -- until a spark appears at the coil wire
- Tighten distributor hold-down bolt. You are done.

Setting Timing with Timing Light
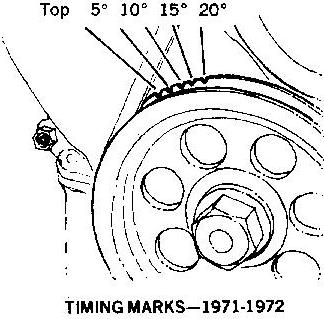
Fine-tuning the Timing - Relative Timing Marks
Note the timing marks on the A12 plate.
Advance and Retard marks
These are NOT used to time the engine (the marks on the crankshaft pulley are). But they are very useful for advancing or retarding the timing a degree or two. After installation, you can look down past the #1 spark plug, between the engine and the distributor to view the marks.
- Advance it two degrees (turn distributor clockwise), test drive, repeat until it pings at part throttle
- Retard it one degree (turn counter-clockwise) to remove the pinging