![[Datsun 1200 encyclopedia]](/wiki/upload/wiki.png)
| Revision as of 08:35, 20 September 2017 ddgonzal (Talk | contribs) <- Previous diff |
Revision as of 00:03, 5 August 2018 ddgonzal (Talk | contribs) Next diff -> |
||
| Line 1: | Line 1: | ||
| - | The valves should be adjusted every 6 months, or per the Nissan factory [[Tune-up|Schedule]]. | + | The valves should be adjusted every 6 months or 6,000 miles as per the Nissan factory maintenance schedule. |
| = Overview = | = Overview = | ||
| Line 13: | Line 13: | ||
| {{Photo|32.jpg|Datsun%201200/owners_manual/1972}} | {{Photo|32.jpg|Datsun%201200/owners_manual/1972}} | ||
| + | Adjust intake & exhaust valve clearances | ||
| 600 mile service | 600 mile service | ||
| 6 months/6000 miles | 6 months/6000 miles | ||
| Line 24: | Line 25: | ||
| From the Nissan Factory Service Manual for A12 engine: | From the Nissan Factory Service Manual for A12 engine: | ||
| * HOT: [http://datsun1200.com/modules/myalbum/photo.php?lid=6192 0.35 mm (14 thousands inch)] | * HOT: [http://datsun1200.com/modules/myalbum/photo.php?lid=6192 0.35 mm (14 thousands inch)] | ||
| + | |||
| + | It is more consistent when hot. Because what is Cold? 95 degrees? 55 degrees? Yet hot is controlled by the engine thermostat -- same temp every time. | ||
| {{OwnersManual|40||Valve clearance (hot) 0.014 in (0.35 mm)}} | {{OwnersManual|40||Valve clearance (hot) 0.014 in (0.35 mm)}} | ||
| Line 35: | Line 38: | ||
| * Test COLD: 0.33 mm (13 thousands inch) | * Test COLD: 0.33 mm (13 thousands inch) | ||
| - | NOTE: The 1971 manual (in the text) has the cold specification at 0.35 mm but at 0.25 in the Specifiations. The 1973 manual lists it at 0.25 mm. Either one works OK, but Nissan recommends resetting lash after getting engine to full temperature (set it HOT). | + | NOTE: The 1971 manual (in the text) has the cold specification at 0.35 mm but at 0.25 in the Specifications. The 1973 manual lists it at 0.25 mm. Either one works OK, but Nissan recommends resetting lash after getting engine to full temperature (set it HOT). |
| The Service Bulletin confirms the .25 mm COLD setting. In my personal tests (multiple tests) of HOT setting at .35 then letting the engine cool overnight, it returns to a .33 COLD -- so I've been setting it to .33 COLD for the last 25+ years with great success (I've never had a valve problem). | The Service Bulletin confirms the .25 mm COLD setting. In my personal tests (multiple tests) of HOT setting at .35 then letting the engine cool overnight, it returns to a .33 COLD -- so I've been setting it to .33 COLD for the last 25+ years with great success (I've never had a valve problem). | ||
| Line 43: | Line 46: | ||
| = Procedure = | = Procedure = | ||
| - | It is more consistent when hot. Because what is Cold? 95 degrees? 55 degrees? Yet hot is controlled by the thermostat same temp every time. | + | Valve adjustment is easy to do. The first time I was worried but it worked out fine. Just double check the final setting by ensuring the next bigger size feeler won't slip in. That's the biggest beginners mistake, setting it just a tiny bit loose so that it's noisier after they are done! |
| - | + | ||
| - | It is easy to do. The first time I was worried but it worked out fine. Just double check the final setting by ensuring the next bigger size feeler won't slip in. That's the biggest beginners mistake, setting it just a tiny bit loose so that it's noisier after they are done! | + | |
| # Block the wheels, set the handbrake, and put the transmission in NEUTRAL | # Block the wheels, set the handbrake, and put the transmission in NEUTRAL | ||
Revision as of 00:03, 5 August 2018
The valves should be adjusted every 6 months or 6,000 miles as per the Nissan factory maintenance schedule.
Contents |
Overview
In addition to the tune-up schedule, also adjust the valves:
- whenever the head gasket is changed
- whenever any valve parts are changed or loosened (Valve Seals, Rocker arms, Rocker Shaft, etc.)
If you are setting the tappet adjustment you should be able to put the timing mark at TDC and adjust four of the tappets then rotate the crank once back to TDC and adjust the other four. Details are below.
Maintenance Schedule
Adjust intake & exhaust valve clearances -- every 30 month or 30 thousands of miles whichever comes first.
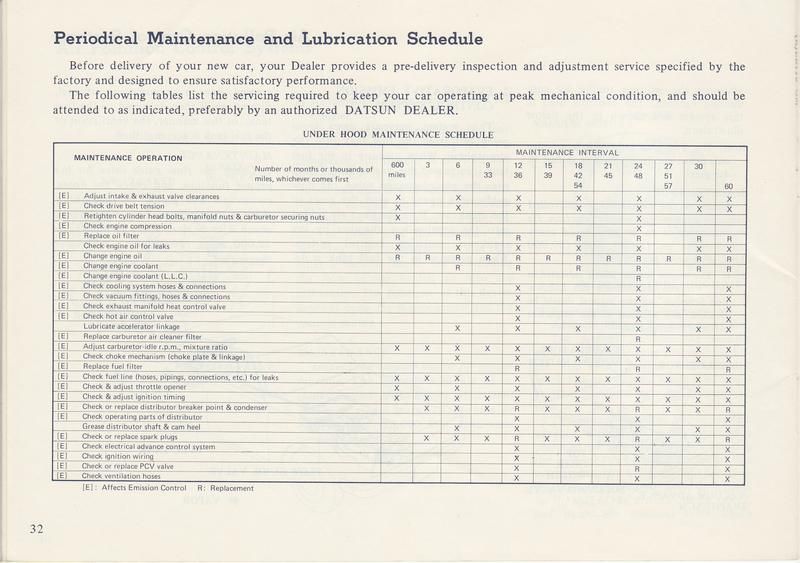
Adjust intake & exhaust valve clearances
600 mile service
6 months/6000 miles
12 months/12000 miles
18 months/18000 miles
24 months/24000 miles
30 months/30000 miles
60 months/60000 miles
Specification
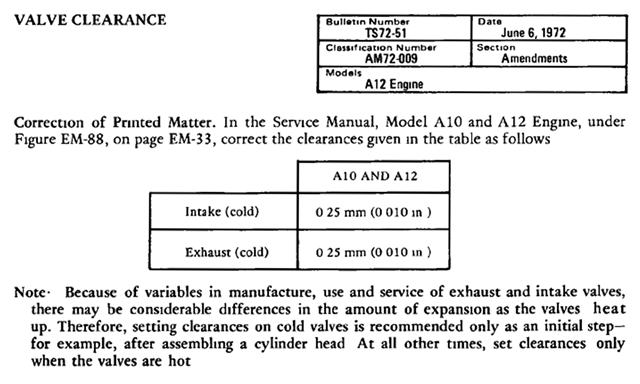
From the Nissan Factory Service Manual for A12 engine:
It is more consistent when hot. Because what is Cold? 95 degrees? 55 degrees? Yet hot is controlled by the engine thermostat -- same temp every time.
1972 USA Owners manual (Page 40 ... ):
 Valve clearance (hot) 0.014 in (0.35 mm)

Cold Setting
Per Nissan:
Setting clearance on cold valves is recommended only as an initial step -- for example, after assembling a cylinder head. At all other times, set clearances only when the valves are hot
- 1971 COLD: 0.35 mm (14 thousands inch)
- 1973 COLD: 0.25 mm (10 thousands inch)
- Test COLD: 0.33 mm (13 thousands inch)
NOTE: The 1971 manual (in the text) has the cold specification at 0.35 mm but at 0.25 in the Specifications. The 1973 manual lists it at 0.25 mm. Either one works OK, but Nissan recommends resetting lash after getting engine to full temperature (set it HOT).
The Service Bulletin confirms the .25 mm COLD setting. In my personal tests (multiple tests) of HOT setting at .35 then letting the engine cool overnight, it returns to a .33 COLD -- so I've been setting it to .33 COLD for the last 25+ years with great success (I've never had a valve problem).
Corrected by Service Bulletin:
Procedure
Valve adjustment is easy to do. The first time I was worried but it worked out fine. Just double check the final setting by ensuring the next bigger size feeler won't slip in. That's the biggest beginners mistake, setting it just a tiny bit loose so that it's noisier after they are done!
- Block the wheels, set the handbrake, and put the transmission in NEUTRAL
- Remove the Rocker cover
- Turn the engine to the TDC mark.
-
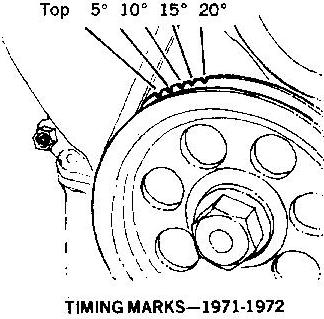

- It's easiest to turn clockwise, but you can turn it either direction.
- TIP: Grab the fan and turn it. It is very easy to turn the engine this way if you remove all four spark plugs, but this is not strictly necessary
- See below for more methods on turning the engine
-
- You now need to figure out which TDC it is on. TDC for power stroke or exhaust stroke? Wiggle the rocker arms. At the TDC mark, either the first two rockers will be slightly loose, or the last two will be. Adjust the four loose ones (See details on just how, below)
- Verify which TDC it is at by removing the distributor cap and noting where the rotor point to: Either the no. 1 sparkplug wire, or the no. 4 wire.
- IF the rotor is pointing to #1 plug wire ...
- adjust valves 1,2,3,5 (counting from front of engine)
- IF the rotor is pointing to #1 plug wire ...
-
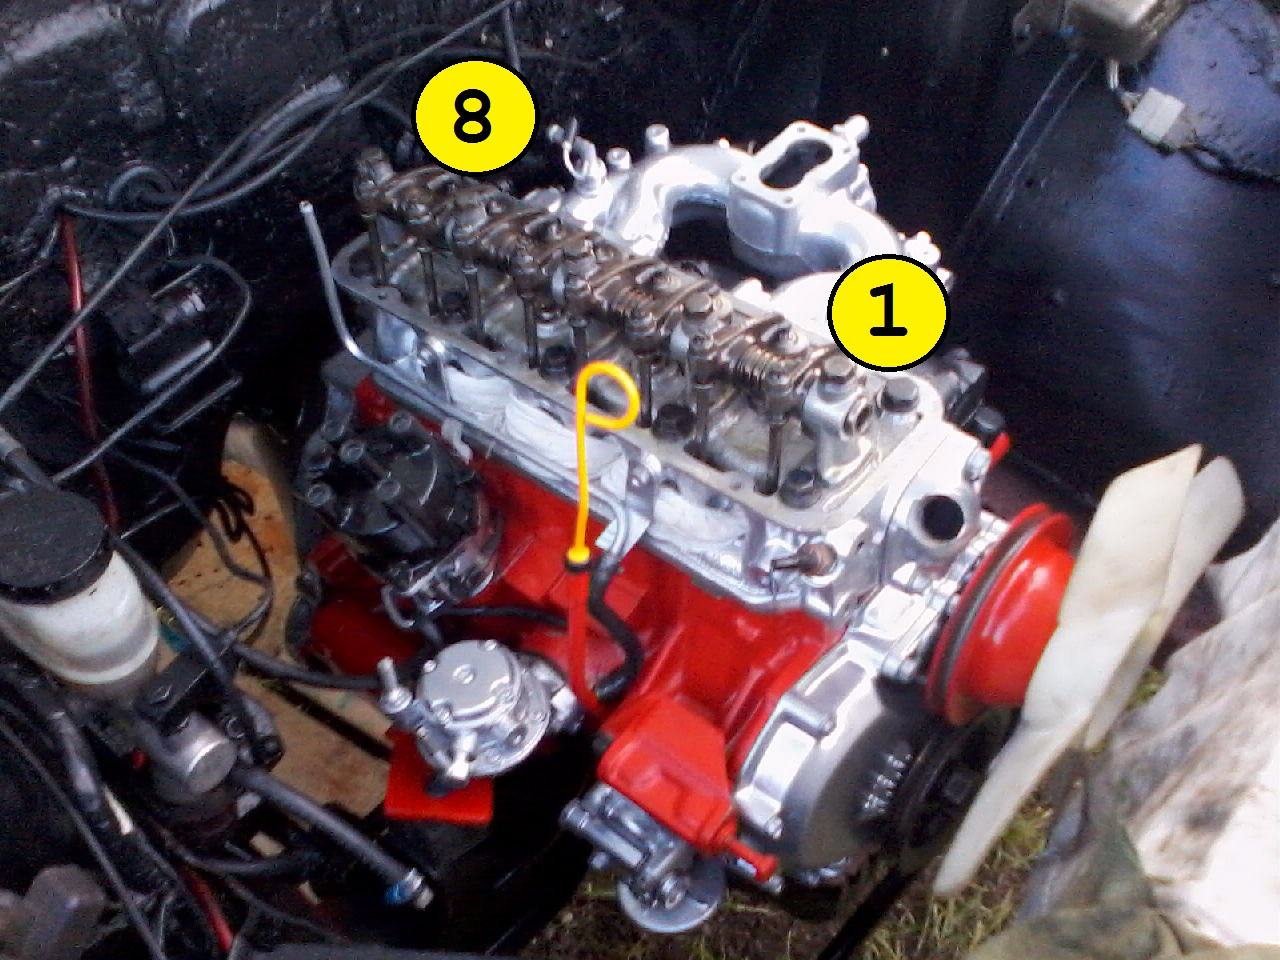
- IF the rotor is pointing to #4 plug wire ...
- adjust valves 4,6,7,8
- IF the rotor is pointing to #4 plug wire ...
-
- Verify which TDC it is at by removing the distributor cap and noting where the rotor point to: Either the no. 1 sparkplug wire, or the no. 4 wire.
- Rotate the engine one full turn, again to the TDC mark
- Adjust the other four valves
- Replace rocker cover
CAUTION: Do not overtighten screws for rocker
cover. Just finger tight.
Technically, these are the valves at TDC. But in practice they should be the only loose ones.
- No. 1 TDC: Adjust valves 1,2,3,5 (counting from front of engine)
- No. 4 TDC: Adjust valves 4,6,7,8
You can verify which TDC it is at by removing the distributor cap and noting whether the rotor point to the no. 1 sparkplug wire, or the no. 4 wire.
Adjustment Method
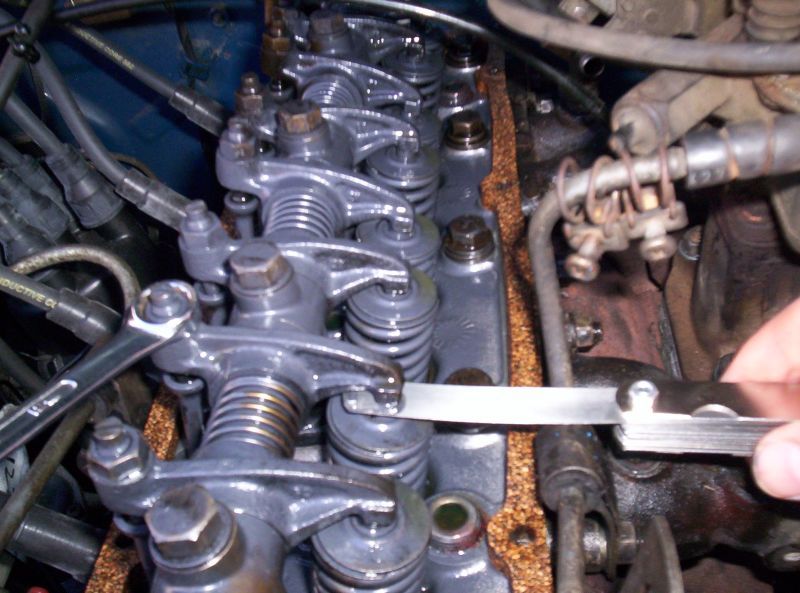
Use a feeler gauge:
- Loosen the 12mm locknut
- You want the feeler to just be able to slip in, and have a slight drag
- If it is a loose fit, tighten the rocker stud (straight screwdriver)
- If it is very tight, very difficult to slip in, loosen it a bit
- After re-tightening the locknut, check the clearance again
- Make sure correct size fits in
- MAKE SURE NEXT SIZE DOES NOT FIT
TIP: You may need to do this several times on each
rocker before getting the hang of it. This is normal.
Too loose: Valves make 'clicking' or 'tapping' sound
and wear excessively
Too tight: Valves may get burned
Check for success: After replacing the rocker cover, Start the engine. Success is:
- Valves are quiet (no ticking whatsoever)
- Engine idles smooth
Turning the Engine
Use one of the following methods (in order of recommendation):
- Turn the engine by grabbing the fan and turning. It's easiest to turn clockwise, but you can turn it either direction. If the fan belt is not loose, this works very well. It has the advantage of all methods in that you have fine control over turning the engine back and forth. If the fan belt slips, see adjusting drive belt.
- TIP: It is very easy to turn if you remove all four spark plugs, but this is not strictly necessary. If the plugs are in, you have to slowly turn it against the compression. But it works.
- Use a socket and ratchet on the crank pulley with the tranny in neutral and turn it by hand. This is a good method, just don't forget to remove the wrench before staring the engine!
- Use a bump switch hooked up to the starter (or try turning the key briefly). This is a hit-and-miss method with no fine control. Be sure to disconnect the power wire to the coil so it doesn't spark.
- Put car in 4th gear and push/pull the whole car to make the driveshaft turn the engine until the marks line up.
Parts
Usually no parts are needed, except sometimes a new Rocker cover gasket. Usually you don't need a new rocker gasket, unless it breaks coming off. The rubber-type A-series rocker gaskets last forever. The cork-type often breaks.