![[Datsun 1200 encyclopedia]](/wiki/upload/wiki.png)
The Datsun 1200 windshield is easily replaced. It just requires patience. Do not force the glass, use light pressure. It takes time to work it. Use the old rubber seal if possible. If you have a new rubber seal, be careful to warm it up in a hot box or boiling water before installation. A soft seal is the key to a succussful installation.
Contents |
Overview
- No sealant.
- Reuse the old rubber, it will work better. If you must use a new rubber, put it in enclosed space with a 75W incandescent light bulb to get the rubber warm and soft, for example in a metal garbage pail used as a heater box
- First, fit rubber to glass
- fit a thin cord into the rubber and tape the ends to the inside of the glass
- place glass into body opening
- gently get the rubber channel all along the bottom inserted into the sheet metal lip
- Pull the cord to move the lip back, GENTLY keeping the glass in place. Be extra careful around the corners. Do not apply any pressure to the glass; just hold it in place
Use a strong thin nylon rope. It will work the smoothest around the edges. And a spray bottle with some soapy water. The nylon rope is fitted to the rubber groove, bring the two tail ends of the rope to finish at the bottom of the windscreen and definitely heat up the rubber. I used a blow dryer when the rubber was fitted to the windscreen. It will be tight but i can only recommend if its too tight pull it off and start again. With one person inside the cabin slowly pulling the nylon rope and the other person supporting from the outside. They are to follow you around as you pull the rope pushing down on the edge. If you feel to much friction on the rubber spray some water and keep going. No broken windscreens if you take your time.
Removal
- Place a protective cover over the hood, front fenders, instrument panel and front seats (in case the glass breaks)
- Remove insider rear-view mrror
- Remove outside windshield wiper arms
- (optional) Remove radio antenna
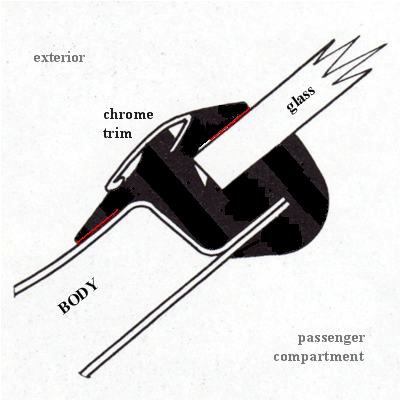
- Remove the exterior windshield trim. On models without chrome trim, remove the rubber insert from the rubber seal
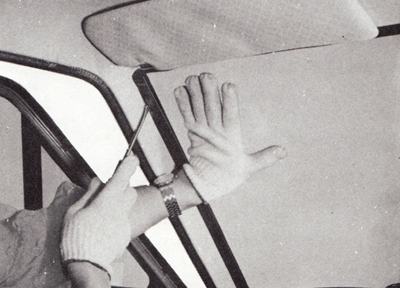
- From inside the cabin, loosen the lip of the glass rubber seal from the body.
- With palm of hand, apply light pressure to glass near the edge. At the same time, use a blunt putty knife or other suitable tool and carefully assist the rubber lip over the metal flange. Work from upper corners down to the bottom and across the top
- After top and side seal lip is free from the flange, with aid of assistant, carefully lift windshield from body opening sufficiently to permit removal of seal from bottom flange. Carefully pry bottom seal lip free
- Remove glass and place it on a protected bench
Installation
Inspect the body opening
- Clean off any old sealer from the body opening and from the rubber seal
- Inspect entire body opening flange for any irregularities, straightness or rust
CAUTION: Do not let glass edge knock against the flange. Edge chips may lead to future breaks.
- Remove seal from glass or body if already fitted. We need to check the bare glass
- With the aid of an assistant, carefully position glass in body opening. Be careful not to chip the glass edge
- With windshield glass supported and centered in body opening, check relationship of glass to body opening around entire perimeter of glass
- The inside surface of the glass should completely contact the metal flange
- The curvature of the glass should be uniform to that of the body opening
- Mark any sections of body to be reformed. Remove glass, and reform opening as required
WARNING: Do not position glass by tapping or hammering at any time
- Clean out old sealer (if any) on rubber seal, and clean seal thoroughly
- Check the rubber seal for any irregularities, especially if the seal is new
- Fit rubber seal to glass
- Insert a strong, thin, cord in the groove of the rubber seal where the body flange will go. Fit cord so ends are at bottom center of glass. Tie each loose end in a knot. Tape the loose ends on the inside of the glass at bottom center of glass
- With aid of assistant, carefully position and center windshield/rubber assembly in body opening
- With the glass and seal properly position in opening, slowly pull the ends of the cord, starting at lower center of windshield to seat the lip of the seal over the metal flange. The cord should be pulled first across bottom of windshield, then up each side and finally across the windshield top
- Carefully tap around glass to assist in seating seal on flange. Never tap or hammer at glass to move or position it
- Using a pressure type applicator, seal the inner and outer lips of the rubber seal to the glass with an approved weatherstrip adhesive. Seal completely around.
- Reinstall the exterior chrome windshield trim
- Reinstall all previously removed parts (mirror, wipers arms) and remove protective coverings
Sealant
I've always put them in with no sealer and didn't have leaks. If re-using the old rubber, make sure the channel is cleaned out and the rubber is warmed (soft) first. If using new rubber, do the same.
However the Factory Service Manual instructs to use adhesive, which I believe is to mitigate any possibility of a comeback (bringing the car back to the dealer if it should happen to leak). In otherwords, a professionally applied adhesive is low-risk.
The Datsun 1200 Factory Service Manual says, AFTER installing the glass:
Using a pressure type applicator, seal inner and outer lips of rubber channel to glass with an approved weatherstrip adhesive... Seal completely around rubber channel.Do this on the exterior, both between glass and rubber, and between rubber and metal. Try not to get the sealer on the visible portion of the glass (wipe any excess away).
Question: why not put the sealant in the rubber channel before installation? Because people have ended up with leaks when putting sealant into the rubber before fitting the glass.
Use a dedicated automotive glass adhesive like "3M Auto Glass Urethane Adhesive". The FSM says use a caulking gun, so that means to force it in between the rubber and glass with more pressure than simply squeezing a tube of it and hoping it gets deep into the correct area.