![[Datsun 1200 encyclopedia]](/wiki/upload/wiki.png)
| Revision as of 20:18, 9 November 2008 Ddgonzal (Talk | contribs) <- Previous diff |
Current revision ddgonzal (Talk | contribs) |
||
| Line 1: | Line 1: | ||
| Drum brakes require periodic adjustment for optimal braking performance. Disc brakes require no adjusting. | Drum brakes require periodic adjustment for optimal braking performance. Disc brakes require no adjusting. | ||
| - | [http://datsun1200.com/modules/myalbum/photo.php?lid=2190 http://ddgonzal.members.winisp.net/getThumb.aspx?width=480&uri=http://datsun1200.com/modules/myalbum/photos/2190.jpg] | + | {{Album|2190}} |
| + | = Master Cylinder = | ||
| + | See [[Brake master cylinder]] for adjustment procedure. | ||
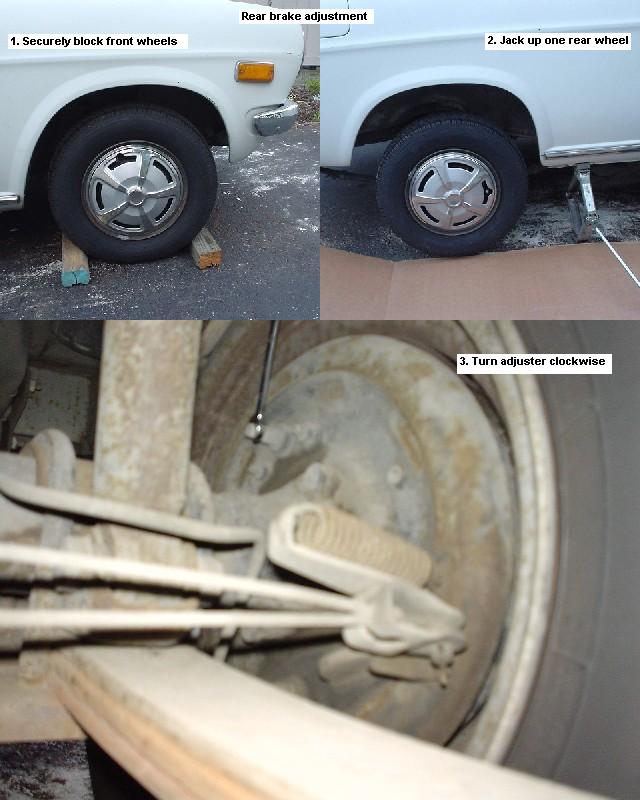
| - | Rear Brake Adjustment | + | = Drum Brakes = |
| - | # Securely block the front wheels | + | Whether you have a 1200 with front disc brakes, or drums all around, keeping the drum adjusted is key. All-drum 1200s stop amazingly well if they are adjusted correctly -- nearly as well as disc brakes. If you keep them adjusted periodically the pedal will be high and tight and stop hard and fast with a minimum of pedal travel. |
| - | # Release hand brake -- you need to be able to spin the wheels | + | |
| - | # Put the gearbox in nuetral | + | |
| - | # Jack one rear wheel up | + | |
| - | # Place safety stand under jacked corner | + | |
| - | # While turning wheel slightly, turn adjuster clock-wise (using 1/4" wrench) | + | |
| - | # Get it as tight as possible by hand, using moderate force. Don't be a muscleman on this little bolt. Even so, you'll find that a quality 1/4" wrench is needed, as cheap ones will bend or break | + | |
| - | # Be sure to back off to the flat of the adjuster. You can't see it, but you will feel it. | + | |
| - | # Ensure the wheel still turns. It can be a little tight (it will 'bed' or loosen up while driving), but you must be able to still turn fairly easy by hand. | + | |
| + | See main article: [[Drum Brake Adjustment]] | ||
| - | [[Category:Brakes]] | + | = Hand Brake = |
| + | Adjust the emergency hand brake '''after''' adjusting the rear drum brakes. | ||
| + | |||
| + | Underneath the vehicle, the cable has an adustable turnbuckle. This is the only adjustment point for the hand brake. Tighten the cable until the handbrake lever can only be pulled to the sixth click with 30 pounds of pull (moderate force). | ||
| + | |||
| + | When the lever can be pulled to the tenth click, it is time to readjust it. | ||
| + | |||
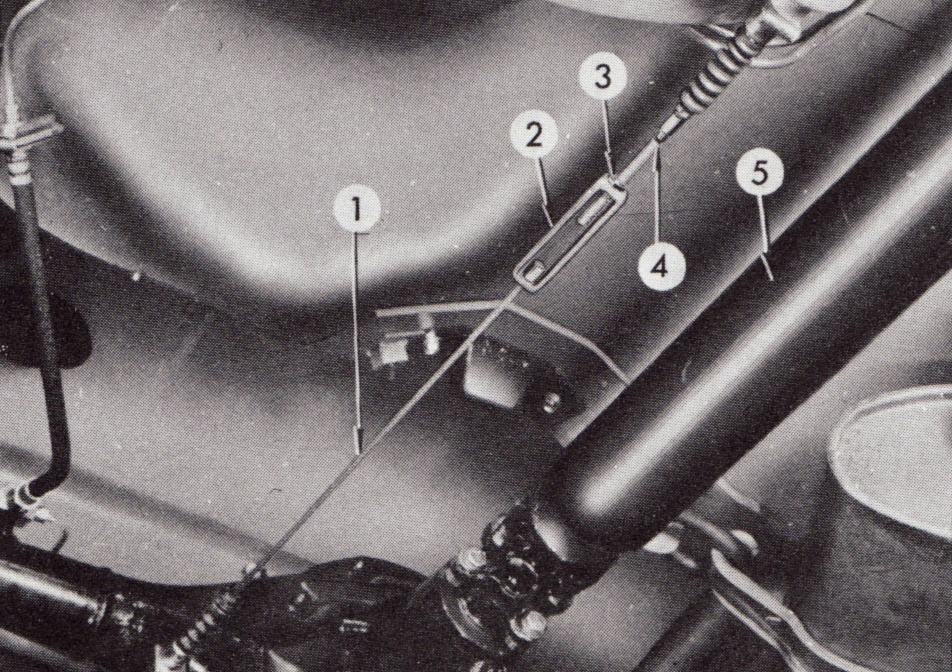
| + | Loosen the locknut (3), turn the buckle (2) to tighten the cable. Then tighten the lock nut. | ||
| + | <br>{{Album|21637}} | ||
| + | |||
| + | [[Category:Rear Axle And Rear Suspension]]{{End}} | ||
Current revision
Drum brakes require periodic adjustment for optimal braking performance. Disc brakes require no adjusting.
Master Cylinder
See Brake master cylinder for adjustment procedure.
Drum Brakes
Whether you have a 1200 with front disc brakes, or drums all around, keeping the drum adjusted is key. All-drum 1200s stop amazingly well if they are adjusted correctly -- nearly as well as disc brakes. If you keep them adjusted periodically the pedal will be high and tight and stop hard and fast with a minimum of pedal travel.
See main article: Drum Brake Adjustment
Hand Brake
Adjust the emergency hand brake after adjusting the rear drum brakes.
Underneath the vehicle, the cable has an adustable turnbuckle. This is the only adjustment point for the hand brake. Tighten the cable until the handbrake lever can only be pulled to the sixth click with 30 pounds of pull (moderate force).
When the lever can be pulled to the tenth click, it is time to readjust it.
Loosen the locknut (3), turn the buckle (2) to tighten the cable. Then tighten the lock nut.