![[Datsun 1200 encyclopedia]](/wiki/upload/wiki.png)
| Revision as of 19:47, 22 November 2007 Ddgonzal (Talk | contribs) (->Specifications) <- Previous diff |
Revision as of 03:24, 23 July 2025 ddgonzal (Talk | contribs) Next diff -> |
||
| Line 1: | Line 1: | ||
| - | <blockquote><table border=1 cellspacing=0><tr><td> | + | {{BackTo|Owners manual|Contents}} |
| - | 1972 USA Owners manual (starting page 8): | + | |
| - | <br>[http://ddgonzal.members.winisp.net/wiki/om1972/ http://ddgonzal.members.winisp.net/wiki/om1972/thumbs/00_cover.jpg] [http://ddgonzal.members.winisp.net/wiki/om1972/08.jpg http://ddgonzal.members.winisp.net/wiki/om1972/thumbs/08.jpg] | + | |
| - | </td></tr></table></blockquote> | + | |
| - | = Dashboard = | + | [[Instruments and Controls]] is a section in the Datsun 1200 [[1972#Instruments_and_Controls|owners manual]]. |
| - | Various dashes were used. Check your owner's manual for particulars of your model. | + | |
| - | [http://datsun1200.com/modules/myalbum/photo.php?lid=2149 http://datsun1200.com/modules/myalbum/photos/thumbs/2149.jpg] | + | = Overview = |
| - | <br>Comparo | + | {{OwnersManual2x|29372|p1=12|29378|p2=13|Instruments and Controls}} |
| - | See the main article: [[Dashboard]] | + | {{OwnersManualB120|06|08|Instruments and Controls}} |
| - | = Gauges = | + | * [[Seat Belt Warning System]] (North America models) |
| + | * [[Speedometer]] | ||
| + | * [[Tachometer]] (OPTIONAL sedan/coupe) | ||
| - | == Tachometer == | + | {{OwnersManual|09||Seat Belt Lamp, Tachometer and Speedometer}} |
| - | See [[Tachometer]] | + | |
| - | == Clock == | + | = Water Temperature Gauge = |
| - | See [[Clock]] | + | {{OwnersManual|10||If the pointer stays on the "H" side for more than two minutes, stop the vehicle and let the engine cool down, keeping it at 1,000 to 1,500 rpm.}} |
| - | == Fuel Gauge == | + | "H" is past the large middle range (way over to right-side — the H area). |
| - | <blockquote><table border=1 cellspacing=0><tr><td> | + | |
| - | [http://ddgonzal.members.winisp.net/wiki/om1972/10.jpg http://ddgonzal.members.winisp.net/wiki/om1972/thumbs/10.jpg] 1972 USA Owners manual<blockquote><hr>The position of the pointer will vary slightly during acceleration, braking and when the car is going up or down a hill.<hr></blockquote> | + | |
| - | </td></tr></table></blockquote> | + | |
| - | === Specifications === | + | Also see: |
| - | Stock Fuel level gauge, ss measured by club members: | + | * [[Thermostat]] |
| - | * Empty mark: 73 ohms input | + | * [[Temperature Gauge]] |
| - | * Full mark: ? | + | |
| + | <blockquote>'''WATER TEMPERATURE GAUGE''' | ||
| + | <br> | ||
| + | <br>When the ignition switch is on, this gauge operates and the pointer indicates the coolant's temperature, For most types of driving, the pointer will hover about halfway. However, the engine will run satisfactorily when the pointer is at any position in the middle range. Continual stop-and-go driving or high-speed driving in warm weather, hill climbing, or towing another car may cause the gauge pointer to swing to the "H" side. If the pointer should remain on the "H" side for more than two minutes, stop the vehicle and let the engine cool down, keeping it at 1,000 to 1,500 rpm.</blockquote> | ||
| - | ang94541 uses an aftermarket '''Autometer 3515''': | + | {{AlbumLinkH|1972#29370|29370|Page 10|height=}} |
| - | * Empty mark: 73 ohms | + | |
| - | * Full mark: 10 ohms | + | |
| - | Note: it doesn't match the Nissan gauge except at the empty mark. | + | |
| - | Reference: [http://datsun1200.com/modules/newbb/viewtopic.php?topic_id=30588&forum=1 Forum: Fuel sending unit specs] | + | Round-gauge dash |
| + | <br>{{Album|21620}} {{Album|21619|text=Early style}} | ||
| + | Standard dash | ||
| + | <br>{{Photo|1977_B120_dash-2.jpg|Datsun%201200/Parts}} | ||
| - | Also see: [[Fuel tank]] (includes Fuel Sender specs) | + | {{OwnersManualB120|08|08|the pointer will hover about halfway...}} |
| - | == Indicator/Warning Lights == | + | {{PhotoLinkH|Owners_manual#08.jpg|1974/08.jpg|Page 8|||Datsun%201200/owners_manual|height=}} |
| - | <blockquote><table border=1 cellspacing=0><tr><td> | + | |
| - | [http://ddgonzal.members.winisp.net/wiki/om1972/10.jpg http://ddgonzal.members.winisp.net/wiki/om1972/thumbs/10.jpg] [http://ddgonzal.members.winisp.net/wiki/om1972/11.jpg http://ddgonzal.members.winisp.net/wiki/om1972/thumbs/11.jpg] 1972 USA Owners manual | + | |
| - | *Ignition Warning Light | + | |
| - | *Oil Pressure Warning Light | + | |
| - | *Headlight Beam Indicator Light | + | |
| - | *Brake System Warning Light | + | |
| - | *Turn Signal Indicator Lights | + | |
| - | </td></tr></table></blockquote> | + | |
| - | Also see: [[Wiring]] | + | = Fuel Gauge = |
| + | {{OwnersManual|10||The position of the pointer will vary slightly during acceleration, braking and when the car is going up or down a hill.}} | ||
| - | == Water Temperature Gauge == | + | {{AlbumLinkH|1972#29370|29370|Page 10|height=}} |
| - | <blockquote><table border=1 cellspacing=0><tr><td> | + | |
| - | [http://ddgonzal.members.winisp.net/wiki/om1972/10.jpg http://ddgonzal.members.winisp.net/wiki/om1972/thumbs/10.jpg] 1972 USA Owners manual<blockquote><hr>If the pointer stays on the "H" side for more than two minutes, stop the vehicle and let the engine cool down, keeping it at 1,000 to 1,500 rpm.<hr> | + | |
| - | </blockquote>By "H" they mean out of the large middle range (way over to right-side -- the H area). | + | |
| - | </td></tr></table></blockquote> | + | |
| - | Also see: [[Thermostat]] | + | <blockquote>'''FUEL GAUGE''' |
| + | <br> | ||
| + | <br>When the ignition switch is "ON," the fuel gauge pointer indicates an approximate amount of fuel in the tank. | ||
| + | <br> | ||
| + | <br>The position of the pointer will vary slightly during acceleration, braking and when the car is going up or down a hill.</blockquote> | ||
| - | = Switches = | + | {{See|Fuel Sender}} |
| - | Also see: [[Wiring]] | + | |
| - | == Heat Glass Switch == | + | Round-gauge dash |
| - | Optional equipment. | + | <br>{{Album|21620}} {{Album|21619|text=Early style}} |
| - | <blockquote><table border=1 cellspacing=0><tr><td> | + | |
| - | [http://ddgonzal.members.winisp.net/wiki/om1972/13.jpg http://ddgonzal.members.winisp.net/wiki/om1972/thumbs/13.jpg] 1972 USA Owners manual<blockquote> | + | |
| - | </blockquote> | + | |
| - | </td></tr></table></blockquote> | + | |
| - | == Horn == | + | The fuel gauge is part of the [[Cluster Gauge]] |
| - | Just press the button to sound the horn. | + | <br>{{Album|26218}} |
| - | <blockquote><table border=1 cellspacing=0><tr><td> | + | |
| - | [http://ddgonzal.members.winisp.net/wiki/om1972/13.jpg http://ddgonzal.members.winisp.net/wiki/om1972/thumbs/13.jpg] 1972 USA Owners manual<blockquote></blockquote> | + | |
| - | </td></tr></table></blockquote> | + | |
| + | Standard dash | ||
| + | <br>{{Album|26046}} | ||
| + | |||
| + | {{OwnersManualB120|08|08|approximate amount of fuel...}} | ||
| + | |||
| + | <blockquote>'''FUEL GAUGE''' | ||
| + | <br> | ||
| + | <br>When the ignition switch is "ON," the fuel gauge pointer indicates an approximate amount of fuel in the tank. | ||
| + | <br> | ||
| + | <br>The position of the pointer will vary slightly during acceleration, braking and when the car is going up or down a hill. So check the fuel supply when the vehicles is reasonably level, either standing still or moving steadily.</blockquote> | ||
| + | |||
| + | {{PhotoLinkH|Owners_manual#08.jpg|1974/08.jpg|Page 8|||Datsun%201200/owners_manual|height=}} | ||
| + | |||
| + | = Indicator/Warning Lights = | ||
| + | {{See|Wiring}} | ||
| + | |||
| + | == Ignition Warning Light == | ||
| + | '''CHG''' lamp | ||
| + | |||
| + | {{OwnersManual|10||Glows red whenever the alternator is not supplying current}} | ||
| + | |||
| + | <blockquote>'''IGNITION WARNING LIGHT''' | ||
| + | <br> | ||
| + | <br>With the ignition switch on, the ignition warning ['''CHG'''] light glows red whenever the [[alternator]] is not supplying current to the electrical system. After the engine starts, the light should go out, indicating that the alternator is operating properly. | ||
| + | <br> | ||
| + | <br>The light may glow or flicker occasionally when the engine is idling, However, if the light remains on at normal driving speeds, the alternator and electrical system should be checked.</blockquote> | ||
| + | |||
| + | {{AlbumLinkH|1972#29370|29370|Page 10|height=}} | ||
| + | |||
| + | Round-gauge dash | ||
| + | <br>{{Album|21620}} {{Album|21619|text=Early style}} | ||
| + | |||
| + | Standard dash: CHG ignition lamp is on far left | ||
| + | <br>{{AlbumLinkH|Standard_Dash_Photo_Index#Four_Warning_Lamps|26046|STD Dash|height=}} | ||
| + | |||
| + | {{OwnersManualB120|08|08|After the engine starts, the light should go out...}} | ||
| + | |||
| + | {{PhotoLinkH|Owners_manual#08.jpg|1974/08.jpg|Page 8|||Datsun%201200/owners_manual|height=}} | ||
| + | |||
| + | {{PhotoLinkH|Owners_manual#06.jpg|1974/06.jpg|Page 6|||Datsun%201200/owners_manual|height=}} | ||
| + | |||
| + | == Oil Pressure Warning Light == | ||
| + | '''OIL''' lamp | ||
| + | |||
| + | {{OwnersManual|10||Stop the engine immediately}} | ||
| + | |||
| + | <blockquote>'''OIL PRESSURE WARNING LIGHT''' | ||
| + | <br> | ||
| + | <br>The oil pressure warning light will glow red, when ignition switch is on; if the light does not glow, the bulb or wiring is causing the trouble. The light | ||
| + | will go out as soon as engine starts and the oil pressure reaches normal condition. If the engine oil pressure should below a safe operating limit, the light | ||
| + | will glow. The light may flicker for a few seconds after a sudden stop, but this condition is not necessarily harmful to the engine. | ||
| + | <br> | ||
| + | <br>However, if the light glows steadily at normal driving speeds, stop the engine immediately and have its lubrication system checked.</blockquote> | ||
| + | |||
| + | {{AlbumLinkH|1972#29370|29370|Page 10|height=}} | ||
| + | |||
| + | Round-gauge lights | ||
| + | <br>{{Album|21620}} {{Album|21619|text=Early style}} | ||
| + | |||
| + | Standard dash lights: Oil is on far right | ||
| + | <br>{{Photo|1977_B120_dash-2.jpg|Datsun%201200/Parts}} | ||
| + | |||
| + | {{OwnersManualB120|09|09|warning light will glow red...}} | ||
| + | |||
| + | {{PhotoLinkH|Owners_manual#09.jpg|1974/09.jpg|Page 9|||Datsun%201200/owners_manual|height=}} | ||
| + | |||
| + | == Headlight Beam Indicator Light == | ||
| + | Blue '''BEAM''' lamp | ||
| + | |||
| + | {{OwnersManual|10||The beam indicator glows whenever the high beams are being used}} | ||
| + | |||
| + | <blockquote>'''HEADLIGHT BEAM INDICATOR LIGHT''' | ||
| + | <br> | ||
| + | <br>The [[headlights]] have two beams to meet varying night driving conditions. | ||
| + | <br> | ||
| + | <br>The high beams give you better long-range visibility on dark roads in the suburbs. | ||
| + | <br> | ||
| + | <br>With the headlights on, the beam indicator glows whenever the high beams are being used, and goes off when the low beams are selected.</blockquote> | ||
| + | |||
| + | {{AlbumLinkH|1972#29370|29370|Page 10|height=}} | ||
| + | |||
| + | Round-gauge dash | ||
| + | <br>{{Album|21620}} {{Album|21619|text=Early style}} | ||
| + | |||
| + | Standard dash lights: BEAM is the blue light | ||
| + | <br>{{Photo|1977_B120_dash-2.jpg|Datsun%201200/Parts}} | ||
| + | |||
| + | {{OwnersManualB120|09|098|The high beams give you better long-range visibility on dark roads...}} | ||
| + | |||
| + | {{PhotoLinkH|Owners_manual#09.jpg|1974/09.jpg|Page 9|||Datsun%201200/owners_manual|height=}} | ||
| + | |||
| + | == Brake System Warning Light == | ||
| + | '''BRAKE''' lamp | ||
| + | |||
| + | {{OwnersManual|11||Brake System [[Warning_Light_Switch|Warning Light]]}} | ||
| + | |||
| + | <blockquote>'''BRAKE SYSTEM WARNING LIGHT''' | ||
| + | <br> | ||
| + | <br>If either half of the dual brake system fails, the brake warning light (BRAKE) glows when brakes are applied, You must stop the car immediately and if you can safely operate with two-wheel brakes, move your car at reduced speed to the nearest service station. | ||
| + | <br> | ||
| + | <br>This warning light is also used as the parking brake warning light. | ||
| + | <br> | ||
| + | <br>Before starting, if the warning light does not glow when the parking brake and ignition switch are on, have the electrical system checked.</blockquote> | ||
| + | |||
| + | {{AlbumLinkH|1972#29371|29371|Page 11|height=}} | ||
| + | |||
| + | Round-gauge dash | ||
| + | <br>{{Album|21620}} {{Album|21619|text=Early style}} | ||
| + | |||
| + | Standard dash lights: On Deluxe models only. BRAKE is second from left | ||
| + | <br>{{Photo|1977_B120_dash-2.jpg|Datsun%201200/Parts}} | ||
| + | |||
| + | == Turn Signal Indicator Lights == | ||
| + | {{OwnersManual|11||Flashing type indicators wink...}} | ||
| + | |||
| + | <blockquote>'''TURN SIGNAL INDICATOR LIGHT''' | ||
| + | <br> | ||
| + | <br>Flashing type indicators wink simultaneously with the traffic indicators in the front both sides, and rear of the vehicle, with the ignition switch turned on.</blockquote> | ||
| + | |||
| + | {{AlbumLinkH|1972#29371|29371|Page 11|height=}} | ||
| + | |||
| + | Round-gauge dash: to right and left of [[speedometer]] | ||
| + | <br>{{UploadLinkH|Speedometer#174_67e7685d5a557.jpg|174_67e7685d5a557.jpg|Speedometer|height=}} | ||
| + | |||
| + | Standard dash lights: Winkers are to left and right of the speedometer dial | ||
| + | <br>{{AlbumLinkH|Standard_Dash_Photo_Index#Four_Warning_Lamps|26046|STD Dash|height=}} | ||
| + | |||
| + | {{OwnersManualB120|09|098|wink simultaneously with the traffic indicators...}} | ||
| + | |||
| + | {{PhotoLinkH|Owners_manual#09.jpg|1974/09.jpg|Page 9|||Datsun%201200/owners_manual|height=}} | ||
| + | |||
| + | {{PhotoLinkH|Owners_manual#06.jpg|1974/06.jpg|Page 6|||Datsun%201200/owners_manual|height=}} | ||
| + | |||
| + | = Switches = | ||
| + | Also see: [[Wiring]] | ||
| - | Also see: [[Wiring]] | ||
| == Ignition Switch == | == Ignition Switch == | ||
| - | See [[Keys]] | + | Also see: |
| + | * [[Keys]] | ||
| + | * [[Locks]] | ||
| + | * [[Ignition Switch]] | ||
| + | |||
| + | {{OwnersManual|11||ignition switch ... is integrated with the steering lock device | ||
| + | <br>... | ||
| + | <br>The "ACC" (accessories) position of the switch permits you to use all of the electrical accessories.}} | ||
| + | |||
| + | {{OwnersManualB120-2|09|10|(Optional) | ||
| + | <br>ignition switch ... is integrated with the steering lock device | ||
| + | <br>... | ||
| + | <br>The key can be inserted or withdrawn only when the switch is in the "GARAGE" or "LOCK" position. In the "GARAGE" position, however, the steering is not locked. | ||
| + | <br> | ||
| + | <br>(3-position) | ||
| + | <br>The "ON" position allows you to turn on the ignition system as well as all the other electrical circuits.}} | ||
| + | |||
| + | No mention is made of what the OFF position is for. Presumably its use is the same as the "GARAGE" position. | ||
| + | |||
| + | Notice that the standard 3-position type does not have an "ACC" position. | ||
| + | <br>{{Album-|22007}} | ||
| + | |||
| + | 5-position switch vs 4-position switch: | ||
| + | <br>{{Album-|22011}} | ||
| + | <br>Note addition of ACC position, which power [[Radio]] & Rear [[Defroster]] | ||
| + | |||
| + | Portugal market: | ||
| + | {{Album|22008}} | ||
| + | Interruptor de ignićāo [Ignition switch] | ||
| + | Desligado [OFF] | ||
| + | Ligado [ON] | ||
| + | Arranque [START] | ||
| == Light Switches == | == Light Switches == | ||
| - | Light switch operation differs between Australia models and other markets. Turn Signal operation (T/S) is the same? | + | Also see: [[Lighting Switch]] |
| - | [http://datsun1200.com/modules/myalbum/photo.php?lid=10046 http://datsun1200.com/modules/myalbum/photos/thumbs/10046.jpg] | + | === Light Switch === |
| + | {{Photo!|lights.jpg}} | ||
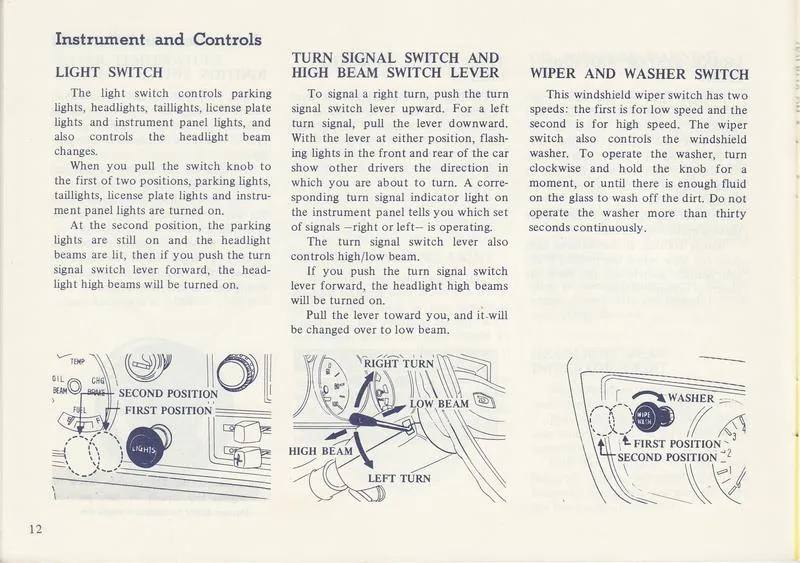
| + | {{OwnersManual|12||When you pull the switch knob to the first of two positions, parking lights, taillights, license plate lights and instrument panel lights are turned on. | ||
| + | <br><br>At the second position, the parking lights are still on and the headlight beams are lit, then if you push the turn signal lever switch forward, the headlight high beams will be turned on ... Pull the lever toward you, and it will be changed over to low beam.}} | ||
| - | <blockquote><table border=1 cellspacing=0><tr><td> | + | The key takeaway here is that: |
| - | [http://ddgonzal.members.winisp.net/wiki/om1972/12.jpg http://ddgonzal.members.winisp.net/wiki/om1972/thumbs/12.jpg] 1972 USA Owners manual<blockquote><hr>...first of two positions, parking lights, taillights, license plate lights and instrument panel lights are turned on.<hr> | + | * Knob in the 1st Position, NO HEADLIGHTS for US models |
| - | </blockquote> | + | * Knob in the 1st Position, LOW BEAMS work for other countries, including Japan-market |
| - | </td></tr></table></blockquote> | + | |
| - | Also see: [[Wiring]] | + | {{OwnersManualB120|10|11|<hr><b>LIGHT SWITCH</b><br>The light switch clearance lights, parking lights, headlights, taillights, license plate light and instrument panel lights. |
| + | <br>With the light switch knob pulled on, the following lights will be on. | ||
| - | == Wiper and Washer Switch == | + | <b>1st position:</b> |
| - | <blockquote><table border=1 cellspacing=0><tr><td> | + | <br>Clearance, parking, tail, license, instrument panel lights and then headlight low beams. |
| - | [http://ddgonzal.members.winisp.net/wiki/om1972/12.jpg http://ddgonzal.members.winisp.net/wiki/om1972/thumbs/12.jpg] 1972 USA Owners manual<blockquote><hr>To operate the washer, turn clockwise and hold the knob for a moment, or until there is enough fluid on the glass to wash off the dirt. Do not operate the washer for more than thirty seconds continuously.<hr> | + | <br>With the turn signal switch lever pulled up, the headlight low beams can be turned on. |
| - | </blockquote> | + | |
| - | </td></tr></table></blockquote> | + | |
| - | Also see: [[Wiring]] | + | <b>2nd position:</b> |
| + | <br>Headlights and other lights | ||
| + | <br>If you push the turn signal switch lever forward, the headlight high beams will be turned on.}} | ||
| - | = Glovebox = | ||
| - | Hot tip: replace the B110's cardboard glove box with a plastic unit from an early B210. | ||
| - | [http://datsun1200.com/modules/myalbum/photo.php?lid=13434 http://datsun1200.com/modules/myalbum/photos/thumbs/13434.jpg] | + | (Australia only) |
| - | <br>Latchless door style | + | <br>{{Photo!|lights_aus.jpg}} |
| + | |||
| + | {{OwnersManualB120|11||<b>INSTRUMENT PANEL LIGHT CONTROL</b> (For Australia only) | ||
| + | <br> | ||
| + | <br>The instrument panel light control is integral with light switch. The brightness of instrument panel lights can be adjusted by turn the light switch knob. | ||
| + | <br> | ||
| + | <br>Turning the knob clockwise will darken the instrument panel lights.}} | ||
| + | |||
| + | === Turn Signal Switch and High Beam Switch Lever=== | ||
| + | {{OwnersManual|12||Pull the lever toward you, and it will be changed over to low beam}} | ||
| + | |||
| + | === Hazard Warning Switch=== | ||
| + | <br>{{SeeEx|see=Main|Hazards#Operation|Hazards}} | ||
| + | |||
| + | {{OwnersManual|13||By pushing the tumbler switch, all the directional lights flash at the same time to warn other cars that some trouble happened in your car.}} | ||
| + | |||
| + | == Wiper and Washer Switch == | ||
| + | <br>{{SeeEx|see=Main|Wipers#Operation|Wipers}} | ||
| + | |||
| + | {{OwnersManual|12||To operate the washer, turn clockwise and hold the knob for a moment, or until there is enough fluid on the glass to wash off the dirt. Do not operate the washer for more than thirty seconds continuously.}} | ||
| + | |||
| + | == Horn == | ||
| + | <br>{{SeeEx|see=Main|Horn#Operation|Horn}} | ||
| - | [http://datsun1200.com/modules/myalbum/photo.php?lid=978 http://datsun1200.com/modules/myalbum/photos/thumbs/978.jpg] [http://datsun1200.com/modules/myalbum/photo.php?lid=223 http://datsun1200.com/modules/myalbum/photos/thumbs/223.jpg] | + | {{OwnersManual|13||Sound the horn by depressing a horn button on either side of the steering wheel}} |
| - | <br>RHD glove boxes | + | |
| - | [http://datsun1200.com/modules/myalbum/photo.php?lid=13439 http://datsun1200.com/modules/myalbum/photos/thumbs/13439.jpg] [http://datsun1200.com/modules/myalbum/photo.php?lid=13440 http://datsun1200.com/modules/myalbum/photos/thumbs/13440.jpg] | + | = Parking Brake Lever = |
| - | <br>LHD with latch | + | {{SeeEx|see=Main|Hand_Brake#Operation|Hand Brake}} |
| - | [http://datsun1200.com/modules/myalbum/photo.php?lid=13441 http://datsun1200.com/modules/myalbum/photos/thumbs/13441.jpg] | + | {{OwnersManual|13||If the ignition switch is on when the parking brake lever is applied, the [[#Brake_System_Warning_Light|brake warning light]] will glow.}} |
| - | <br>Hinge detail. If often wears away the box material. The B210 unit will fix this. | + | |
| - | [http://datsun1200.com/modules/myalbum/photo.php?lid=13442 http://datsun1200.com/modules/myalbum/photos/thumbs/13442.jpg] [http://datsun1200.com/modules/myalbum/photo.php?lid=13443 http://datsun1200.com/modules/myalbum/photos/thumbs/13443.jpg] | + | = Heat Glass Switch = |
| - | <br>1972 USA tire inflation sticker and key sticker | + | Heated rear (defrostable) window was [[Options|Optional]] equipment. |
| - | = Parking Brake Lever = | + | {{SeeEx|see=Main|Heated_Glass#Operation|Heated Glass}} |
| - | <blockquote><table border=1 cellspacing=0><tr><td> | + | |
| - | [http://ddgonzal.members.winisp.net/wiki/om1972/13.jpg http://ddgonzal.members.winisp.net/wiki/om1972/thumbs/13.jpg] 1972 USA Owners manual<blockquote><hr>If the ignition switch is on when the parking brake lever is applied, the brake warning light will glow.<hr> | + | |
| - | </blockquote> | + | |
| - | </td></tr></table></blockquote> | + | |
| + | {{OwnersManual|13||The rear heat glass incorporates a printed heating element to prevent frosting or icing}} | ||
| - | [[Category:Body]] | + | [[Category:Owner's Manual]]{{End}} |
Revision as of 03:24, 23 July 2025
<-- back to Owners manual
Instruments and Controls is a section in the Datsun 1200 owners manual.
Contents |
Overview
 Instruments and Controls
1974 B120 Owner's Manual (Page 06 ... 08)
 Instruments and Controls
* Seat Belt Warning System (North America models)
* Speedometer
* Tachometer (OPTIONAL sedan/coupe)
1972 USA Owners manual (Page 09 ... ):
 Seat Belt Lamp, Tachometer and Speedometer

Water Temperature Gauge
1972 USA Owners manual (Page 10 ... ):
If the pointer stays on the "H" side for more than two minutes, stop the vehicle and let the engine cool down, keeping it at 1,000 to 1,500 rpm.
"H" is past the large middle range (way over to right-side — the H area).
Also see:
* Thermostat
* Temperature Gauge
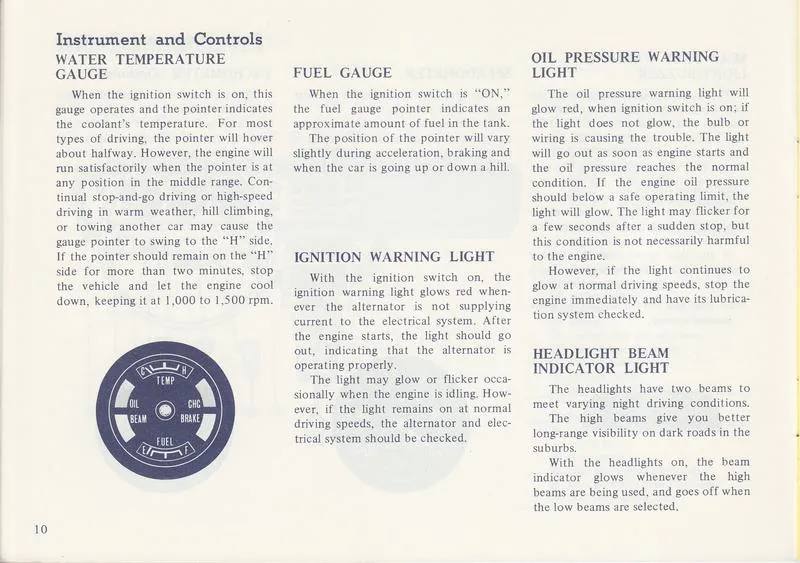
WATER TEMPERATURE GAUGE
When the ignition switch is on, this gauge operates and the pointer indicates the coolant's temperature, For most types of driving, the pointer will hover about halfway. However, the engine will run satisfactorily when the pointer is at any position in the middle range. Continual stop-and-go driving or high-speed driving in warm weather, hill climbing, or towing another car may cause the gauge pointer to swing to the "H" side. If the pointer should remain on the "H" side for more than two minutes, stop the vehicle and let the engine cool down, keeping it at 1,000 to 1,500 rpm.
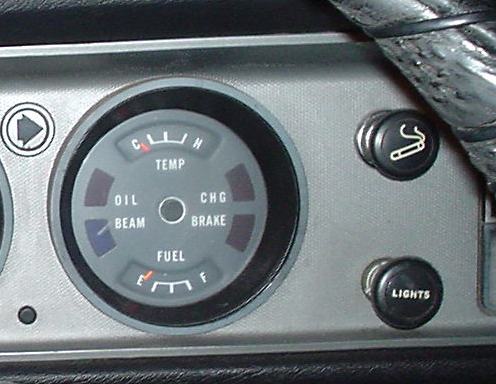
Round-gauge dash

Standard dash

1974 B120 Owner's Manual (Page 08 ... 08)
the pointer will hover about halfway...

Fuel Gauge
1972 USA Owners manual (Page 10 ... ):
The position of the pointer will vary slightly during acceleration, braking and when the car is going up or down a hill.
FUEL GAUGE
When the ignition switch is "ON," the fuel gauge pointer indicates an approximate amount of fuel in the tank.
The position of the pointer will vary slightly during acceleration, braking and when the car is going up or down a hill.
Round-gauge dash
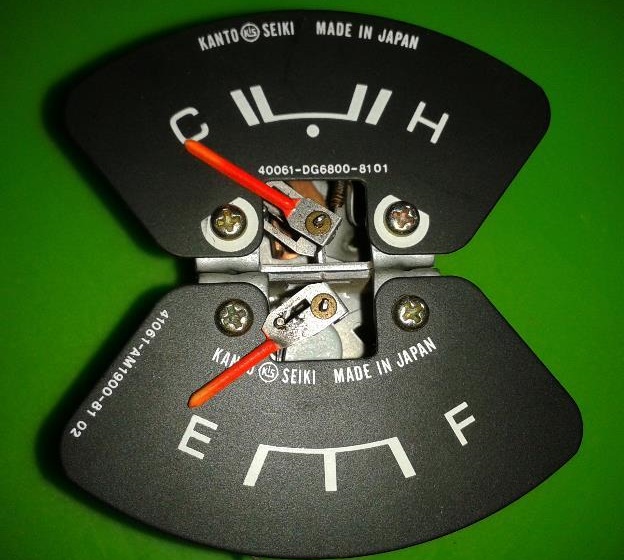
The fuel gauge is part of the Cluster Gauge
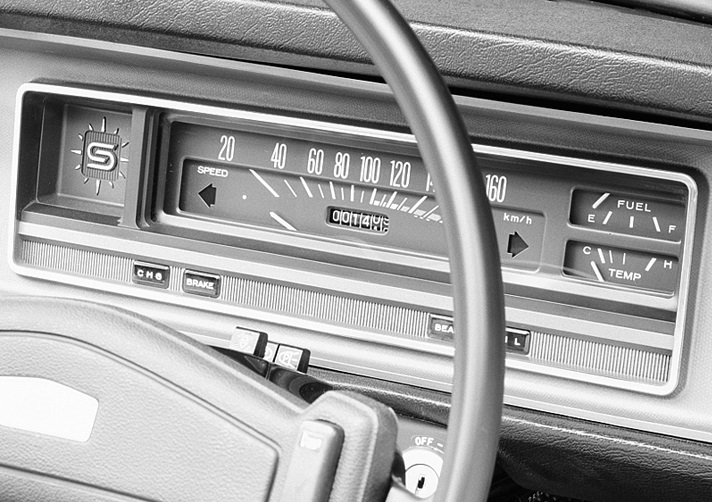
Standard dash
1974 B120 Owner's Manual (Page 08 ... 08)
approximate amount of fuel...
FUEL GAUGE
When the ignition switch is "ON," the fuel gauge pointer indicates an approximate amount of fuel in the tank.
The position of the pointer will vary slightly during acceleration, braking and when the car is going up or down a hill. So check the fuel supply when the vehicles is reasonably level, either standing still or moving steadily.
Indicator/Warning Lights
Ignition Warning Light
CHG lamp
1972 USA Owners manual (Page 10 ... ):
Glows red whenever the alternator is not supplying current
IGNITION WARNING LIGHT
With the ignition switch on, the ignition warning [CHG] light glows red whenever the alternator is not supplying current to the electrical system. After the engine starts, the light should go out, indicating that the alternator is operating properly.
The light may glow or flicker occasionally when the engine is idling, However, if the light remains on at normal driving speeds, the alternator and electrical system should be checked.
Round-gauge dash
Standard dash: CHG ignition lamp is on far left
1974 B120 Owner's Manual (Page 08 ... 08)
After the engine starts, the light should go out...

Oil Pressure Warning Light
OIL lamp
1972 USA Owners manual (Page 10 ... ):
Stop the engine immediately
OIL PRESSURE WARNING LIGHT
The oil pressure warning light will glow red, when ignition switch is on; if the light does not glow, the bulb or wiring is causing the trouble. The light will go out as soon as engine starts and the oil pressure reaches normal condition. If the engine oil pressure should below a safe operating limit, the light will glow. The light may flicker for a few seconds after a sudden stop, but this condition is not necessarily harmful to the engine.
However, if the light glows steadily at normal driving speeds, stop the engine immediately and have its lubrication system checked.
Round-gauge lights
Standard dash lights: Oil is on far right
1974 B120 Owner's Manual (Page 09 ... 09)
warning light will glow red...

Headlight Beam Indicator Light
Blue BEAM lamp
1972 USA Owners manual (Page 10 ... ):
The beam indicator glows whenever the high beams are being used
HEADLIGHT BEAM INDICATOR LIGHT
The headlights have two beams to meet varying night driving conditions.
The high beams give you better long-range visibility on dark roads in the suburbs.
With the headlights on, the beam indicator glows whenever the high beams are being used, and goes off when the low beams are selected.
Round-gauge dash
Standard dash lights: BEAM is the blue light
1974 B120 Owner's Manual (Page 09 ... 098)
The high beams give you better long-range visibility on dark roads...
Brake System Warning Light
BRAKE lamp
1972 USA Owners manual (Page 11 ... ):
Brake System Warning Light
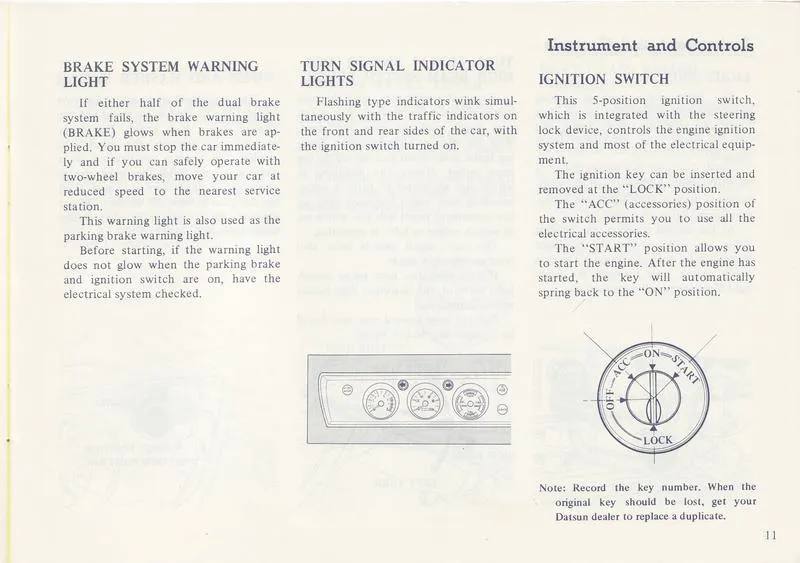
BRAKE SYSTEM WARNING LIGHT
If either half of the dual brake system fails, the brake warning light (BRAKE) glows when brakes are applied, You must stop the car immediately and if you can safely operate with two-wheel brakes, move your car at reduced speed to the nearest service station.
This warning light is also used as the parking brake warning light.
Before starting, if the warning light does not glow when the parking brake and ignition switch are on, have the electrical system checked.
Round-gauge dash
Standard dash lights: On Deluxe models only. BRAKE is second from left
Turn Signal Indicator Lights
1972 USA Owners manual (Page 11 ... ):
Flashing type indicators wink...
TURN SIGNAL INDICATOR LIGHT
Flashing type indicators wink simultaneously with the traffic indicators in the front both sides, and rear of the vehicle, with the ignition switch turned on.
Round-gauge dash: to right and left of speedometer

Standard dash lights: Winkers are to left and right of the speedometer dial
1974 B120 Owner's Manual (Page 09 ... 098)
wink simultaneously with the traffic indicators...
Switches
Also see: Wiring
Ignition Switch
Also see:
* Keys
* Locks
* Ignition Switch
1972 USA Owners manual (Page 11 ... ):
ignition switch ... is integrated with the steering lock device
...
The "ACC" (accessories) position of the switch permits you to use all of the electrical accessories.
1974 Export B120 Owners manual
Page 09 Page 10 (Optional)
ignition switch ... is integrated with the steering lock device
...
The key can be inserted or withdrawn only when the switch is in the "GARAGE" or "LOCK" position. In the "GARAGE" position, however, the steering is not locked.
(3-position)
The "ON" position allows you to turn on the ignition system as well as all the other electrical circuits.

No mention is made of what the OFF position is for. Presumably its use is the same as the "GARAGE" position.
Notice that the standard 3-position type does not have an "ACC" position.
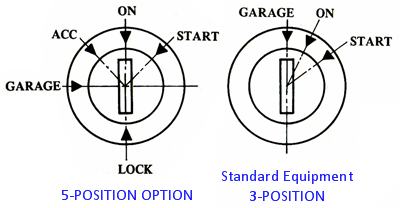
5-position switch vs 4-position switch:
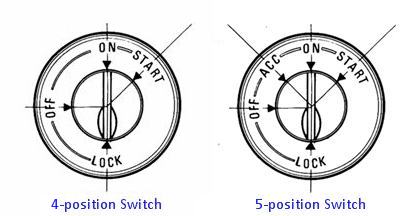
Note addition of ACC position, which power Radio & Rear Defroster
Portugal market:
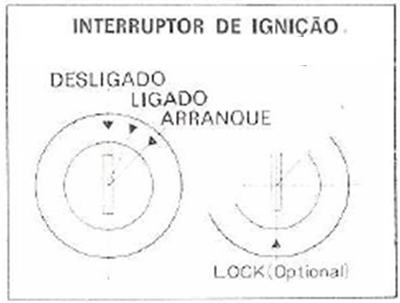 Interruptor de ignićāo [Ignition switch]
Desligado [OFF]
Ligado [ON]
Arranque [START]
Interruptor de ignićāo [Ignition switch]
Desligado [OFF]
Ligado [ON]
Arranque [START]
Light Switches
Also see: Lighting Switch
Light Switch

1972 USA Owners manual (Page 12 ... ):
When you pull the switch knob to the first of two positions, parking lights, taillights, license plate lights and instrument panel lights are turned on.
At the second position, the parking lights are still on and the headlight beams are lit, then if you push the turn signal lever switch forward, the headlight high beams will be turned on ... Pull the lever toward you, and it will be changed over to low beam.
The key takeaway here is that:
- Knob in the 1st Position, NO HEADLIGHTS for US models
- Knob in the 1st Position, LOW BEAMS work for other countries, including Japan-market
1974 B120 Owner's Manual (Page 10 ... 11)
LIGHT SWITCH
The light switch clearance lights, parking lights, headlights, taillights, license plate light and instrument panel lights.
With the light switch knob pulled on, the following lights will be on.1st position:
Clearance, parking, tail, license, instrument panel lights and then headlight low beams.
With the turn signal switch lever pulled up, the headlight low beams can be turned on.2nd position:
Headlights and other lights
If you push the turn signal switch lever forward, the headlight high beams will be turned on.

(Australia only)

1974 B120 Owner's Manual (Page 11 ... )
INSTRUMENT PANEL LIGHT CONTROL (For Australia only)
The instrument panel light control is integral with light switch. The brightness of instrument panel lights can be adjusted by turn the light switch knob.
Turning the knob clockwise will darken the instrument panel lights.

Turn Signal Switch and High Beam Switch Lever
1972 USA Owners manual (Page 12 ... ):
Pull the lever toward you, and it will be changed over to low beam
Hazard Warning Switch
1972 USA Owners manual (Page 13 ... ):
By pushing the tumbler switch, all the directional lights flash at the same time to warn other cars that some trouble happened in your car.
Wiper and Washer Switch
1972 USA Owners manual (Page 12 ... ):
To operate the washer, turn clockwise and hold the knob for a moment, or until there is enough fluid on the glass to wash off the dirt. Do not operate the washer for more than thirty seconds continuously.
Horn
1972 USA Owners manual (Page 13 ... ):
Sound the horn by depressing a horn button on either side of the steering wheel
Parking Brake Lever
1972 USA Owners manual (Page 13 ... ):
If the ignition switch is on when the parking brake lever is applied, the brake warning light will glow.
Heat Glass Switch
Heated rear (defrostable) window was Optional equipment.
1972 USA Owners manual (Page 13 ... ):
The rear heat glass incorporates a printed heating element to prevent frosting or icing