![[Datsun 1200 encyclopedia]](/wiki/upload/wiki.png)
| Revision as of 12:14, 22 February 2016 ddgonzal (Talk | contribs) (->Misc - moved to Flashers) <- Previous diff |
Current revision ddgonzal (Talk | contribs) |
||
| Line 1: | Line 1: | ||
| Nissan calls the dash assembly the "[[Instrument Panel]]". Both square-gauge type (Standard) and round-gauge type (Deluxe) are removed in the same way. | Nissan calls the dash assembly the "[[Instrument Panel]]". Both square-gauge type (Standard) and round-gauge type (Deluxe) are removed in the same way. | ||
| - | [http://datsun1200.com/modules/myalbum/photo.php?lid=5044 http://datsun1200.com/modules/myalbum/photos/thumbs/5044.jpg] | + | {{Dash_Navbox}} |
| - | [http://datsun1200.com/modules/myalbum/photo.php?lid=5045 http://datsun1200.com/modules/myalbum/photos/thumbs/5045.jpg] [http://datsun1200.com/modules/myalbum/photo.php?lid=5046 http://datsun1200.com/modules/myalbum/photos/thumbs/5046.jpg] | + | = Instrument Panel Mounting = |
| + | The dash unit (instrument panel) mounts to the firewall via three screws on the top side, and a bolt at each side, underneath. The sixty bolt is on the bottom of the dash. | ||
| - | Also see [[Wiring]] | + | {{Album|5044}} |
| - | Also see: [http://datsun1200.com/modules/nsections/index.php?op=viewarticle&artid=18 Dash Changes] for info on swapping Round-gauge cluster into a Standard-trim 1200. | + | The top screws are accessible close to the windshield. A right-angle Philips screwdriver can be used to remove/install them. |
| - | == Instrument Panel Mounting == | + | {{Album|5045}} |
| - | The dash unit (instrument panel) mounts to the firewall via three screws on the top side, and a bolt at each side, underneath. | + | |
| - | + | ||
| - | [http://datsun1200.com/modules/myalbum/photo.php?lid=5044 http://datsun1200.com/uploads/photos/5044.jpg] | + | |
| - | + | ||
| - | The top screws are accessible close to the windshield. A right-angle Philips screwdriver can be used to remove/install them. | + | |
| The three top brackets are welded to the [[Firewall#Cowl_Panels_.28Firewall_.26_Dash.29|Firewall]] | The three top brackets are welded to the [[Firewall#Cowl_Panels_.28Firewall_.26_Dash.29|Firewall]] | ||
| - | <br><img size=480>http://datsun1200.com/uploads/photos/24154.jpg</img> [http://datsun1200.com/modules/myalbum/photo.php?lid=24154 album] | + | <br>{{Album|24154}} |
| Top Center bracket is right above the heater | Top Center bracket is right above the heater | ||
| - | <br><img size=480>http://datsun1200.com/uploads/photos/24155.jpg</img> [http://datsun1200.com/modules/myalbum/photo.php?lid=24155 album] | + | <br>{{Album|24155}} |
| - | ==Dash Assembly Removal== | + | = Dash Assembly Removal = |
| - | [http://datsun1200.com/modules/myalbum/photo.php?lid=5028 http://datsun1200.com/modules/myalbum/photos/thumbs/5028.jpg] Dash assembly (LHD) | + | Dash assembly (LHD pictured) |
| + | <br>{{Album|5028}} | ||
| You will need to remove the dash assembly to remove the dash pad, troubleshoot wiring, or to replace/lubricate the wiper linkage. Having the dash out makes changing the radio easier, but you can alternatively do that by only removing the glove box to gain access. It also much easier to install a tachometer after removing the dash, but again that could be done by reaching up under the dash. | You will need to remove the dash assembly to remove the dash pad, troubleshoot wiring, or to replace/lubricate the wiper linkage. Having the dash out makes changing the radio easier, but you can alternatively do that by only removing the glove box to gain access. It also much easier to install a tachometer after removing the dash, but again that could be done by reaching up under the dash. | ||
| - | It would be a good idea to label each wire you remove with masking tape. Write on the tape what the wire is for so that when you put the dash back in you'll know which wire goes where. This is especially important for all the green wires (flashers and brake-pedal wires). If you get stuck, see the [[Wiring]] article but beware the wire colors vary for differents years. | + | It would be a good idea to label each wire you remove with masking tape. Write on the tape what the wire is for so that when you put the dash back in, you'll know which wire goes where. This is especially important for all the green wires (flashers and brake-pedal wires). If you get stuck, see the [[Wiring]] article but beware the wire colors vary for different years. |
| - | It's easiest to remove the entire dash (with gauges, radio, etc) '''after''' separating the wiring harness from the firewall. I've done it by removing wires from dash/gauges etc. and leaving the harness in the car, but it's much easier to separate the harness first from the car, then remove the whole thing. | + | It's easiest to remove the entire dash (with gauges, radio, etc.) '''after''' separating the wiring harness from the firewall. I've done it by removing wires from dash/gauges etc. and leaving the harness in the car, but it's much easier to separate the harness first from the car, then remove the whole thing. |
| You don't need to remove the steering column plastic cover or the steering wheel, though it is recommended, so that the cover doesn't break while maneuvering the dash. | You don't need to remove the steering column plastic cover or the steering wheel, though it is recommended, so that the cover doesn't break while maneuvering the dash. | ||
| - | === Overview === | + | == Overview == |
| Here are BASIC OVERVIEW steps: | Here are BASIC OVERVIEW steps: | ||
| - | # Disconnect battery | + | # Disconnect the [[battery]] |
| # Disconnect interior wiring harness connectors from dash harness | # Disconnect interior wiring harness connectors from dash harness | ||
| - | # Disconnect radio speakers and antenna cables | + | # Disconnect radio [[speakers]] and [[antenna]] cable |
| # Remove [[Package Tray]] if equipped | # Remove [[Package Tray]] if equipped | ||
| # Disconnect [[Speedometer]] cable from back of dash | # Disconnect [[Speedometer]] cable from back of dash | ||
| - | # Disconnect heater control | + | # Disconnect [[heater]] control |
| - | # Unbolt dash assembly | + | # '''Unbolt dash assembly''' |
| # Pull unit back and then out through passenger door | # Pull unit back and then out through passenger door | ||
| - | === Detailed Steps === | + | == Detailed Steps == |
| Here are DETAILED STEPS: | Here are DETAILED STEPS: | ||
| Step 1 | Step 1 | ||
| - | # Disconnect battery. There's live power in the dash assembly, so this is important | + | # Disconnect battery. There's live power in the dash assembly, so this is important. Only the Negative cable needs to be removed from the battery |
| - | # Reach up under dash and unscrew the speedometer cable from the housing | + | # Reach up under dash and unscrew the [[speedometer cable]] from the housing |
| - | # unbolt glove box: Open glove box door, then remove two tiny bottom screws, and two larger top screws. Leave the the latch bolted in. Pull the box out from behind | + | # Unbolt glove box |
| - | # remove the round clip holding the glove-box door swing arm. Then remove the little plastic rectangle. Then set the door in a safe place, it scratches easily | + | ## Open [[glovebox]] door, then remove two tiny bottom screws, and two larger top screws. Leave the latch bolted in. Pull the box out from behind |
| + | ## Remove the round clip holding the glove-box door swing arm. Then remove the little plastic rectangle. Then set the door in a safe place, it scratches easily | ||
| # Remove the two 12mm-head bolts holding the steering column to the dash assembly. The column will hang free just a bit, enough to get the dash out | # Remove the two 12mm-head bolts holding the steering column to the dash assembly. The column will hang free just a bit, enough to get the dash out | ||
| - | # remove the heater-defroster tubes (they simply pull free) | + | # Remove the heater-defroster tubes (they simply pull free) |
| - | # remove the ashtray | + | # Remove the ashtray |
| # On driver's side a-pillar, unplug the door switch wire, and if equipped, speaker wires | # On driver's side a-pillar, unplug the door switch wire, and if equipped, speaker wires | ||
| - | # unplug the ignition switch connector, and if equipped the two ACC wires | + | # Unplug the ignition switch connector, and — if equipped — the two ACC wires |
| Step 2 | Step 2 | ||
| - | # unplug the two Turn Signal switch connectors, the Hazard flasher green wire (but not white wire), the two brake pedal switch wires (GY), and the two T/S Flasher wires (GW, GL) | + | # Unplug the two Turn Signal switch connectors, the Hazard flasher green wire (but not white wire), the two brake pedal switch wires (GY), and the two T/S Flasher wires (GW, GL) |
| - | #: [http://datsun1200.com/modules/myalbum/photo.php?lid=5043 http://datsun1200.com/modules/myalbum/photos/thumbs/5043.jpg] | + | #: {{Album|5043}} |
| #: No. 2, No. 4 - Hazard and Turn Signal connectors | #: No. 2, No. 4 - Hazard and Turn Signal connectors | ||
| - | # unplug speaker wires (L/Gray) and antenna wire through glovebox opening | + | # Unplug the speaker wires (L/Gray) and antenna wire through glovebox opening |
| # Unplug passenger corner wiring (door switch wiring, and the plugs that come through the firewall) | # Unplug passenger corner wiring (door switch wiring, and the plugs that come through the firewall) | ||
| # Unplug the two wires for the heater (black, blue/white) | # Unplug the two wires for the heater (black, blue/white) | ||
| # Remove the three dash-top machine screws (visible through windshield) | # Remove the three dash-top machine screws (visible through windshield) | ||
| - | #: [http://datsun1200.com/modules/myalbum/photo.php?lid=5044 http://datsun1200.com/modules/myalbum/photos/thumbs/5044.jpg] | + | #: {{Album|5044}} |
| - | #: Be careful, these are philips-head, and strip easily. Use a No. 1 stubby or a L-shaped screwdriver tool. | + | #: Be careful, these are Philips-head, and strip easily. Use a No. 1 stubby or a L-shaped screwdriver tool |
| - | #: [http://datsun1200.com/modules/myalbum/photo.php?lid=5045 http://datsun1200.com/modules/myalbum/photos/thumbs/5045.jpg] | + | #: {{Album|5045}} |
| #: NOTE: the center bottom bolt doesn't seem to be on some/all dashes | #: NOTE: the center bottom bolt doesn't seem to be on some/all dashes | ||
| # Remove the dash-to-A pillar bolts: One on left bottom of dash, other on right. 10mm head | # Remove the dash-to-A pillar bolts: One on left bottom of dash, other on right. 10mm head | ||
| - | #: [http://datsun1200.com/modules/myalbum/photo.php?lid=5043 http://datsun1200.com/modules/myalbum/photos/thumbs/5043.jpg] | + | #: {{Album|5043}} |
| #: Dash-to-Pillar connector (far right, below No. 3) | #: Dash-to-Pillar connector (far right, below No. 3) | ||
| # Carefully pull dash away from firewall. Make sure the heater control levers are out of the slot | # Carefully pull dash away from firewall. Make sure the heater control levers are out of the slot | ||
| # Carefully and slowly pull dash assembly out passenger door. While doing so, check to ensure wires and heater control are all free | # Carefully and slowly pull dash assembly out passenger door. While doing so, check to ensure wires and heater control are all free | ||
| - | ==Clean Up and Maintenance== | + | {{Album|18121}} {{Album|18122}} {{Album|18123}} |
| + | |||
| + | = Clean Up and Maintenance = | ||
| Now that you have the dash out, it's the most convenient time for these tasks: | Now that you have the dash out, it's the most convenient time for these tasks: | ||
| * Tighten heater hoses (four clamps: three on one side, one on the other) | * Tighten heater hoses (four clamps: three on one side, one on the other) | ||
| * Ensure all the dash lights are working (see the [[Wiring]] article) | * Ensure all the dash lights are working (see the [[Wiring]] article) | ||
| - | * Wipe dust away from firewall, pedal box, heater box, etc | + | * Wipe dust away from firewall, pedal box, heater box, etc. |
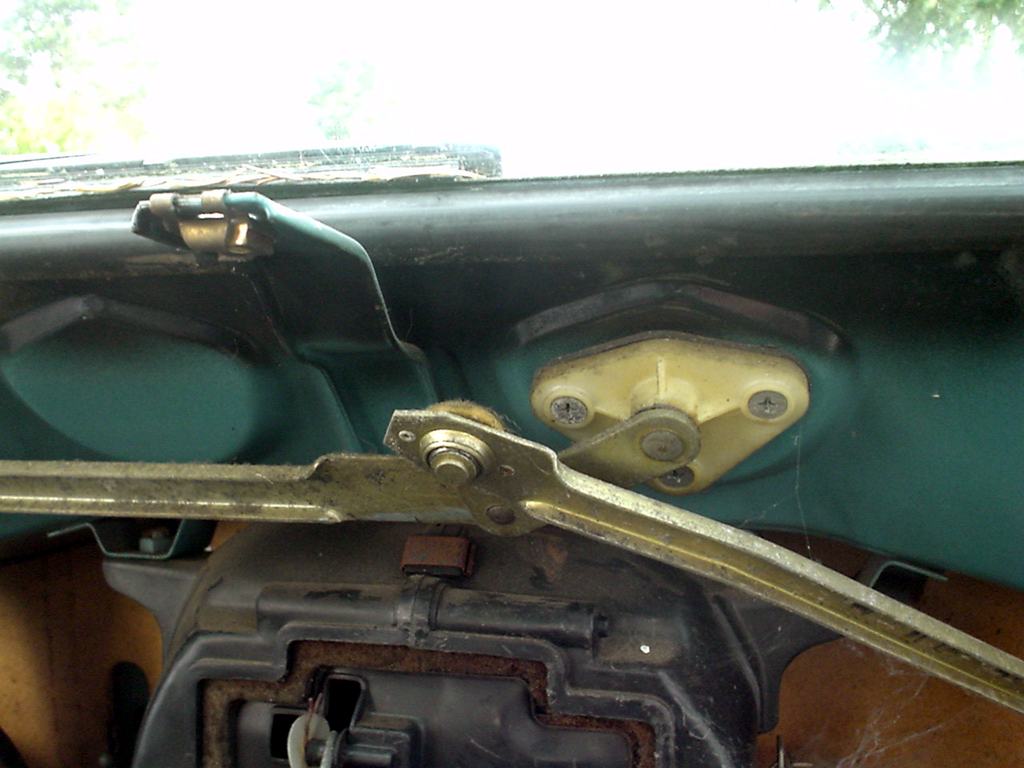
| - | * Lubricate the wiper linkage. This is a heim-joint/rose-joint type of system. Just put some general purpose grease on it as best you can and wipe off the excess. | + | * Lubricate the wiper linkage. This is a Heim-joint/rose-joint type of system. Just put some general-purpose grease on it as best you can and wipe off the excess. |
| - | * Align the dash defrost ducts. Mine had 1/8 gap. By loosing, moving and retightening, I've got a much better seal. Hopefully the heater will demist/defrost better now | + | * Align the dash defrost ducts. Mine had 1/8 gap. By loosening, moving and retightening, I've got a much better seal. Hopefully the heater will demist/defrost better now |
| - | * clean the heater ducts (if you feel like it) | + | * Clean the heater ducts (if you feel like it) |
| * Lubricate pedal shaft | * Lubricate pedal shaft | ||
| * Lubricate hood-opener (bonnet lever) | * Lubricate hood-opener (bonnet lever) | ||
| Line 90: | Line 90: | ||
| * Wash dash with mild cleaning solution | * Wash dash with mild cleaning solution | ||
| * Remove dash pad and paint it with vinyl/upholstery paint | * Remove dash pad and paint it with vinyl/upholstery paint | ||
| - | *: flat black or or semi-gloss? | + | *: flat black or semi-gloss? |
| - | *: [http://datsun1200.com/modules/newbb/viewtopic.php?topic_id=14100&forum=1 satin black] | + | *: [{{Post|59939}} satin black] |
| - | ==Removing the Dash Pad== | + | = Removing the Dash Pad = |
| If you need to ... | If you need to ... | ||
| - | + | The dash pad is held on by eight small screws on inside of dash (four near top, four near bottom). | |
| - | The dash pad is held on by eight small screws on inside of dash (four near top, four near bottom). | + | |
| - | + | ||
| But first you need to remove the "Cluster Lid" (gauge assembly) ... | But first you need to remove the "Cluster Lid" (gauge assembly) ... | ||
| + | = Cluster Lid Removal = | ||
| + | The cluster lid is held in place mostly by the knobs (Radio, Wiper Switch, Lighting Switch and Choke). | ||
| - | == Cluster Lid Removal and Replacement == | + | {{Main|Cluster lid Removal and Replacement}} |
| - | The "Cluster Lid" can be removed with the dash in the car, if you remove the steering column plastic cover. Some say you need to remove the steering wheel as well, but it is not necessary. Of course it is easiest of all if the the dash assembly is out of the car. | + | |
| - | + | ||
| - | [http://datsun1200.com/modules/myalbum/photo.php?lid=3068 http://datsun1200.com/modules/myalbum/photos/thumbs/3068.jpg] cluster gauge [http://datsun1200.com/modules/myalbum/photo.php?lid=3376 http://datsun1200.com/modules/myalbum/photos/thumbs/3376.jpg] | + | |
| - | + | ||
| - | Removing the instrument panel cluster lid is not too difficult. It is needed to replace the [[Speedometer]] as well as the [[Instrument Panel |fuel gauge, temperature gauge, or instrument voltage regulator]]. It is also recommended when replacing burned out [[Lighting System|bulbs]] (though you can replace the bulbs without removing the cluster). | + | |
| - | + | ||
| - | [http://datsun1200.com/modules/myalbum/photo.php?lid=5025 http://datsun1200.com/modules/myalbum/photos/thumbs/5025.jpg] | + | |
| - | Testing lights [http://datsun1200.com/modules/myalbum/photo.php?lid=4346 http://datsun1200.com/modules/myalbum/photos/thumbs/4346.jpg] temp | + | |
| - | + | ||
| - | When replacing the [[Clock]] or [[Tachometer]] it is also recommended. Sometimes you can do it without removing the cluster, but the wiring is not easy to get to. | + | |
| - | + | ||
| - | + | ||
| - | === Instructions === | + | |
| - | The only tool needed to remove and replace the cluster is: | + | |
| - | * No. 1 (small) philips head screwdriver | + | |
| - | + | ||
| - | Instructions | + | |
| - | * Remove top half of steering column shroud | + | |
| - | *: [http://datsun1200.com/modules/myalbum/photo.php?lid=2136 http://datsun1200.com/modules/myalbum/photos/thumbs/2136.jpg] | + | |
| - | * Remove the two heater control knobs. The fan knob has a tiny philips screw on the bottom. The cold-hot lever may also have a screw (I've seen it both ways) so if you don't see a screw, simply pull the knob off | + | |
| - | *: [http://datsun1200.com/modules/myalbum/photo.php?lid=2126 http://datsun1200.com/modules/myalbum/photos/thumbs/2126.jpg] | + | |
| - | * Pull the Radio knobs off. Then remove the shaft nuts. Remove faceplate | + | |
| - | *: [http://datsun1200.com/modules/myalbum/photo.php?lid=5023 http://datsun1200.com/modules/myalbum/photos/thumbs/5023.jpg] | + | |
| - | * Behind dash | + | |
| - | ** Unplug the round cluster wiring connector. On the back of the gauge assembly, pull the main round gauge connector off. Just rock it off, there is no screw holding it on | + | |
| - | **: [http://datsun1200.com/modules/myalbum/photo.php?lid=5024 http://datsun1200.com/modules/myalbum/photos/thumbs/5024.jpg] | + | |
| - | ** If the Speedo cable is still attached, reach up under the dash and unscrew it | + | |
| - | ** At the bottom of the gauge cluster (behind dash face) are two screws holding it to the bottom of the dash metal. (if you can't find them, wait until the last step. When the cluster is loose you'll see how the bottom is fastened to the dash frame) | + | |
| - | **: [http://datsun1200.com/modules/myalbum/photo.php?lid=5043 http://datsun1200.com/modules/myalbum/photos/thumbs/5043.jpg] | + | |
| - | **: Cluster bottom screw (above connector No. 5) | + | |
| - | **: Unscrew both these screws (only one is visible in the photo). You may need to lie on your back with a flashlight to see these. Use a No. 1 Philips stubby screwdriver. | + | |
| - | ***: [http://datsun1200.com/modules/myalbum/photo.php?lid=19669 http://datsun1200.com/modules/myalbum/photos/thumbs/19669.jpg] look for screw below tachometer | + | |
| - | ***: The other screw is below the multi-gauge (on other side of steering column) | + | |
| - | * Remove 4 knobs from face. IMPORTANT: there are a flat washer on the back side of each switches, don't lose it | + | |
| - | ** Choke knob (if equipped). TIP: for the choke cable, pull it all the way out, grip the shaft with pliers, then push-n-turn the knob | + | |
| - | ** Wiper knob and nut. Simply push in and turn counter-clockwise 1/4 turn. Then pull off. Unscrew the nut with your fingers. | + | |
| - | **: [http://datsun1200.com/modules/myalbum/photo.php?lid=2028 http://datsun1200.com/modules/myalbum/photos/thumbs/2028.jpg] | + | |
| - | ** Headlight switch knob and nut. Removes same way as wiper switch. | + | |
| - | ** Cigarette lighter. Reach up from under dash and unscrew the housing (unscrew the collar of the lighter from the back). Then the lighter body pulls straight out of the lid. Pull the L (blue) wire off the cigarette lighter when you can see it. | + | |
| - | + | ||
| - | Finally: | + | |
| - | # Open glovebox door to prevent the dash from scratching the side of the door. | + | |
| - | # Push the headlight switch and wiper switch through | + | |
| - | # Tilt the top of the cluster out. Pull towards you and up. It should come right out. | + | |
| - | ==Reinstall== | + | = {{RefNo|Reinstall|}} Reinstallation = |
| This is actually the hardest part ... | This is actually the hardest part ... | ||
| Fit the dash assembly back into place through passenger door: | Fit the dash assembly back into place through passenger door: | ||
| # Place dash assembly into the general area, then make sure the heater levers come through the slots before setting it fully on the three firewall brackets | # Place dash assembly into the general area, then make sure the heater levers come through the slots before setting it fully on the three firewall brackets | ||
| - | # bottom of dash fits between pedal box and steering column brackets | + | # The bottom of the dash fits between the pedal box and steering column brackets |
| - | # The hardest part for me was putting the two bolts back in for the heater control. These are screwed in behind the dash, so a mirror is helpful. If the radio is out, it makes it easier. In any case, remove the ashtray base (three screws), so you can reach up under the lever assembly. Use a #1 phillips (large screwdriver) to avoid stripping the bolt heads. | + | # The hardest part for me was putting the two bolts back in for the heater control. These are screwed in behind the dash, so a mirror is helpful. If the radio is out, it makes it easier. In any case, remove the ashtray base (three screws), so you can reach up under the lever assembly. Use a #1 (large) Phillips screwdriver to avoid stripping the bolt heads. |
| - | # hook up the wires | + | # Hook up the wires |
| - | # put the three dash-top machine screws in, loosely | + | # Put the three dash-top machine screws in, loosely |
| - | # put the right and left dash-to-A pillar bolts in, then tighten the dash-top screws | + | # Put the right and left dash-to-A pillar bolts in, then tighten the dash-top screws |
| - | # replace and tighten the two 12mm-head steering column bolts | + | # Replace and tighten the two 12mm-head steering column bolts |
| - | # reach up under dash and screw speedometer cable into back of housing | + | # Reach up under dash and screw speedometer cable into back of housing |
| # Reconnect the battery, test the lights and ignition | # Reconnect the battery, test the lights and ignition | ||
| - | [[Category:Body Electrical System]] | + | [[Category:Body Electrical System]]{{End}} |
Current revision
Nissan calls the dash assembly the "Instrument Panel". Both square-gauge type (Standard) and round-gauge type (Deluxe) are removed in the same way.
|  |
Contents |
Instrument Panel Mounting
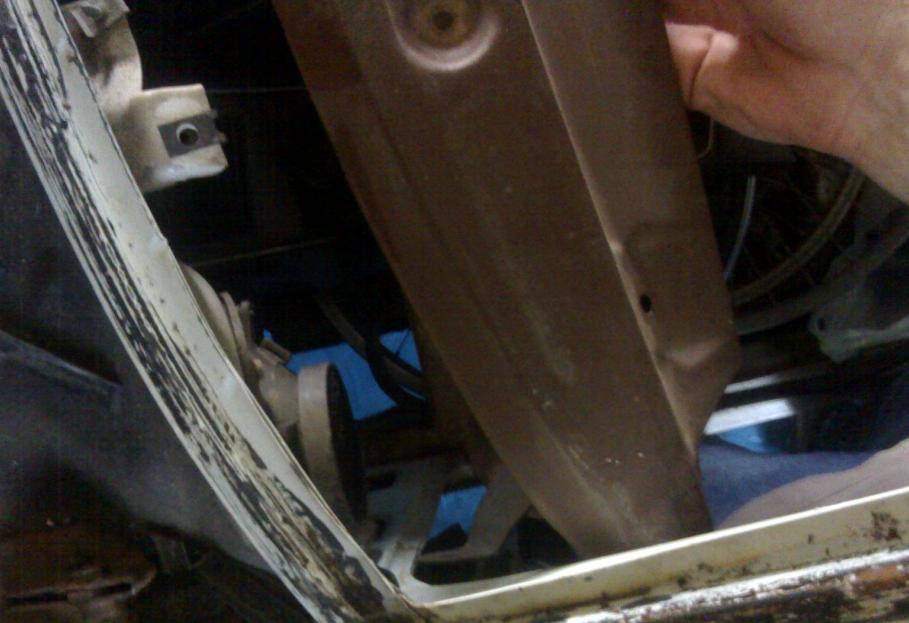
The dash unit (instrument panel) mounts to the firewall via three screws on the top side, and a bolt at each side, underneath. The sixty bolt is on the bottom of the dash.
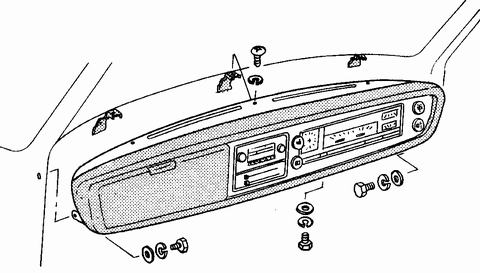
The top screws are accessible close to the windshield. A right-angle Philips screwdriver can be used to remove/install them.
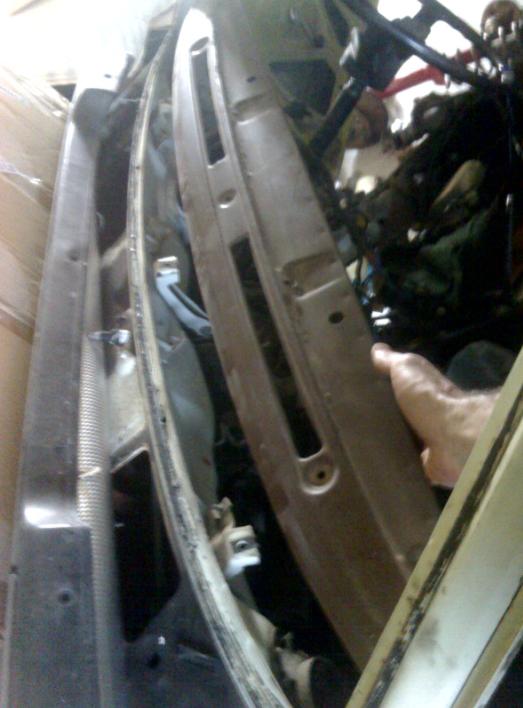
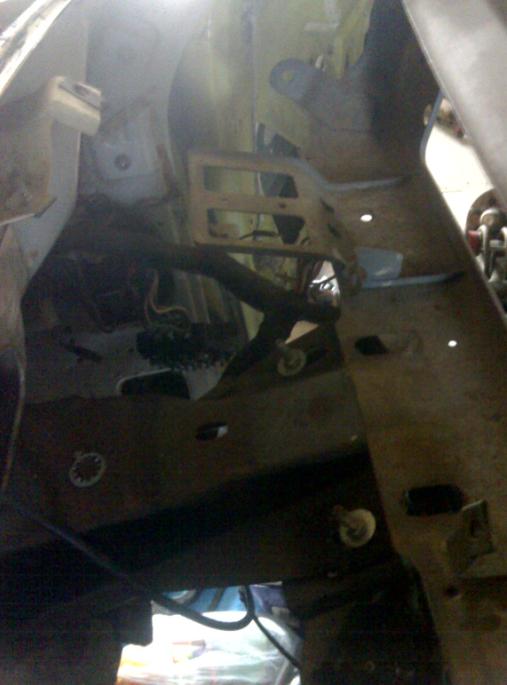
The three top brackets are welded to the Firewall
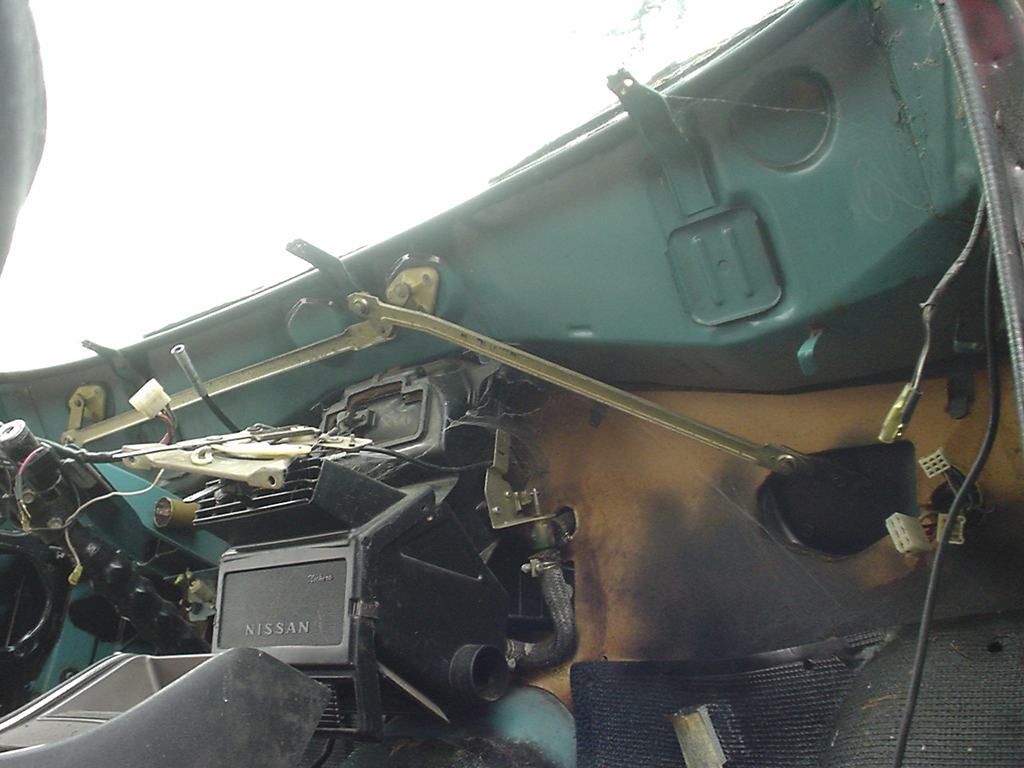
Top Center bracket is right above the heater
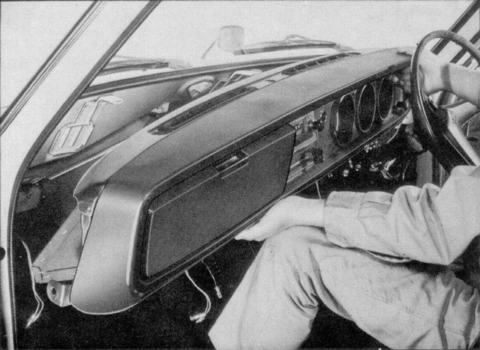
Dash Assembly Removal
Dash assembly (LHD pictured)
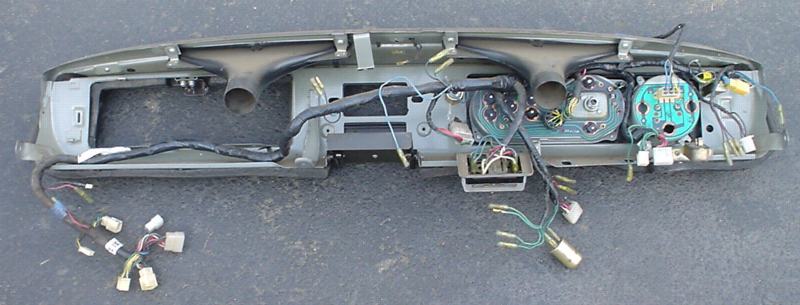
You will need to remove the dash assembly to remove the dash pad, troubleshoot wiring, or to replace/lubricate the wiper linkage. Having the dash out makes changing the radio easier, but you can alternatively do that by only removing the glove box to gain access. It also much easier to install a tachometer after removing the dash, but again that could be done by reaching up under the dash.
It would be a good idea to label each wire you remove with masking tape. Write on the tape what the wire is for so that when you put the dash back in, you'll know which wire goes where. This is especially important for all the green wires (flashers and brake-pedal wires). If you get stuck, see the Wiring article but beware the wire colors vary for different years.
It's easiest to remove the entire dash (with gauges, radio, etc.) after separating the wiring harness from the firewall. I've done it by removing wires from dash/gauges etc. and leaving the harness in the car, but it's much easier to separate the harness first from the car, then remove the whole thing.
You don't need to remove the steering column plastic cover or the steering wheel, though it is recommended, so that the cover doesn't break while maneuvering the dash.
Overview
Here are BASIC OVERVIEW steps:
- Disconnect the battery
- Disconnect interior wiring harness connectors from dash harness
- Disconnect radio speakers and antenna cable
- Remove Package Tray if equipped
- Disconnect Speedometer cable from back of dash
- Disconnect heater control
- Unbolt dash assembly
- Pull unit back and then out through passenger door
Detailed Steps
Here are DETAILED STEPS:
Step 1
- Disconnect battery. There's live power in the dash assembly, so this is important. Only the Negative cable needs to be removed from the battery
- Reach up under dash and unscrew the speedometer cable from the housing
- Unbolt glove box
- Open glovebox door, then remove two tiny bottom screws, and two larger top screws. Leave the latch bolted in. Pull the box out from behind
- Remove the round clip holding the glove-box door swing arm. Then remove the little plastic rectangle. Then set the door in a safe place, it scratches easily
- Remove the two 12mm-head bolts holding the steering column to the dash assembly. The column will hang free just a bit, enough to get the dash out
- Remove the heater-defroster tubes (they simply pull free)
- Remove the ashtray
- On driver's side a-pillar, unplug the door switch wire, and if equipped, speaker wires
- Unplug the ignition switch connector, and — if equipped — the two ACC wires
Step 2
- Unplug the two Turn Signal switch connectors, the Hazard flasher green wire (but not white wire), the two brake pedal switch wires (GY), and the two T/S Flasher wires (GW, GL)
-
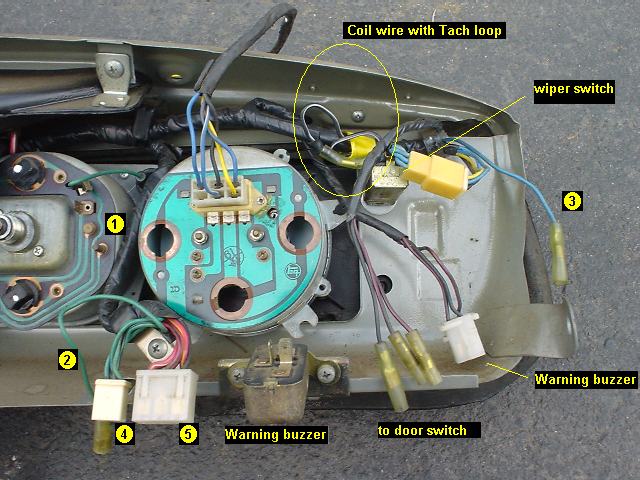
- No. 2, No. 4 - Hazard and Turn Signal connectors
-
- Unplug the speaker wires (L/Gray) and antenna wire through glovebox opening
- Unplug passenger corner wiring (door switch wiring, and the plugs that come through the firewall)
- Unplug the two wires for the heater (black, blue/white)
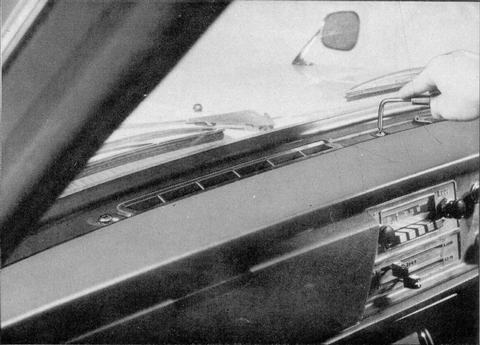
- Remove the three dash-top machine screws (visible through windshield)
-
- Be careful, these are Philips-head, and strip easily. Use a No. 1 stubby or a L-shaped screwdriver tool
-
- NOTE: the center bottom bolt doesn't seem to be on some/all dashes
-
- Remove the dash-to-A pillar bolts: One on left bottom of dash, other on right. 10mm head
-
- Dash-to-Pillar connector (far right, below No. 3)
-
- Carefully pull dash away from firewall. Make sure the heater control levers are out of the slot
- Carefully and slowly pull dash assembly out passenger door. While doing so, check to ensure wires and heater control are all free
Clean Up and Maintenance
Now that you have the dash out, it's the most convenient time for these tasks:
- Tighten heater hoses (four clamps: three on one side, one on the other)
- Ensure all the dash lights are working (see the Wiring article)
- Wipe dust away from firewall, pedal box, heater box, etc.
- Lubricate the wiper linkage. This is a Heim-joint/rose-joint type of system. Just put some general-purpose grease on it as best you can and wipe off the excess.
- Align the dash defrost ducts. Mine had 1/8 gap. By loosening, moving and retightening, I've got a much better seal. Hopefully the heater will demist/defrost better now
- Clean the heater ducts (if you feel like it)
- Lubricate pedal shaft
- Lubricate hood-opener (bonnet lever)
- Lubricate heater lever assembly (dry grease) and cables
- Lubricate accelerator pedal pivot point
- Wash dash with mild cleaning solution
- Remove dash pad and paint it with vinyl/upholstery paint
- flat black or semi-gloss?
- POST satin black
Removing the Dash Pad
If you need to ...
The dash pad is held on by eight small screws on inside of dash (four near top, four near bottom).
But first you need to remove the "Cluster Lid" (gauge assembly) ...
Cluster Lid Removal
The cluster lid is held in place mostly by the knobs (Radio, Wiper Switch, Lighting Switch and Choke).
Reinstallation
This is actually the hardest part ...
Fit the dash assembly back into place through passenger door:
- Place dash assembly into the general area, then make sure the heater levers come through the slots before setting it fully on the three firewall brackets
- The bottom of the dash fits between the pedal box and steering column brackets
- The hardest part for me was putting the two bolts back in for the heater control. These are screwed in behind the dash, so a mirror is helpful. If the radio is out, it makes it easier. In any case, remove the ashtray base (three screws), so you can reach up under the lever assembly. Use a #1 (large) Phillips screwdriver to avoid stripping the bolt heads.
- Hook up the wires
- Put the three dash-top machine screws in, loosely
- Put the right and left dash-to-A pillar bolts in, then tighten the dash-top screws
- Replace and tighten the two 12mm-head steering column bolts
- Reach up under dash and screw speedometer cable into back of housing
- Reconnect the battery, test the lights and ignition