![[Datsun 1200 encyclopedia]](/wiki/upload/wiki.png)
| Revision as of 04:02, 17 July 2007 Ddgonzal (Talk | contribs) <- Previous diff |
Current revision ddgonzal (Talk | contribs) (->Flex Plate) |
||
| Line 1: | Line 1: | ||
| - | Automatic-equipped cars had a significantly larger front tunnel area. The rear of the tunnel is the same. For this reason you can easily convert an Auto car to a Manual car. Going to automatic you, may need to modify the tunnel. | + | Automatic-equipped cars had a significantly larger front tunnel area (the rear of the tunnel is the same). For this reason you can easily convert an Auto car to a Manual car. |
| - | If you convert your originally automatic 1200 to a manual, you will notice that you have barely any room between the gas and brake pedals and you have to do tip-toe driving to make it work. | + | = Overview = |
| + | Source all the manual transmission and clutch parts from a wrecked 1200, and the swap is easy. Trying to obtain all the parts piece by piece is a chore. | ||
| - | Replace the auto pedals with its larger brake pedal with the standard setup that has small brake pedal and clutch pedal. | + | The only downside of converting your originally-automatic 1200 to a manual, you will notice that you have barely any room between the gas and brake pedals and you have to do tip-toe driving to make it work. |
| + | Also see: [[Automatic Transmission|Automatic Transmission Overview]] | ||
| - | # 'Bridge' the start inhibit wires that go to the auto gearbox | + | Auto vs 60 |
| - | # Replace the spacer in pedal box with clutch pedal (requires removal of dash and pedal box) | + | <br>{{Album|6270}} |
| + | |||
| + | # Add [[#clutch pedal]] | ||
| # Knock out the clutch firewall hole blanking plate | # Knock out the clutch firewall hole blanking plate | ||
| - | ## In manual cars there are nuts welded from factory on the inside but autos don't. You can either put bolts and nuts thru the holes or weld some | + | #* RHD: Install clutch cable |
| - | # Install clutch cable | + | #* LHD: Install clutch Master and Slave cylinders |
| - | # Engine: remove flex plate and spacer | + | # [[Automatic removal and installation|Remove automatic gearbox]] |
| - | ## add pilot bushing (if not already fitted) | + | # remove gearbox vacuum hose at intake manifold and plug opening |
| + | # Engine | ||
| + | ## remove [[#flex plate|#flex plate and spacer]] | ||
| + | ## add [[#pilot bushing]] (if not already fitted) | ||
| ## add flywheel, clutch disc and pressure plate | ## add flywheel, clutch disc and pressure plate | ||
| - | # Mount: either weld new mounts in or make a new crossmember | + | ## add or remove engine plate to match the manual transmission |
| - | # Replace gearbox and auto tailshaft with manual versions | + | # Mount: modify the [[#Rear Engine Mount|#mount]] or make a new crossmember |
| + | # Install manual transmission | ||
| + | # Install manual transmission [[#driveshaft]] (tailshaft) | ||
| + | # Fill transmission with [[Transmission_Overview#Lubricants|GL-4 gear oil]] | ||
| + | # Install [[#clutch cable]] or [[#hydraulic clutch]] system and adjust the clutch | ||
| + | # Modify [[#wiring]] for starter and reverse lights | ||
| - | The speedo cable is the same. | + | Auto gearbox mounts are different than manual mounts, but the shifter hole in the tunnel is in the same place (the rear portion of the tunnel is the same). Reportedly 5-speed (60-series?) fits on the automatic crossmember -- pure bolt in. If not a simple fabrication to the mount will suffice. See [[Gearbox Crossmember]]. |
| + | |||
| + | = Parts Required = | ||
| + | New Parts: | ||
| + | * [[#Pilot bearing]] | ||
| + | * [[Release Bearing]] | ||
| + | * [[56-Series_Transmission_Parts#Output_Shaft_Seal|Output shaft seal]] (optional) | ||
| + | Matching parts: | ||
| + | * Manual transmission | ||
| + | * [[Engine Plate|engine rear plate]] (if the tranmission used it) | ||
| + | * [[#Flywheel]] (to match transmission) | ||
| + | * Clutch [[Release Bearing#Sleeve|release bearing Sleeve]] | ||
| + | Clutch parts: | ||
| + | * [[#Clutch pedal]] | ||
| + | * [[Clutch]] disk and pressure plate | ||
| + | * Clutch Release Arm & dust boot | ||
| + | * RHD [[#Clutch cable]] | ||
| + | * LHD ([[Hydraulic clutch]]) | ||
| + | Clutch master cylinder | ||
| + | Clutch slave cylinder with matching pushrod | ||
| + | Clutch hard line | ||
| + | Clutch hose | ||
| + | Engine Parts: | ||
| + | * [[Crankshaft#Flywheel_Bolts|Flywheel bolts]] | ||
| + | Fluids: | ||
| + | * (LHD only) pint of DOT3 brake fluid for clutch system | ||
| + | * Dabs of multipurpose grease | ||
| + | - for clutch disk splines | ||
| + | - for release lever | ||
| + | - for rear seal | ||
| + | * A bit of clean motor oil for pilot bushing | ||
| + | * [[Transmission_Overview#Lubricants|GL-4 gear oil]] | ||
| + | [[#Shifter]] | ||
| + | * Shift lever | ||
| + | * Shifter boot (fits into hole in tunnel) | ||
| + | * Transmission boot | ||
| + | |||
| + | NOTE: The speedometer cable is the same | ||
| + | |||
| + | Release bearing SLEEVE | ||
| + | <br>{{Album|23061}} | ||
| + | |||
| + | = Transmission = | ||
| + | Sourcing a [[Transmission|manual transmission]] from a 1200 obviously will work in your 1200. But larger transmissions from B210 or B310 will also work, including 5-speeds. | ||
| + | |||
| + | :Be sure to get all the matching parts including shifter, driveshaft, flywheel and clutch. | ||
| + | |||
| + | = Clutch Pedal = | ||
| + | Replace the automatic Pedal box assembly, which has a large brake pedal, with the standard setup that has small brake pedal and clutch pedal. Only a 1200 pedal box fits (B210 does not fit). | ||
| + | |||
| + | {{SeeMainArticle|Pedal Box|20631}}} | ||
| + | |||
| + | Alternatively, you can add a clutch pedal to the automatic pedal box. Replace the spacer in pedal box with clutch pedal (requires removal of dash and pedal box, and bending the brake pedal to gain clearance). | ||
| + | |||
| + | == Clutch Cable == | ||
| + | RHD cars: bolt [[Clutch Cable]] to firewall, connect to transmission, and perform [[Clutch Adjustment]] | ||
| + | |||
| + | == Hydraulic Clutch == | ||
| + | LHD cars: | ||
| + | # Knock out the clutch firewall hole blanking plate | ||
| + | #* In manual cars there are nuts welded from factory on the inside but autos don't. | ||
| + | #* You can either put bolts and nuts thru the holes or weld nuts to it | ||
| + | # Install clutch master cylinder | ||
| + | # Fit hard line from master down under the tunnel | ||
| + | # Fit clutch hose from hard line to slave cylinder | ||
| + | # Perform [[Clutch Adjustment]] | ||
| - | Gearbox mounts are different, but is the shifter hole in the tunnel is in the same place (the rear portion of the tunnel is the same). | + | See Main Article: [[Hydraulic clutch]] |
| + | http://datsun1200.com/uploads/photos/537.JPG | ||
| = Shifter = | = Shifter = | ||
| - | Shifter came with a console. | + | Automatic shifter come with a [[Console]]. You can retain the console, simply remove the selector panel out of it. |
| + | <br>{{Album|13667}} | ||
| + | # Remove [[Console]] | ||
| + | # Remove [[Automatic Shifter]] | ||
| + | # Remove shifter plate from console | ||
| + | {{Photo!|fPOfNh0.jpg}} | ||
| - | =Driveshaft = | + | The shifter boot will have to be used from another type of car because the automatic hole is larger than the standard shifter hole. Reportedly a boot from a 1980s Ford Escort will fit. |
| - | The automatic has a larger spline. So use the auto driveshaft with auto transmission. Remember that B110 and B210 [[Driveshaft]] is the same. The B210 and B110 driveshafts are the same length. Only automatic vs manual lengths are different. | + | <br>{{Album|25231}} |
| + | |||
| + | * [[Shifter|Shift lever]] | ||
| + | {{Album|18191}} | ||
| + | |||
| + | * [[Shifter#Boots|small transmission boot]] (fits gearbox) | ||
| + | {{Album|19139|jpg|240}} | ||
| + | * [[Shifter#Shifter_Bushes|Shifter bushings]] (if they are damaged) | ||
| + | {{Album|23575|jpg|240}} | ||
| + | |||
| + | = Driveshaft = | ||
| + | The automatic driveshaft ([[Propeller Shaft]]) has a larger spline. Automatic vs manual lengths are also different. So obtain the M/T driveshaft. Remember that B110 and 1974 B210 driveshafts are the same, including length. The 1975-1978 B210 driveshafts have a different flange. | ||
| + | |||
| + | Note: [[Australian-assembled]] sedans use a unique tailshaft. | ||
| + | |||
| + | See Main Article: [[Propeller Shaft Swaps]] | ||
| + | |||
| + | {{Photo!|P1010125.jpg}} | ||
| = Rear Engine Mount = | = Rear Engine Mount = | ||
| - | The rear engine mount, also called the "transmission crossmember" is mounted about six inches further back. | + | See main article: [[Gearbox Crossmember]] |
| + | The rear engine mount, also called the "transmission crossmember" is mounted about a little further back. So you have two choices: | ||
| - | === Part Numbers === | + | * Unweld auto crossmember mount points in the tunnel, and weld in manual mount points. Then fit manual crossmber |
| + | |||
| + | OR | ||
| + | |||
| + | * Use a customized crossmember or mount | ||
| + | |||
| + | Customized mount, with 2nd set of bolts | ||
| + | <br>{{Album|17841}} | ||
| + | |||
| + | 4-speed mount | ||
| + | <br>{{Album|884}} | ||
| + | |||
| + | auto mount | ||
| + | <br>{{Album|2133}} | ||
| + | |||
| + | B210 and B310 have multiple crossmember mounting hole locations: | ||
| + | <br>{{Album|1960}} | ||
| + | <br>The B210 has a single set, which differs between auto and manual cars. | ||
| + | |||
| + | == Part Numbers == | ||
| Rubber Mount | Rubber Mount | ||
| * 11321-H1000 ASSY-INSULATOR ENGINE MOUNTING REAR Manual trans | * 11321-H1000 ASSY-INSULATOR ENGINE MOUNTING REAR Manual trans | ||
| Line 42: | Line 162: | ||
| * 11322-H1002 MEMBER-ENGINE MOUNTING REAR Manual | * 11322-H1002 MEMBER-ENGINE MOUNTING REAR Manual | ||
| * 11322-H1020 MEMBER-ENGINE MOUNTING REAR Automatic | * 11322-H1020 MEMBER-ENGINE MOUNTING REAR Automatic | ||
| - | |||
| NOTE: B210 parts number are different from B110, but reportedly fit the same. | NOTE: B210 parts number are different from B110, but reportedly fit the same. | ||
| - | + | = Engine Differences = | |
| - | == Engine Differences == | + | |
| == Carburetor == | == Carburetor == | ||
| - | For emission controls, the carb differed. However you can use any carb with an automatic. | + | For emission controls, the [[carburetor]] differed. However you can use any carburetor with either transmission. |
| == Distributor == | == Distributor == | ||
| - | Auto cars had a different distributor curve for emission control. However you can use any distributor with an automatic. | + | Auto cars had a different distributor curve for emission control. However you can use any distributor with either transmission. |
| == Clutch Fittings == | == Clutch Fittings == | ||
| - | |||
| Automatic cars don't have: | Automatic cars don't have: | ||
| * Clutch pedal | * Clutch pedal | ||
| Line 62: | Line 179: | ||
| * Clutch cable (RHD models) | * Clutch cable (RHD models) | ||
| These parts can be swapped from a manual car. | These parts can be swapped from a manual car. | ||
| + | |||
| + | On the US AT models the hole for the clutch master is there but is covered up with a sheet metal cover that is spot welded in place. Takes a cold chisel, hammer, and some patience to uncover. The mounting studs need to be sourced as they are missing. | ||
| + | |||
| + | On RHD, grind off the plate where the clutch cable comes out of the fire wall and get some nuts to bolt the thing to the firewall. | ||
| == Starter Motor == | == Starter Motor == | ||
| - | [[Starter]] for automatic transmission differs from starter for manual transmission. But otherwise A12 & A14 starters interchange. | + | [[Starter]] for automatic transmission differs from starter for manual transmission. But they interchange. And both A12 & A14 starters interchange. |
| + | = Crankshaft = | ||
| == Flex Plate == | == Flex Plate == | ||
| - | Automatics don't use a flywheel, the torque convertor has enough mass to act as the flywheel. They use a thin "flex plate" with has the ring gear teeth for the starter. | + | Automatics don't use a flywheel, as the torque convertor has enough mass to act as a flywheel. They use a thin "flex plate" with ring gear teeth for the starter. |
| - | [http://datsun1200.com/modules/myalbum/photo.php?lid=5329 http://datsun1200.com/modules/myalbum/photos/thumbs/5329.jpg] flex plate | + | # Unbolt the flex plate |
| + | # Pull the crankshaft adapter off (see Spacer section below) | ||
| - | Also note the crankshaft adapter. | + | == Spacer == |
| + | Engine fitted with an automatic has a spacer on the end of the crankshaft that has to be removed to mate to the manual transmission. | ||
| - | You can use the flywheel off the A14 on the A15. The thing to look at is the back of your A15's crankshaft -- make sure it has the hole for the trans pilot shaft bearing. | + | spacer |
| + | <br>{{Album|9419}} | ||
| - | == Crankshaft == | + | == Pilot Bearing == |
| + | spigot bush/pilot bushing | ||
| - | the A-14 engine with an automatic has a lip on the end of the crankshaft that might have to be ground down with a grinder to mate to the manual tranny. Then you will be set to mate them together. | + | {{SeeMainArticle|Pilot Bushing|25418}} |
| - | = Kick down Switch = | + | The thing to look at is the back of your crankshaft -- make sure it has the hole for the transmission pilot shaft bearing. If the bushing is missing, buy a new one and lightly tap into place. |
| - | Check around the top of the throttle pedal, with autos there should be either a bracket for the kick down switch,or maybe the switch is still there | + | |
| + | = Flywheel = | ||
| + | You can use the flywheel off an A12, A14 or A15 -- as long as you get the matching setup. | ||
| + | |||
| + | Matching parts | ||
| + | * Flywheel | ||
| + | * Transmission | ||
| + | * Engine rear plate | ||
| + | * Clutch release bearing sleeve | ||
| + | |||
| + | If you obtain all these parts from the same car (B110, B210 or B310) then you will have no problem. If mixing and matching, be aware that only certain combinations will work - see [[Release Bearing]]. | ||
| = Tunnel= | = Tunnel= | ||
| - | The Auto body has seperate tunnel and floor. The tunnel is spot welded in. The seam is clearly noticeable on the firewall at the back of the engine. | + | The automatic tunnel is designed to fit the 71-series [[automatic]], so the smaller manual transmission fits no problem. Even large Nissan manual transmissions will fit in it - handy for an [[Engine Swaps|engine swap]]. |
| - | Manual body has one piece floor and tunnel, no joins whatsoever. Bellhouseing part of tunnel is one piece with firewall. | + | {{SeeMainArticle|Tunnel|18963}} |
| + | Conclusion: No change needed. | ||
| - | [http://datsun1200.com/modules/myalbum/photo.php?lid=7475 http://datsun1200.com/modules/myalbum/photos/thumbs/7475.jpg] auto [http://datsun1200.com/modules/myalbum/photo.php?lid=7476 http://datsun1200.com/modules/myalbum/photos/thumbs/7476.jpg] std | + | = Cooling = |
| + | The standard radiator was used on automatic transmission 1200s, but a plastic shroud was fitted. However the standard radiator is not really large enough to cool the engine properly. | ||
| + | |||
| + | See main article: [[Radiator Upgrades]] | ||
| + | |||
| + | Autos used: | ||
| + | * (optional) larger radiator. A B210 radiator is a direct bolt-in | ||
| + | * Radiator Shroud | ||
| + | * (optional) Flex fan | ||
| + | |||
| + | All are a good idea for standard or manual transmission cars. | ||
| + | |||
| + | = Kick down Switch = | ||
| + | Check around the top of the throttle pedal, with autos there should be either a bracket for the kick down switch,or maybe the switch is still there. | ||
| + | You will no longer need this switch. It can be left in place. | ||
| + | = Wiring = | ||
| + | Automatic equipped cars have an inhibitor switch. This prevents the engine from being started unless the auto is in P or N (park or neutral). The switch is on the Automatic transmission. See [[Automatic_Transmission#Inhibitor_Switch]]. | ||
| - | [http://datsun1200.com/modules/myalbum/photo.php?lid=8197 http://datsun1200.com/modules/myalbum/photos/thumbs/8197.jpg] | + | Bridge these start inhibit wires that originally went to the auto gearbox. |
| + | There is a 6-terminal wiring connector on the firewall just above the rocker cover. | ||
| + | <br>{{Album|21634}} | ||
| + | <br>Leave this connected as the wires are needed. | ||
| - | =Wiring = | + | Down by the transmission where the harness ends is where you need to connect the wires. The starter wires are BY (black with Yellow stripe) or BR (black with Red stripe. |
| - | Check the engine wiring loom to see if there is prevision for the auto inhibitor switch. This prevents the engine from being started unless the auto is in P or N (park or neutral) | + | |
| + | * Connect the two BY or BR wires together. This is for the starter | ||
| + | * Plug the two RB or R wires into the manual transmission Reverse Lamp switch | ||
| [[Category:Automatic Transmission]] | [[Category:Automatic Transmission]] | ||
| + | [[Category:Transmission]]{{End}} | ||
Current revision
Automatic-equipped cars had a significantly larger front tunnel area (the rear of the tunnel is the same). For this reason you can easily convert an Auto car to a Manual car.
Contents |
Overview
Source all the manual transmission and clutch parts from a wrecked 1200, and the swap is easy. Trying to obtain all the parts piece by piece is a chore.
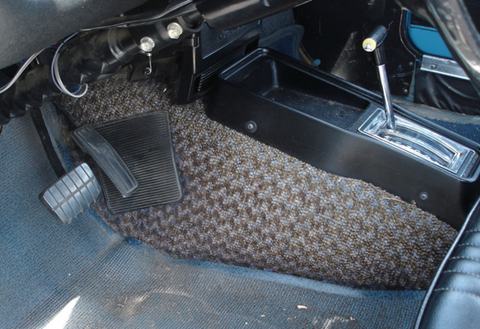
The only downside of converting your originally-automatic 1200 to a manual, you will notice that you have barely any room between the gas and brake pedals and you have to do tip-toe driving to make it work.
Also see: Automatic Transmission Overview
Auto vs 60
- Add #clutch pedal
- Knock out the clutch firewall hole blanking plate
- RHD: Install clutch cable
- LHD: Install clutch Master and Slave cylinders
- Remove automatic gearbox
- remove gearbox vacuum hose at intake manifold and plug opening
- Engine
- remove #flex plate and spacer
- add #pilot bushing (if not already fitted)
- add flywheel, clutch disc and pressure plate
- add or remove engine plate to match the manual transmission
- Mount: modify the #mount or make a new crossmember
- Install manual transmission
- Install manual transmission #driveshaft (tailshaft)
- Fill transmission with GL-4 gear oil
- Install #clutch cable or #hydraulic clutch system and adjust the clutch
- Modify #wiring for starter and reverse lights
Auto gearbox mounts are different than manual mounts, but the shifter hole in the tunnel is in the same place (the rear portion of the tunnel is the same). Reportedly 5-speed (60-series?) fits on the automatic crossmember -- pure bolt in. If not a simple fabrication to the mount will suffice. See Gearbox Crossmember.
Parts Required
New Parts:
 * #Pilot bearing
 * Release Bearing
 * Output shaft seal (optional)
Matching parts:
 * Manual transmission
 * engine rear plate (if the tranmission used it)
 * #Flywheel (to match transmission)
 * Clutch release bearing Sleeve
Clutch parts:
 * #Clutch pedal
 * Clutch disk and pressure plate
 * Clutch Release Arm & dust boot
 * RHD #Clutch cable
 * LHD (Hydraulic clutch)
   Clutch master cylinder
   Clutch slave cylinder with matching pushrod
   Clutch hard line
   Clutch hose
Engine Parts:
 * Flywheel bolts
Fluids:
 * (LHD only) pint of DOT3 brake fluid for clutch system
 * Dabs of multipurpose grease
   - for clutch disk splines
   - for release lever
   - for rear seal
 * A bit of clean motor oil for pilot bushing
 * GL-4 gear oil
#Shifter
 * Shift lever
 * Shifter boot (fits into hole in tunnel)
 * Transmission boot
NOTE: The speedometer cable is the same
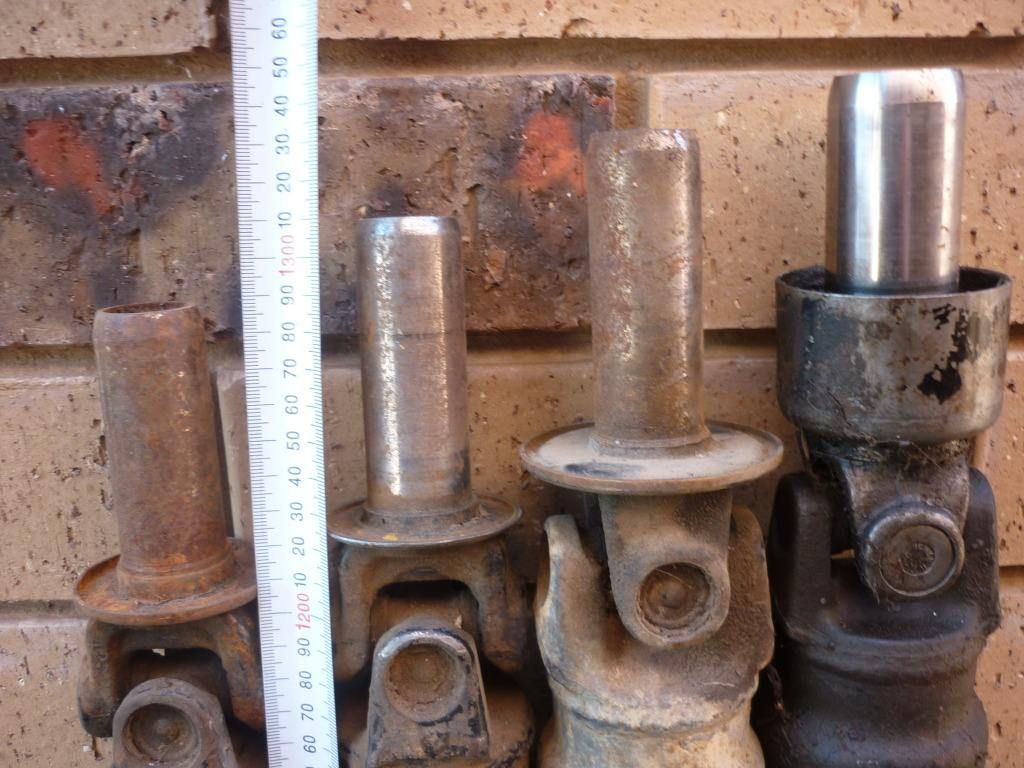
Release bearing SLEEVE

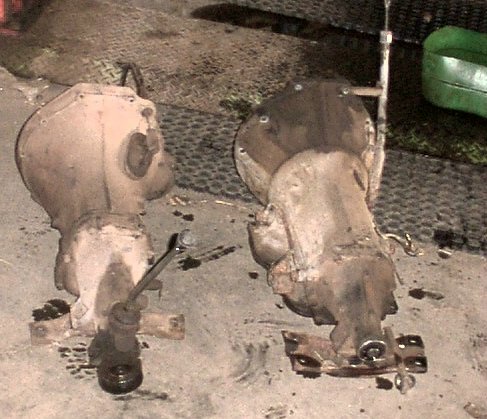
Transmission
Sourcing a manual transmission from a 1200 obviously will work in your 1200. But larger transmissions from B210 or B310 will also work, including 5-speeds.
- Be sure to get all the matching parts including shifter, driveshaft, flywheel and clutch.
Clutch Pedal
Replace the automatic Pedal box assembly, which has a large brake pedal, with the standard setup that has small brake pedal and clutch pedal. Only a 1200 pedal box fits (B210 does not fit).
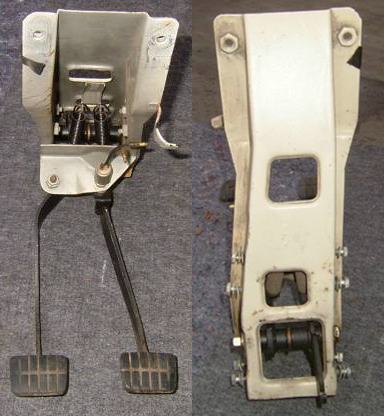
Alternatively, you can add a clutch pedal to the automatic pedal box. Replace the spacer in pedal box with clutch pedal (requires removal of dash and pedal box, and bending the brake pedal to gain clearance).
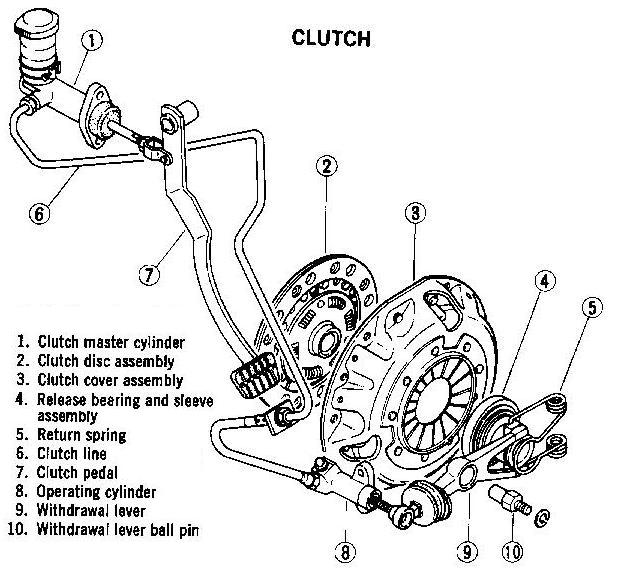
Clutch Cable
RHD cars: bolt Clutch Cable to firewall, connect to transmission, and perform Clutch Adjustment
Hydraulic Clutch
LHD cars:
- Knock out the clutch firewall hole blanking plate
- In manual cars there are nuts welded from factory on the inside but autos don't.
- You can either put bolts and nuts thru the holes or weld nuts to it
- Install clutch master cylinder
- Fit hard line from master down under the tunnel
- Fit clutch hose from hard line to slave cylinder
- Perform Clutch Adjustment
See Main Article: Hydraulic clutch
Shifter
Automatic shifter come with a Console. You can retain the console, simply remove the selector panel out of it.
- Remove Console
- Remove Automatic Shifter
- Remove shifter plate from console
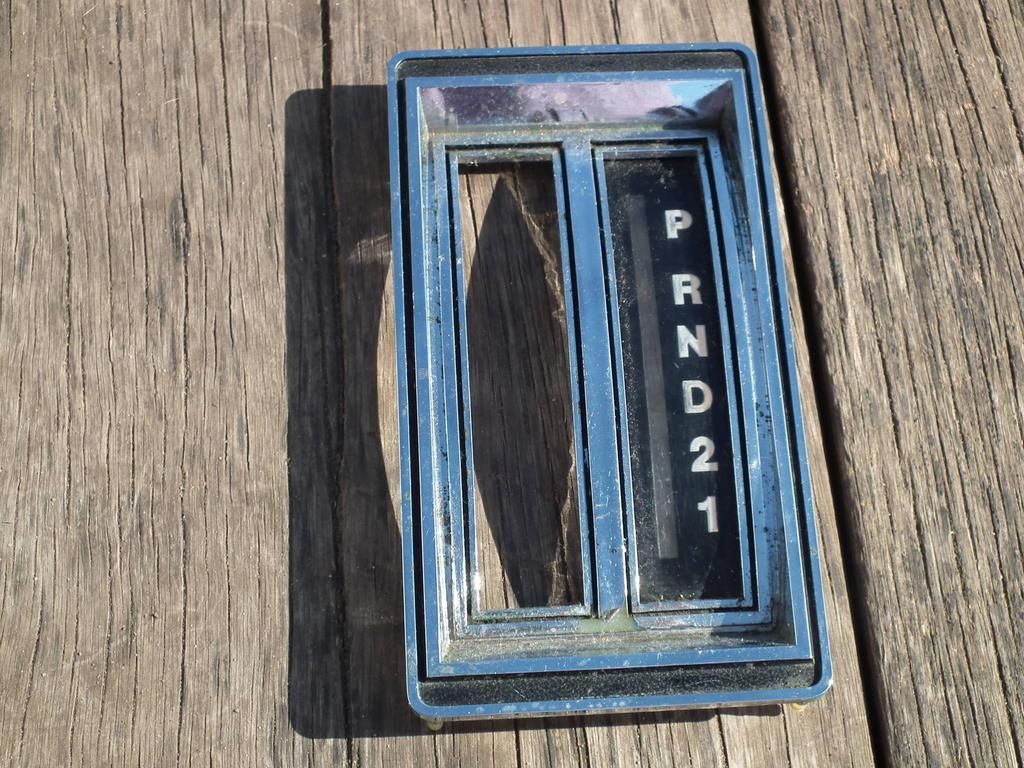
The shifter boot will have to be used from another type of car because the automatic hole is larger than the standard shifter hole. Reportedly a boot from a 1980s Ford Escort will fit.
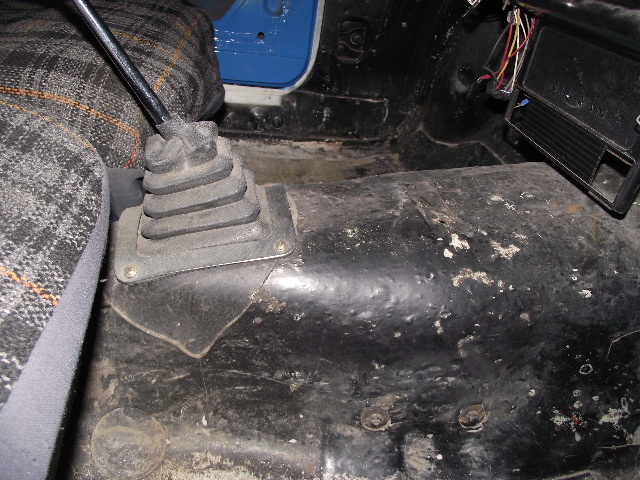
* Shift lever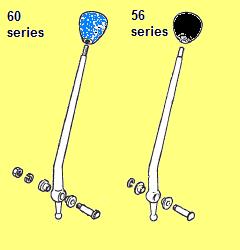
* small transmission boot (fits gearbox)* Shifter bushings (if they are damaged)
Driveshaft
The automatic driveshaft (Propeller Shaft) has a larger spline. Automatic vs manual lengths are also different. So obtain the M/T driveshaft. Remember that B110 and 1974 B210 driveshafts are the same, including length. The 1975-1978 B210 driveshafts have a different flange.
Note: Australian-assembled sedans use a unique tailshaft.
See Main Article: Propeller Shaft Swaps
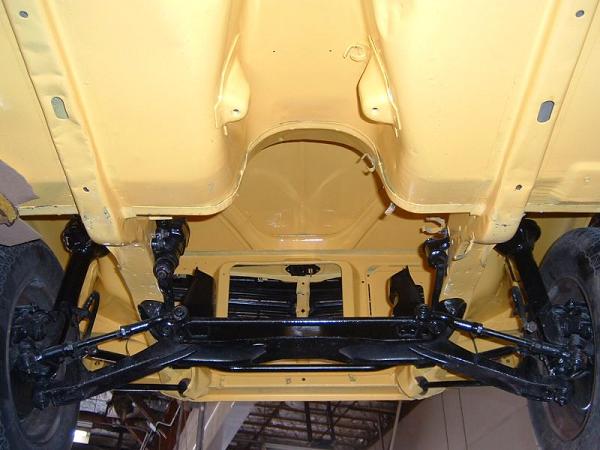
Rear Engine Mount
See main article: Gearbox Crossmember
The rear engine mount, also called the "transmission crossmember" is mounted about a little further back. So you have two choices:
- Unweld auto crossmember mount points in the tunnel, and weld in manual mount points. Then fit manual crossmber
OR
- Use a customized crossmember or mount
Customized mount, with 2nd set of bolts

4-speed mount
auto mount
B210 and B310 have multiple crossmember mounting hole locations:
The B210 has a single set, which differs between auto and manual cars.
Part Numbers
Rubber Mount
- 11321-H1000 ASSY-INSULATOR ENGINE MOUNTING REAR Manual trans
- 11321-H1020 ASSY-INSULATOR ENGINE MOUNTING REAR Manual trans
Crossmember
- 11322-H1002 MEMBER-ENGINE MOUNTING REAR Manual
- 11322-H1020 MEMBER-ENGINE MOUNTING REAR Automatic
NOTE: B210 parts number are different from B110, but reportedly fit the same.
Engine Differences
Carburetor
For emission controls, the carburetor differed. However you can use any carburetor with either transmission.
Distributor
Auto cars had a different distributor curve for emission control. However you can use any distributor with either transmission.
Clutch Fittings
Automatic cars don't have:
- Clutch pedal
- Clutch master cylinder (LHD models)
- Clutch cable (RHD models)
These parts can be swapped from a manual car.
On the US AT models the hole for the clutch master is there but is covered up with a sheet metal cover that is spot welded in place. Takes a cold chisel, hammer, and some patience to uncover. The mounting studs need to be sourced as they are missing.
On RHD, grind off the plate where the clutch cable comes out of the fire wall and get some nuts to bolt the thing to the firewall.
Starter Motor
Starter for automatic transmission differs from starter for manual transmission. But they interchange. And both A12 & A14 starters interchange.
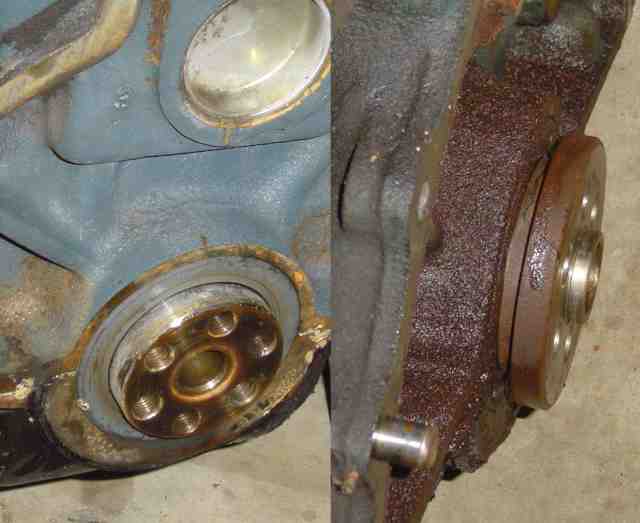
Crankshaft
Flex Plate
Automatics don't use a flywheel, as the torque convertor has enough mass to act as a flywheel. They use a thin "flex plate" with ring gear teeth for the starter.
- Unbolt the flex plate
- Pull the crankshaft adapter off (see Spacer section below)
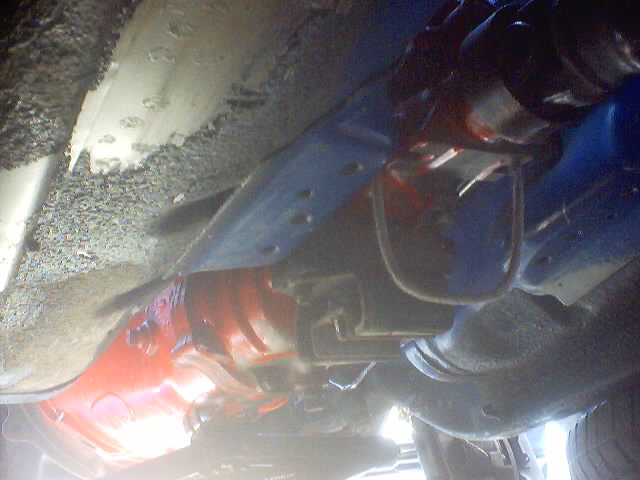
Spacer
Engine fitted with an automatic has a spacer on the end of the crankshaft that has to be removed to mate to the manual transmission.
spacer
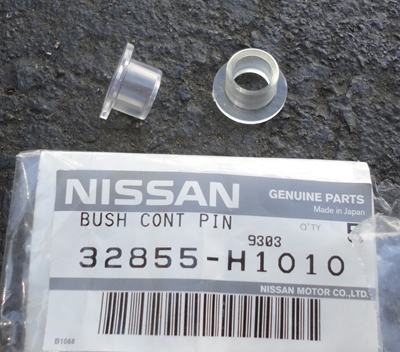
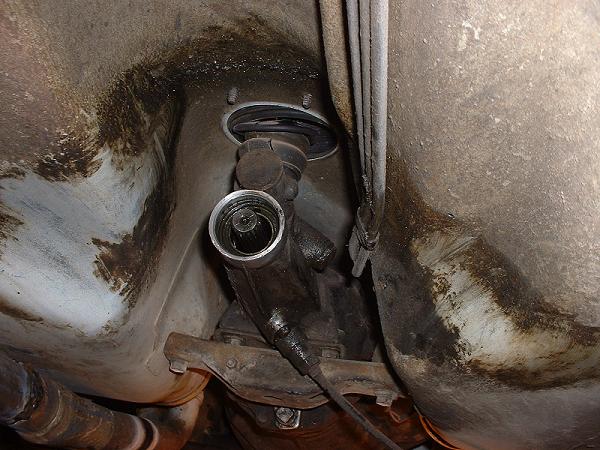
Pilot Bearing
spigot bush/pilot bushing
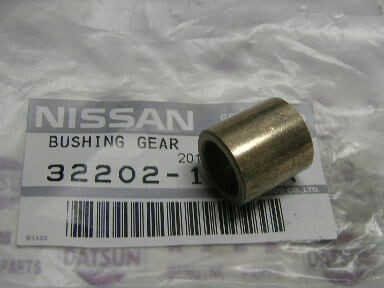
The thing to look at is the back of your crankshaft -- make sure it has the hole for the transmission pilot shaft bearing. If the bushing is missing, buy a new one and lightly tap into place.
Flywheel
You can use the flywheel off an A12, A14 or A15 -- as long as you get the matching setup.
Matching parts
* Flywheel
* Transmission
* Engine rear plate
* Clutch release bearing sleeve
If you obtain all these parts from the same car (B110, B210 or B310) then you will have no problem. If mixing and matching, be aware that only certain combinations will work - see Release Bearing.
Tunnel
The automatic tunnel is designed to fit the 71-series automatic, so the smaller manual transmission fits no problem. Even large Nissan manual transmissions will fit in it - handy for an engine swap.
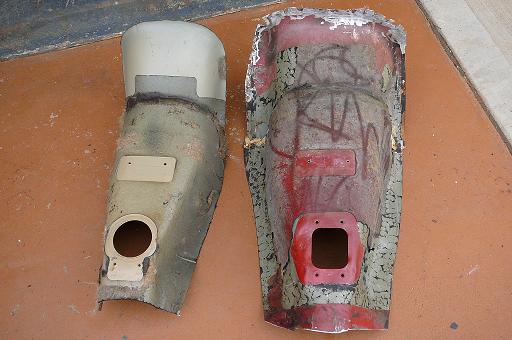
Conclusion: No change needed.
Cooling
The standard radiator was used on automatic transmission 1200s, but a plastic shroud was fitted. However the standard radiator is not really large enough to cool the engine properly.
See main article: Radiator Upgrades
Autos used:
- (optional) larger radiator. A B210 radiator is a direct bolt-in
- Radiator Shroud
- (optional) Flex fan
All are a good idea for standard or manual transmission cars.
Kick down Switch
Check around the top of the throttle pedal, with autos there should be either a bracket for the kick down switch,or maybe the switch is still there.
You will no longer need this switch. It can be left in place.
Wiring
Automatic equipped cars have an inhibitor switch. This prevents the engine from being started unless the auto is in P or N (park or neutral). The switch is on the Automatic transmission. See Automatic_Transmission#Inhibitor_Switch.
Bridge these start inhibit wires that originally went to the auto gearbox.
There is a 6-terminal wiring connector on the firewall just above the rocker cover.
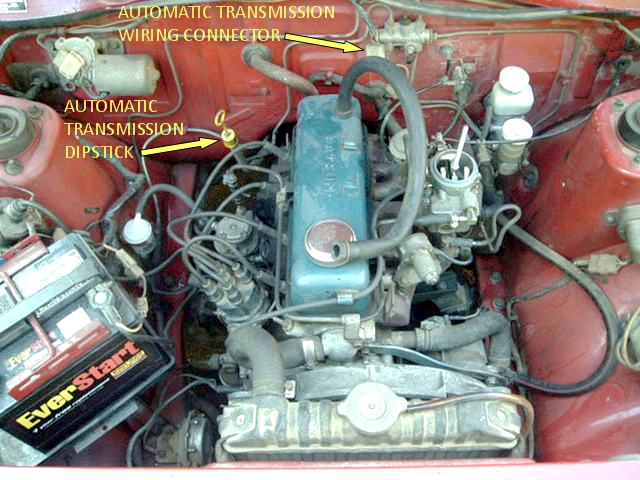
Leave this connected as the wires are needed.
Down by the transmission where the harness ends is where you need to connect the wires. The starter wires are BY (black with Yellow stripe) or BR (black with Red stripe.
- Connect the two BY or BR wires together. This is for the starter
- Plug the two RB or R wires into the manual transmission Reverse Lamp switch