![[Datsun 1200 encyclopedia]](/wiki/upload/wiki.png)
| Revision as of 09:07, 10 January 2017 ddgonzal (Talk | contribs) (->Exhaust Pipe) <- Previous diff |
Revision as of 07:52, 20 September 2017 ddgonzal (Talk | contribs) Next diff -> |
||
| Line 48: | Line 48: | ||
| Peek under the car, on the right side of the gearbox for the letter 56A and you are golden: | Peek under the car, on the right side of the gearbox for the letter 56A and you are golden: | ||
| - | <br><img size=400>http://datsun1200.com/uploads/photos/21400.jpg</img> [http://datsun1200.com/modules/myalbum/photo.php?lid=21400 album] | + | <br>{{Album|21400}} |
| Or in this area (56A late ute super strong): | Or in this area (56A late ute super strong): | ||
| - | <br><img size=400>http://datsun1200.com/uploads/photos/1680.jpg</img> [http://datsun1200.com/modules/myalbum/photo.php?lid=1680 album] | + | <br>{{Album|1680}} |
| = Differential = | = Differential = | ||
| Line 65: | Line 65: | ||
| A14/A15 engine mounts are '''35 mm''' further back in location than early (B110) A12. If you locate the engine like this, it will be in the correct spot | A14/A15 engine mounts are '''35 mm''' further back in location than early (B110) A12. If you locate the engine like this, it will be in the correct spot | ||
| - | <br><img size=400>http://datsun1200.com/uploads/photos/1779.jpg</img> [http://datsun1200.com/modules/myalbum/photo.php?lid=1779 album] | + | <br>{{Album|1779}} |
| <blockquote>Note that late A12 (1974 and up) use exactly the same mounts as A14/A14.</blockquote> | <blockquote>Note that late A12 (1974 and up) use exactly the same mounts as A14/A14.</blockquote> | ||
| Engine setback is approximately 2-1/2 inches from firewall to back of rocker cover | Engine setback is approximately 2-1/2 inches from firewall to back of rocker cover | ||
| - | <br><img size=400>http://datsun1200.com/uploads/photos/23550.jpg</img> [http://datsun1200.com/modules/myalbum/photo.php?lid=23550 album] | + | <br>{{Album|23550}} |
| = Engine Mounts = | = Engine Mounts = | ||
| Line 80: | Line 80: | ||
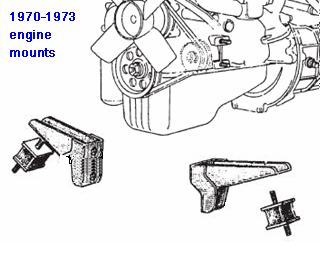
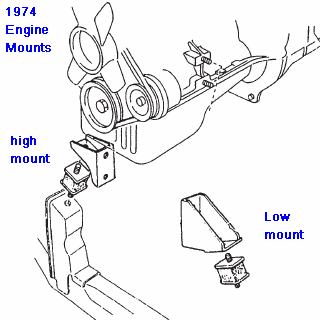
| 1974-up engines (including all A14/A15 engines) have the motor mount bosses in a different place compared to the 1971-1973 A12 engines. So the engine mounts are a bit different. This photos illustrates the difference: | 1974-up engines (including all A14/A15 engines) have the motor mount bosses in a different place compared to the 1971-1973 A12 engines. So the engine mounts are a bit different. This photos illustrates the difference: | ||
| - | <br>[http://datsun1200.com/modules/myalbum/photo.php?lid=1779 http://datsun1200.com/uploads/photos/1779.jpg] | + | <br>{{Album|1779}} |
| <br>Stock left-side mount in Datsun 1200, but Newer A12 engine. All it needs is a simple flat plate with two holes drilled in it. | <br>Stock left-side mount in Datsun 1200, but Newer A12 engine. All it needs is a simple flat plate with two holes drilled in it. | ||
| - | <br>[http://datsun1200.com/modules/myalbum/photo.php?lid=26378 http://datsun1200.com/uploads/photos/26378.png] | + | <br>{{Album|26378|png}} |
| '''Alternatively''', you could 1) use the 1974-up 1200 crossmember or 2) modify the crossmember or 3) modify the engine brackets. | '''Alternatively''', you could 1) use the 1974-up 1200 crossmember or 2) modify the crossmember or 3) modify the engine brackets. | ||
| Line 96: | Line 96: | ||
| <b>Swap the crossmember?</b> Swapping crossmembers is fairly easy. There are two bolts on each side, plus the LCA bushing mount. But you don't have to swap crossmembers -- it's just one way of doing it. Perhaps the most elegant way. See [[Changing Crossmember]]. | <b>Swap the crossmember?</b> Swapping crossmembers is fairly easy. There are two bolts on each side, plus the LCA bushing mount. But you don't have to swap crossmembers -- it's just one way of doing it. Perhaps the most elegant way. See [[Changing Crossmember]]. | ||
| - | <img size=400>http://datsun1200.com/uploads/photos/23609.jpg</img> [http://datsun1200.com/modules/myalbum/photo.php?lid=23609 album] | + | {{Album|23609}} {{Album|20925}} {{Album|20924}} |
| - | + | ||
| - | [http://datsun1200.com/modules/myalbum/photo.php?lid=20925 http://datsun1200.com/uploads/photos/20925.jpg] | + | |
| - | + | ||
| - | [http://datsun1200.com/modules/myalbum/photo.php?lid=20924 http://datsun1200.com/uploads/photos/20924.jpg] | + | |
| Early vs Late Engine crossmembers | Early vs Late Engine crossmembers | ||
| - | <br><img size=400>http://datsun1200.com/uploads/photos/8487.jpg</img> [http://datsun1200.com/modules/myalbum/photo.php?lid=8487 album] | + | <br>{{Album|8487}} |
| == Late Engine onto Early Crossmember == | == Late Engine onto Early Crossmember == | ||
| Line 114: | Line 110: | ||
| 154 mm: Early block front face to center of mount | 154 mm: Early block front face to center of mount | ||
| - | <br>[http://datsun1200.com/modules/myalbum/photo.php?lid=23475 http://i297.photobucket.com/albums/mm219/ddgonzal/Datsun%201200/wiki/19179.jpg] | + | <br>{{PhotoAlbum|19179.jpg|23475}} |
| 189 mm: Revised block front face to center of mount | 189 mm: Revised block front face to center of mount | ||
| - | <br>[http://datsun1200.com/modules/myalbum/photo.php?lid=23474 http://i297.photobucket.com/albums/mm219/ddgonzal/Datsun%201200/wiki/6109.jpg] | + | <br>{{PhotoAlbum|6109.jpg|23474}} |
| 1. Remove this Late LH bracket, and discard | 1. Remove this Late LH bracket, and discard | ||
| - | <br>[http://datsun1200.com/modules/myalbum/photo.php?lid=2564 http://datsun1200.com/uploads/thumbs/2564.jpg] | + | <br>{{Album|2564}} |
| 2. Obtain a duplicate late RH bracket, and then fit it to the LH side. Old A12 brackets won't fit, but new A12/A14/A15 brackets will: | 2. Obtain a duplicate late RH bracket, and then fit it to the LH side. Old A12 brackets won't fit, but new A12/A14/A15 brackets will: | ||
| - | <br>[http://datsun1200.com/modules/myalbum/photo.php?lid=20923 http://datsun1200.com/uploads/thumbs/20923.jpg] B210 vs B310 Right Bracket | + | <br>{{Album|20923}} B210 vs B310 Right Bracket |
| <br>Which is best for this swap? | <br>Which is best for this swap? | ||
| 3. The new mounts are 35mm (1-3/8") further back. So drill two holes in a flat plate and mount it like this: | 3. The new mounts are 35mm (1-3/8") further back. So drill two holes in a flat plate and mount it like this: | ||
| - | <br>[http://datsun1200.com/modules/myalbum/photo.php?lid=1779 http://datsun1200.com/uploads/thumbs/1779.jpg] | + | <br>{{Album|1779}} |
| If the engine is centered and the plate holes drilled correctly, it will fit straight as above. | If the engine is centered and the plate holes drilled correctly, it will fit straight as above. | ||
| If the engine is not centered, the plate can be skewed: | If the engine is not centered, the plate can be skewed: | ||
| - | <br>[http://i60.photobucket.com/albums/h16/datsik1200/Photo-0283-1.jpg http://i60.photobucket.com/albums/h16/datsik1200/th_Photo-0283-1.jpg] | + | <br>{{PB2|h16|datsik1200||Photo-0283-1.jpg|}} |
| There are three different RH mounts, some allow the engine to sit higher or lower than the others. If the mount is now up too high, slot the bolt holes for the engine bracket, and slide the mount up on the block the thickness of the plate, then tighten. This will lower the engine a bit. | There are three different RH mounts, some allow the engine to sit higher or lower than the others. If the mount is now up too high, slot the bolt holes for the engine bracket, and slide the mount up on the block the thickness of the plate, then tighten. This will lower the engine a bit. | ||
| Line 138: | Line 134: | ||
| RH engine mount brackets (old) 55mm bolt center (new) 50 mm bolt center | RH engine mount brackets (old) 55mm bolt center (new) 50 mm bolt center | ||
| <br>Lower bolt is 5mm higher on new engine, so mounts actually bolt at the same level. | <br>Lower bolt is 5mm higher on new engine, so mounts actually bolt at the same level. | ||
| - | <br>[http://datsun1200.com/modules/myalbum/photo.php?lid=23553 http://datsun1200.com/uploads/thumbs/23553.jpg] | + | <br>{{Album|23553}} |
| Perhaps a 3mm difference. | Perhaps a 3mm difference. | ||
| - | <br>[http://datsun1200.com/modules/myalbum/photo.php?lid=23552 http://datsun1200.com/uploads/thumbs/23552.jpg] | + | <br>{{Album|23552}} |
| '''Alternatively''', you can put the mount on the last accessory boss, which is 26mm (1") farther forward than early blocks. With this choice, you will need to redrill the lower hole on the engine mount bracket, 8mm over. And you will still need to slot the mounts and use a flat plate. Nothing gained, but it takes a little more work this way. | '''Alternatively''', you can put the mount on the last accessory boss, which is 26mm (1") farther forward than early blocks. With this choice, you will need to redrill the lower hole on the engine mount bracket, 8mm over. And you will still need to slot the mounts and use a flat plate. Nothing gained, but it takes a little more work this way. | ||
| Alternative mount location | Alternative mount location | ||
| - | <br>[http://datsun1200.com/modules/myalbum/photo.php?lid=23474 http://i297.photobucket.com/albums/mm219/ddgonzal/Datsun%201200/wiki/6109_.jpg] | + | <br>{{PhotoAlbum|6109_.jpg|23474}} |
| Re-drill the lower bracket hole, and re-drill the crossmember horn hole 26mm farther forward (no plate needed). Rubber sits to one side of horn. Aircon cannot be used with this choice, as the bolt boss is for the A/C compressor. | Re-drill the lower bracket hole, and re-drill the crossmember horn hole 26mm farther forward (no plate needed). Rubber sits to one side of horn. Aircon cannot be used with this choice, as the bolt boss is for the A/C compressor. | ||
| - | <br><img size=400>http://datsun1200.com/uploads/photos/209.JPG</img> [http://datsun1200.com/modules/myalbum/photo.php?lid=209 album] | + | <br>{{Album|209}} |
| === Right Side Mount === | === Right Side Mount === | ||
| Right side (spark-plug/oil pump/starter side) engine mount bracket is practically the same Late vs Early. | Right side (spark-plug/oil pump/starter side) engine mount bracket is practically the same Late vs Early. | ||
| - | [http://datsun1200.com/modules/myalbum/photo.php?lid=2563 http://datsun1200.com/uploads/thumbs/2563.jpg] | + | {{Album|2563}} |
| - | Two types of right-side brackets: | + | Two types of right-side brackets: B210 vs B310 Right Bracket |
| - | <br>[http://datsun1200.com/modules/myalbum/photo.php?lid=20923 http://datsun1200.com/uploads/thumbs/20923.jpg] B210 vs B310 Right Bracket | + | <br>{{Album|20923}} |
| end result with flat plate | end result with flat plate | ||
| - | <br><img size=400>http://datsun1200.com/uploads/photos/1779.jpg</img> [http://datsun1200.com/modules/myalbum/photo.php?lid=1779 album] | + | <br>{{Album|1779}} |
| The only thing you might need to do is Measure engine installed angle and if you need to lower it a little bit: | The only thing you might need to do is Measure engine installed angle and if you need to lower it a little bit: | ||
| Line 175: | Line 171: | ||
| === Discussions and Details === | === Discussions and Details === | ||
| The simplest way to fit the motor mounts is a flat plate: | The simplest way to fit the motor mounts is a flat plate: | ||
| - | <br>[http://datsun1200.com/modules/myalbum/photo.php?lid=26378 http://datsun1200.com/uploads/photos/26378.png] | + | <br>{{Album|26378|png}} |
| - | <img size=400>http://i60.photobucket.com/albums/h16/datsik1200/Photo-0283-1.jpg</img> | + | {{PB2|h16|datsik1200||Photo-0283-1.jpg}} |
| - | [http://i60.photobucket.com/albums/h16/datsik1200/Photo-0283-1.jpg full] | + | |
| If you use the correct engine bracket it will be very close to level, maybe about 4mm higher. | If you use the correct engine bracket it will be very close to level, maybe about 4mm higher. | ||
| Three different Right Side engine brackets. Which is best for a swap? | Three different Right Side engine brackets. Which is best for a swap? | ||
| - | <br><img size=400>http://datsun1200.com/uploads/photos/20945.jpg</img> [http://datsun1200.com/modules/myalbum/photo.php?lid=20945 album] | + | <br>{{Album|20945}} |
| * cheater_5 wrote up a detailed conversion here: [http://datsun1200.com/modules/newbb/viewtopic.php?topic_id=28919&forum=1 Cheaters a15 into 1200 conversion] | * cheater_5 wrote up a detailed conversion here: [http://datsun1200.com/modules/newbb/viewtopic.php?topic_id=28919&forum=1 Cheaters a15 into 1200 conversion] | ||
| * An A14 installation Mildman undertook has been quite significantly detailed at the following web link: [http://mildman.datsunprojects.org/Blue_index.htm Mildman's A14 Installation] | * An A14 installation Mildman undertook has been quite significantly detailed at the following web link: [http://mildman.datsunprojects.org/Blue_index.htm Mildman's A14 Installation] | ||
| - | * There is also a technical article at the datsun1200.com site that discusses this installation too: [http://datsun1200.com/modules/nsections/index.php?op=viewarticle&artid=13 Datsun1200.com Tech Section] | ||
| == Early Engine onto Late Crossmember == | == Early Engine onto Late Crossmember == | ||
| Line 202: | Line 196: | ||
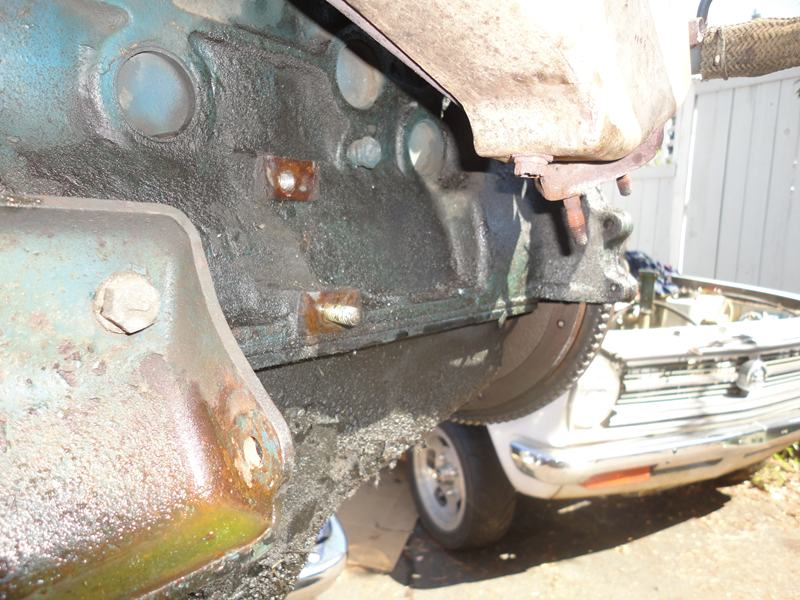
| Right Side | Right Side | ||
| - | <br><img size=400>http://datsun1200.com/uploads/photos/23572.jpg</img> [http://datsun1200.com/modules/myalbum/photo.php?lid=23572 album] | + | <br>{{Album|23572}} |
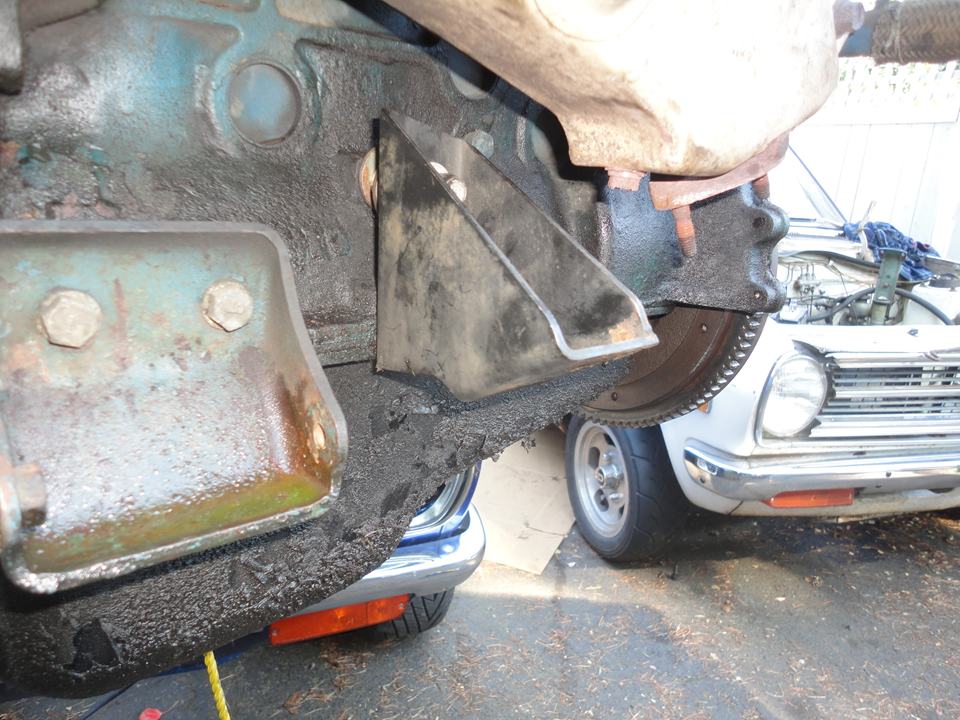
| Left Side | Left Side | ||
| - | <br><img size=400>http://datsun1200.com/uploads/photos/23573.jpg</img> [http://datsun1200.com/modules/myalbum/photo.php?lid=23573 album] | + | <br>{{Album|23573}} |
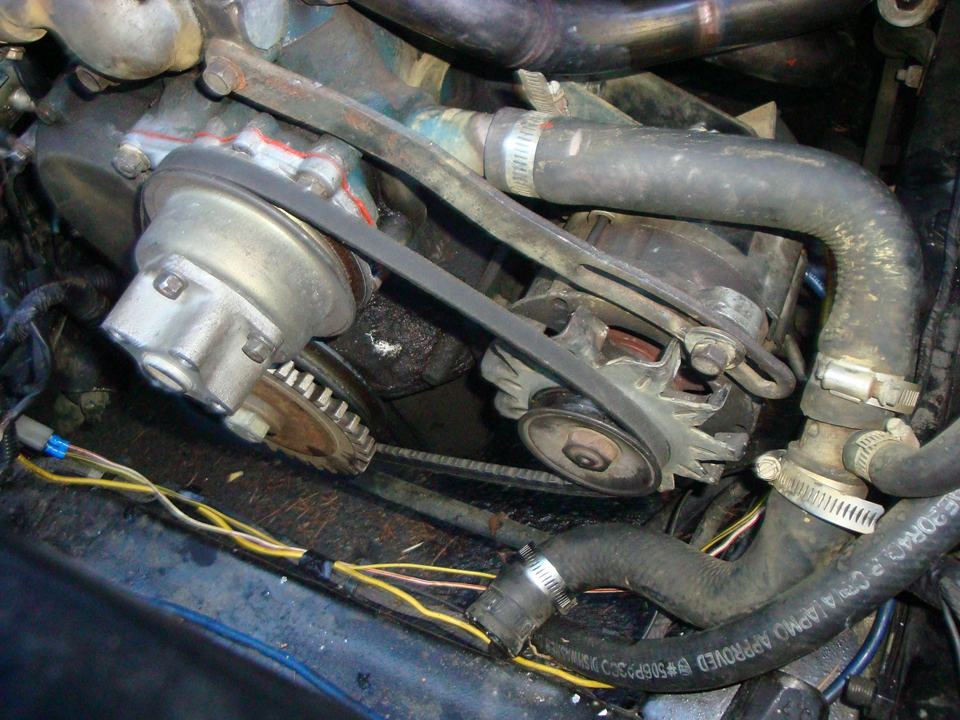
| Use the B110 [[Radiator#Lower_Radiator_Hose|lower radiator hose]] to clear the alternator. The new A12 places the alternator on the other side of the engine compared to the original A12. You'll also need to extend the alternator wires to go to the other side. | Use the B110 [[Radiator#Lower_Radiator_Hose|lower radiator hose]] to clear the alternator. The new A12 places the alternator on the other side of the engine compared to the original A12. You'll also need to extend the alternator wires to go to the other side. | ||
| - | <img size=400>http://datsun1200.com/uploads/photos/23597.jpg</img> [http://datsun1200.com/modules/myalbum/photo.php?lid=23597 album] | + | {{Album|23597}} |
| === Right Mount Bracket === | === Right Mount Bracket === | ||
| Line 217: | Line 211: | ||
| Old A12 uses stepped bracket (upper boss is set back). To fit New A12 bracket, remove the stud and use a longer stud, or a bolt. | Old A12 uses stepped bracket (upper boss is set back). To fit New A12 bracket, remove the stud and use a longer stud, or a bolt. | ||
| - | <br><img size=400>http://datsun1200.com/uploads/photos/23554.jpg</img> [http://datsun1200.com/modules/myalbum/photo.php?lid=23554 album] | + | <br>{{Album|23554}} |
| To fit the new A12 bracket, use 19mm worth of washers and a longer bolt or stud. Bolt centers are the same for the original A12 stepped bracket and the revised A12 flat bracket, so it fits just right | To fit the new A12 bracket, use 19mm worth of washers and a longer bolt or stud. Bolt centers are the same for the original A12 stepped bracket and the revised A12 flat bracket, so it fits just right | ||
| - | <br><img size=400>http://datsun1200.com/uploads/photos/23555.jpg</img> [http://datsun1200.com/modules/myalbum/photo.php?lid=23555 album] | + | <br>{{Album|23555}} |
| = Swap Notes = | = Swap Notes = | ||
| Line 231: | Line 225: | ||
| = Datsun 1000 = | = Datsun 1000 = | ||
| - | When fitting an A12 into Datsun 1000, use 3mm spacer on the engine mounts so that the deeper pan will clear the 1000 crossmember. Reference: [http://datsun1200.com/modules/newbb/viewtopic.php?post_id=480339#forumpost480339 1000 vs 1200 oil pans] | + | When fitting an A12 into Datsun 1000, use 3mm spacer on the engine mounts so that the deeper pan will clear the 1000 crossmember. Reference: [{{Post|480339}} 1000 vs 1200 oil pans] |
| {{UploadPost|174_57a000cf5cbb0.jpg|480296|width=0}} {{UploadPost|174_57a000efe74f3.jpg|480296|width=0}} | {{UploadPost|174_57a000cf5cbb0.jpg|480296|width=0}} {{UploadPost|174_57a000efe74f3.jpg|480296|width=0}} | ||
| Line 244: | Line 238: | ||
| B310 fits all A-series engines from 1974 on. There is no bolt-in crossmember for the early A-series engine. | B310 fits all A-series engines from 1974 on. There is no bolt-in crossmember for the early A-series engine. | ||
| - | [http://i297.photobucket.com/albums/mm219/ddgonzal/Datsun%20Misc/B310/B310-crossmember-3.jpg http://i297.photobucket.com/albums/mm219/ddgonzal/Datsun%20Misc/B310/th_B310-crossmember-3.jpg] [http://i297.photobucket.com/albums/mm219/ddgonzal/Datsun%20Misc/B310/B310-crossmember-1.jpg http://i297.photobucket.com/albums/mm219/ddgonzal/Datsun%20Misc/B310/th_B310-crossmember-1.jpg] [http://i297.photobucket.com/albums/mm219/ddgonzal/Datsun%20Misc/B310/B310-crossmember-2.jpg http://i297.photobucket.com/albums/mm219/ddgonzal/Datsun%20Misc/B310/th_B310-crossmember-2.jpg] | + | {{Photo|B310-crossmember-3.jpg|Datsun%20Misc/B310}} {{Photo|B310-crossmember-1.jpg|Datsun%20Misc/B310}} {{Photo|B310-crossmember-2.jpg|Datsun%20Misc/B310}} |
| = Questions = | = Questions = | ||
| Line 252: | Line 246: | ||
| For answers, see: [[Engine Swaps]], section "A-series Nissan Engines" | For answers, see: [[Engine Swaps]], section "A-series Nissan Engines" | ||
| - | [[Category:Engine Modifications]] [[Category:Engine Swaps]] | + | [[Category:Engine Modifications]] [[Category:Engine Swaps]]{{End}} |
Revision as of 07:52, 20 September 2017
The A14 and A15 engines fit in the 1200 with only minor changes. The A14 and A15 are by far the most popular swapping candidates since the bigger displacement of the A14 and A15 means both more power (peak HP) and more low-speed power (torque) than the A12 engine. Remember: "theres no substitute for cubic inches".
Contents |
Overview
The A14 and A15 are by far the most popular swapping candidates since the bigger displacement of the A14 and A15 means both more power (peak HP) and more low-speed power (torque) than the A12, A13 or A12A. As they say, "There is no replacement for displacement".
A12: 68 hp, 70 lb ft torque
A14: 80 hp, 77-83 torque
A15: 80 hp
A15 in 1200
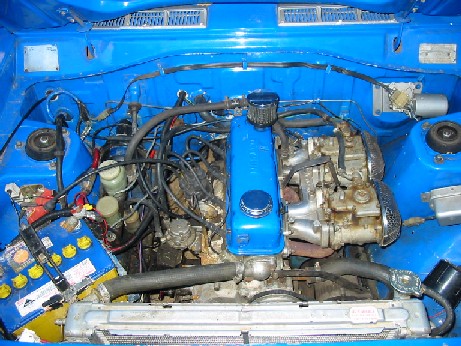
Note that there are 65 HP A14s and A15s too. While less powerful than an A12, they still have more torque so will be an improvement for easy driving. You can identify these by the ID plate in the engine compartment (with HP figures) or by noting if the intake manifold is round-port. Only the oval port engines are 80HP. Additionally, all 1981 and later engines are less than 80HP.
The A14 and A15 engines are "tall deck" engines, and are 3/4 inch higher than A12. However, they fit in the 1200 with a change to the exhaust pipe due to the height. This also applies to the 1974 A13 engine.
With later 1200s (1974 and newer), newer engines bolt right in. With original 1970-1973 1200s, simple changes to the motor mounts will allow the newer A12, A14 or A15 to fit in.
Swap Factors
These factors are different when swapping:
- 1967-1973 motor mounts vs 1974-up mounts. Simple adapters can be used.
- increased deck height raises exhaust pipe
- 3-bolt vs 2-bolt exhaust flange
- A15 calls for stronger transmission. The late 1200 56A type is good
- A15 needs stronger differential than 1967-1974 H145 type
Exhaust Pipe
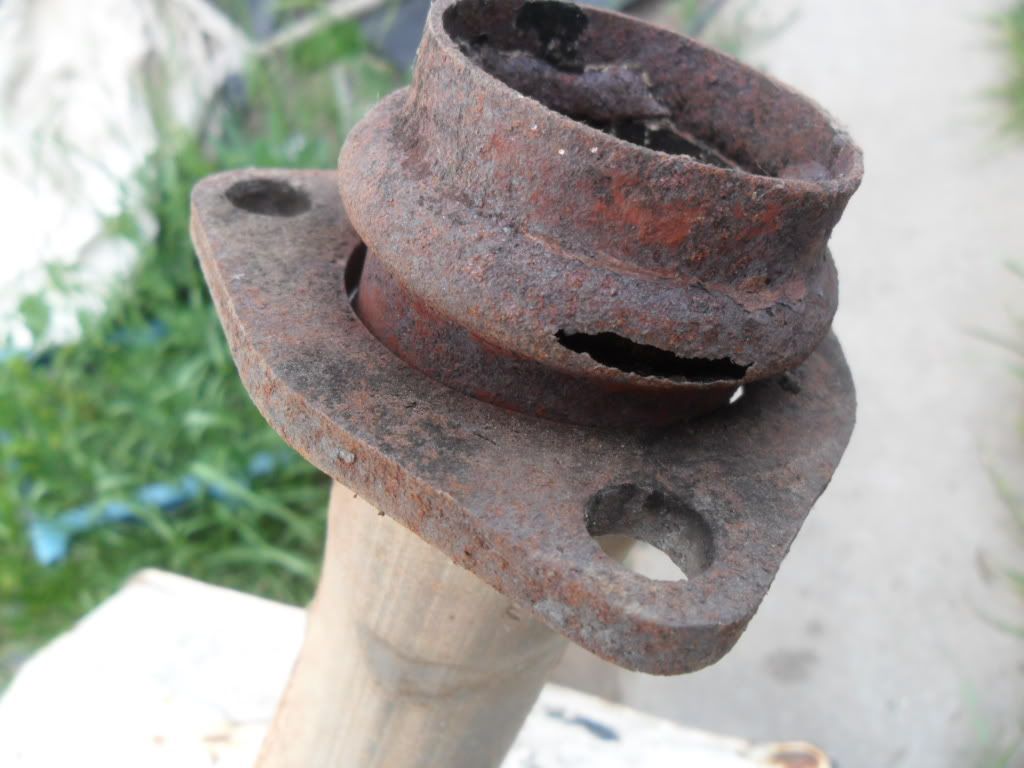
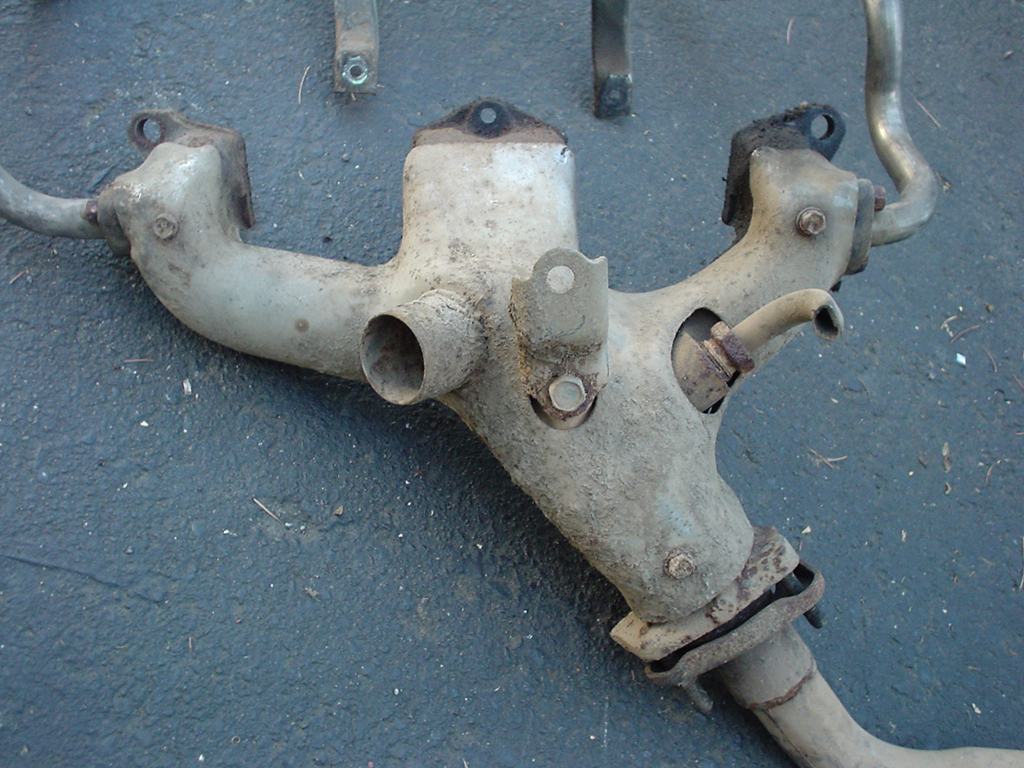
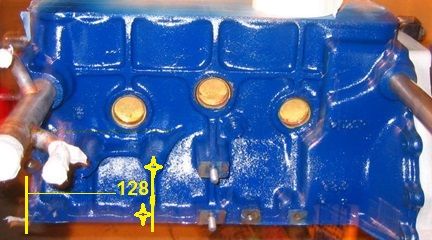
A14/A15 use a 3-bolt exhaust flange. Datsun 1200 uses a 2-bolt exhaust pipe. So get a short section of the exhaust pipe, and have it welded to your exhaust system. Add 3/4" length so the pipe fits in the same location. If you don't have the pipe, any exhaust shop can fabricate the correct part.

Exhaust Pipe: The section of pipe between the manifold and the muffler
Tri-bolt exhaust pipe
Also See: Exhaust Manifold#Gasket
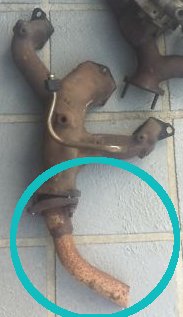
Cut this portion of the exhaust pipe off an A14/A15 vehicle, weld to the 1200 exhaust pipe
Transmission
If upgrading a 1970-1972 Datsun 1200 to an A14 or A15, use the stronger 4-speed that comes with the A14 or A15. It is a bolt-in replacement. Be sure to get the matching set: Flywheel, clutch release sleeeve, engine plate and transmission. See Gearbox Swap Notes.
The early 1200 4-speed will work fine with an A14 if you drive it smoothly. But the A15 has a bit to much torque to be reliable. It may work for a long time, but it may give out. Chipped teeth is the normal problem.
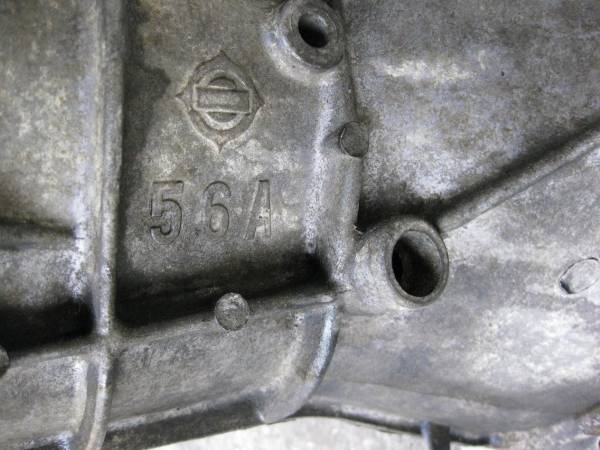
If your 1200 already has the 56A 4-speed it is strong enough for an A15.
Peek under the car, on the right side of the gearbox for the letter 56A and you are golden:
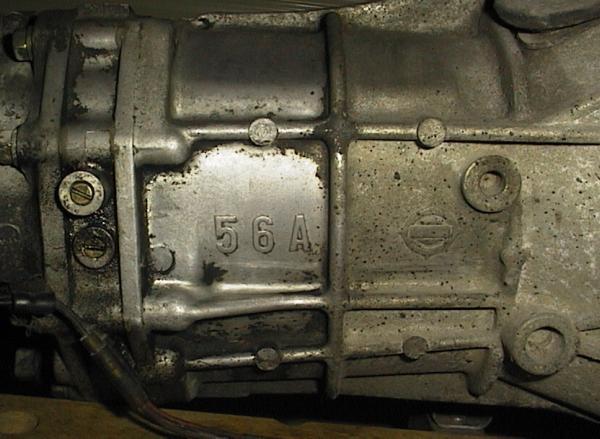
Or in this area (56A late ute super strong):
Differential
The stock H145 from a Datsun 1200 coupe/sedan/wagon is not rated for the torque of an A14 or A15. It can handle the horsepower, but not the torque.
- An A14 or low-torque A15 will be OK in front of an H145. A15 after 1981 is low torque.
- While some club members have had their H145 last behind an A15, many have had it break. It is the ring & pinion gears (CWP) that break, not the axles.
For upgrades you can either: 1) Fit an H150 diff center into your 1200 housing. See H150 center swap or 2) Swap an entire rear axle assembly into your 1200. See Rear Axle Swaps.
Engine Location
It is important to get the new engine in the same location as the original, so that the original driveshaft fits properly. (You can locate the engine further back if you want to customize the driveshaft.)
A14/A15 engine mounts are 35 mm further back in location than early (B110) A12. If you locate the engine like this, it will be in the correct spot
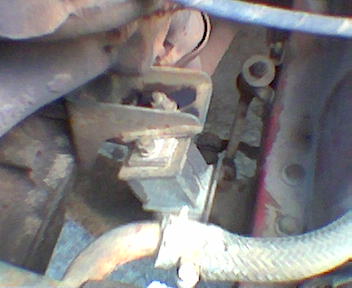
Note that late A12 (1974 and up) use exactly the same mounts as A14/A14.
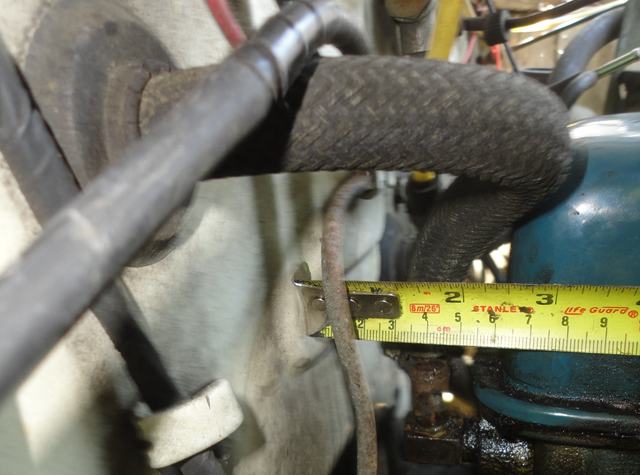
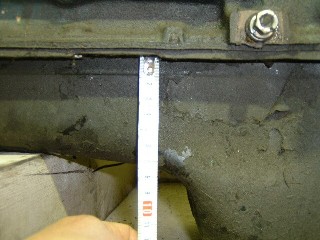
Engine setback is approximately 2-1/2 inches from firewall to back of rocker cover
Engine Mounts
A14/A15 bolts directly into newer 1200 (1974 & newer utes).
When fitting to older 1200s, the easiest thing to do is use simple flat plates to adapt the motor.
The most elegant way is to swap crossmembers. If you can find the right crossmember. For example: 1975 A12 with 1974-up crossmember. Or 1972 A12 with 1970-1973 crossmember.
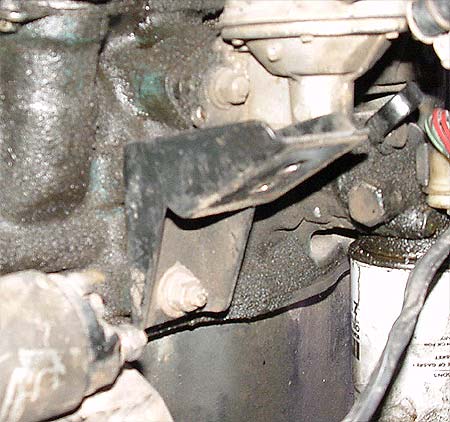
1974-up engines (including all A14/A15 engines) have the motor mount bosses in a different place compared to the 1971-1973 A12 engines. So the engine mounts are a bit different. This photos illustrates the difference:
Stock left-side mount in Datsun 1200, but Newer A12 engine. All it needs is a simple flat plate with two holes drilled in it.

Alternatively, you could 1) use the 1974-up 1200 crossmember or 2) modify the crossmember or 3) modify the engine brackets.
Crossmember Swap
Be sure to get a matched set:
- Late Engine + Late Engine mounting brackets + Late Engine Crossmember
OR
- Early Engine + Early Engine mounting brackets + Early Engine Crossmember
Early engines are 1967-1973, and late engines are 1974-up.
Swap the crossmember? Swapping crossmembers is fairly easy. There are two bolts on each side, plus the LCA bushing mount. But you don't have to swap crossmembers -- it's just one way of doing it. Perhaps the most elegant way. See Changing Crossmember.

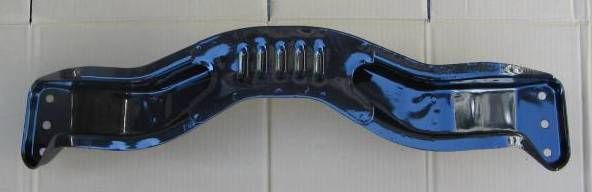
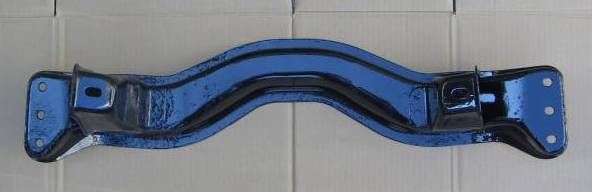
Early vs Late Engine crossmembers

Late Engine onto Early Crossmember
When fitting a 1974-or-newer engine into an orginal Datsun 1200, and using the original crossmber, modifications to the engine mount brackets are needed.
There is no need modify the crossmember, although that can be done. It is easy to modify the brackets.
Left Side Mount Location
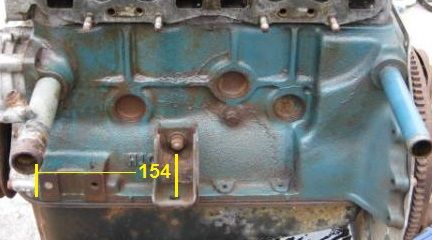
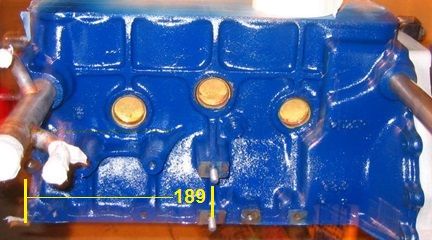
Left Side (manifold side) of A-series engine: change to 1974 and newer blocks: Engine mount bolt bosses were moved back 35mm (1-3/8") on the late blocks.
154 mm: Early block front face to center of mount
189 mm: Revised block front face to center of mount
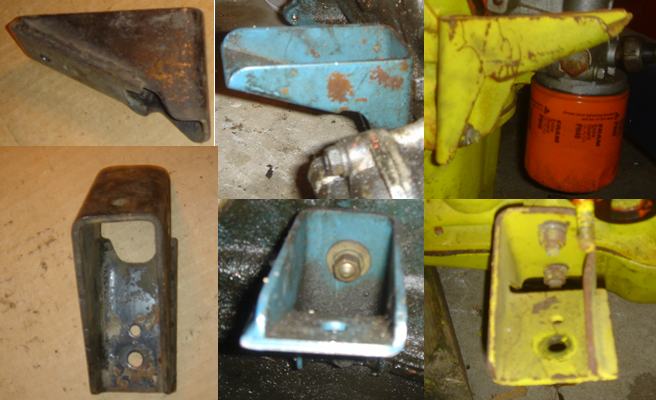
1. Remove this Late LH bracket, and discard
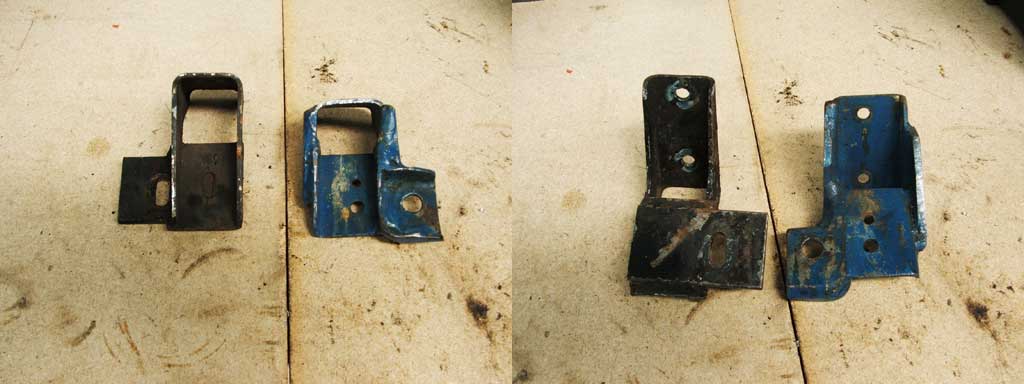
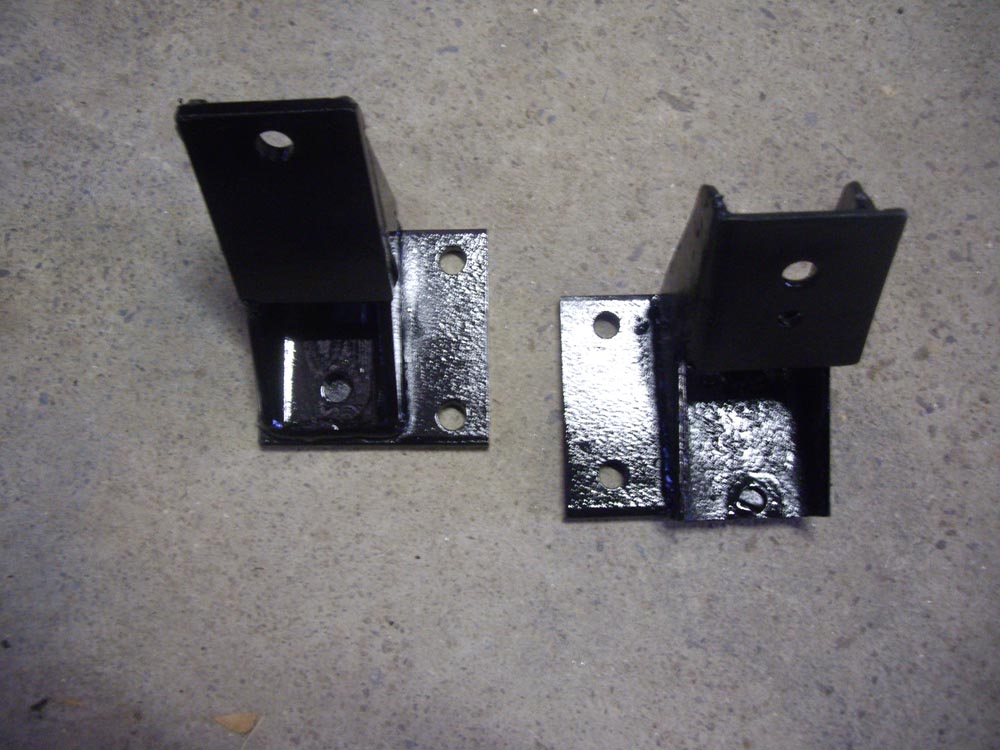
2. Obtain a duplicate late RH bracket, and then fit it to the LH side. Old A12 brackets won't fit, but new A12/A14/A15 brackets will:
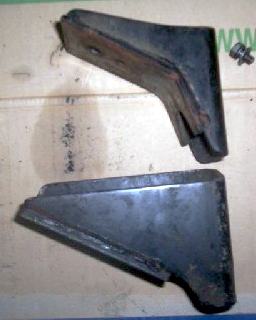 B210 vs B310 Right Bracket
Which is best for this swap?
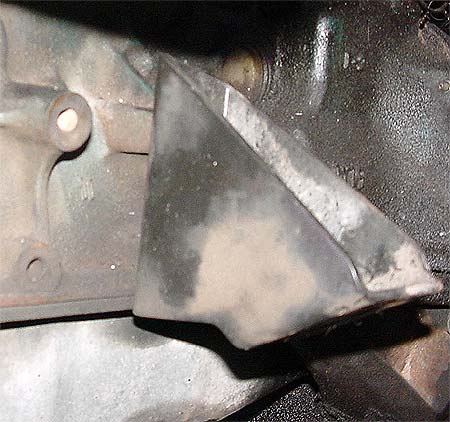
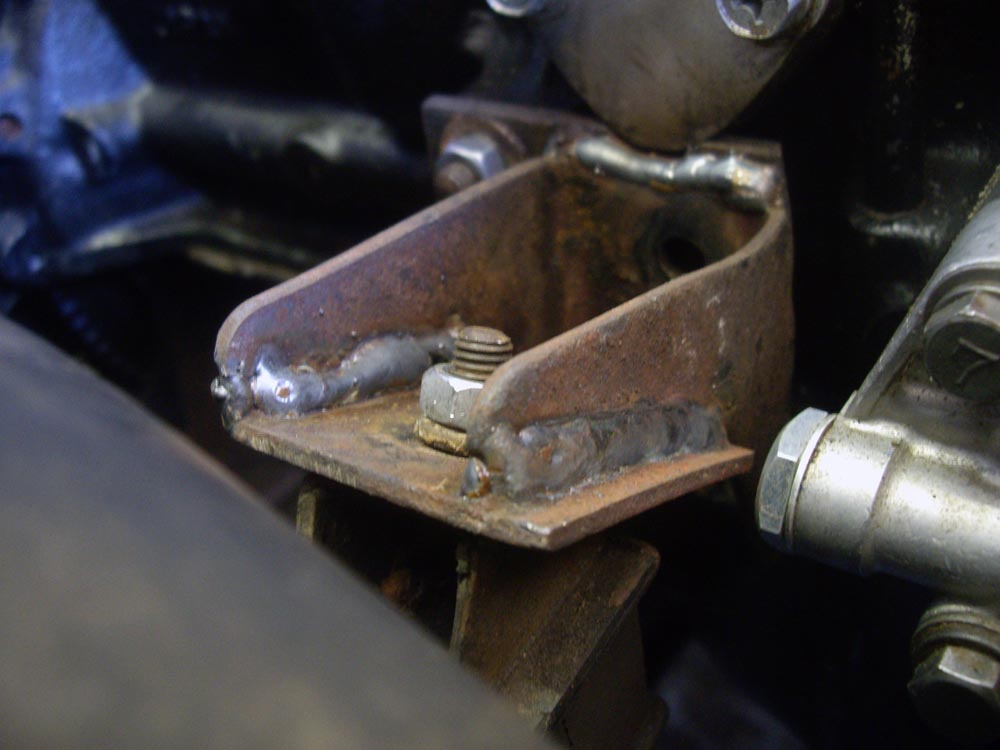
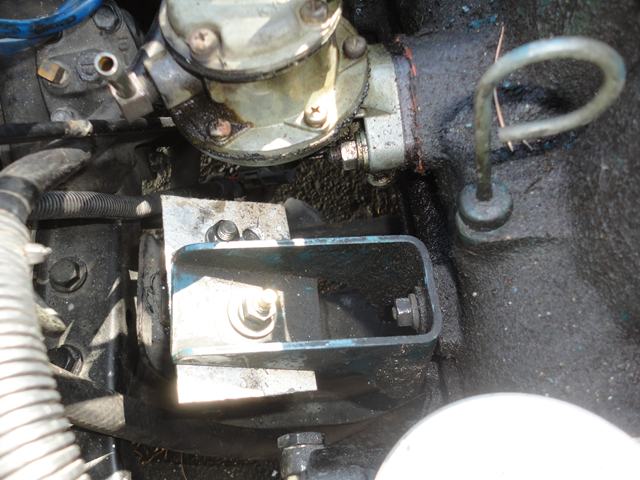
3. The new mounts are 35mm (1-3/8") further back. So drill two holes in a flat plate and mount it like this:
If the engine is centered and the plate holes drilled correctly, it will fit straight as above.
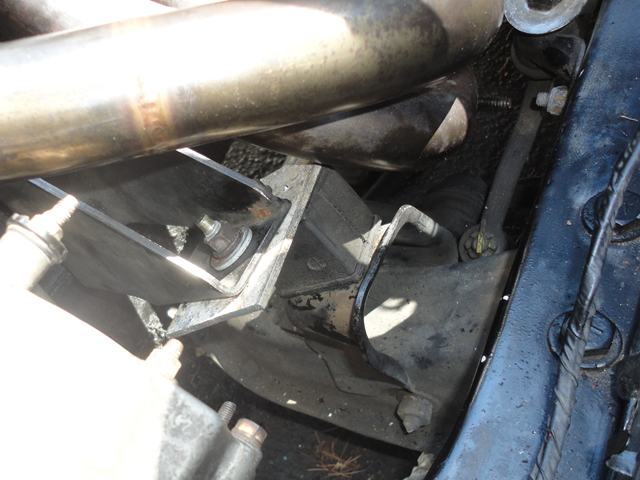
If the engine is not centered, the plate can be skewed:

There are three different RH mounts, some allow the engine to sit higher or lower than the others. If the mount is now up too high, slot the bolt holes for the engine bracket, and slide the mount up on the block the thickness of the plate, then tighten. This will lower the engine a bit.
RH engine mount brackets (old) 55mm bolt center (new) 50 mm bolt center
Lower bolt is 5mm higher on new engine, so mounts actually bolt at the same level.
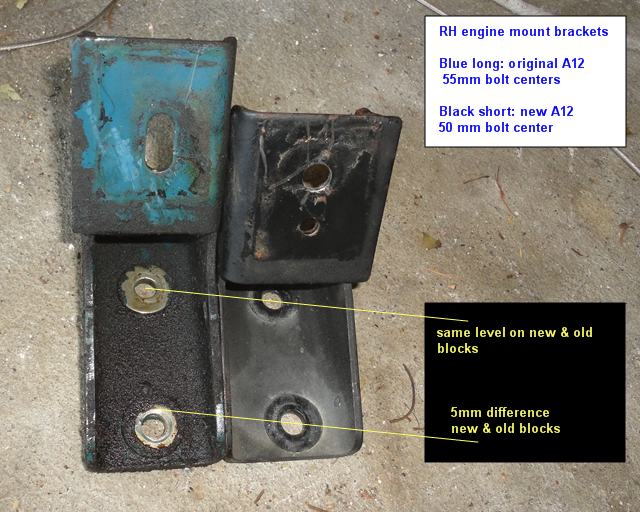
Perhaps a 3mm difference.
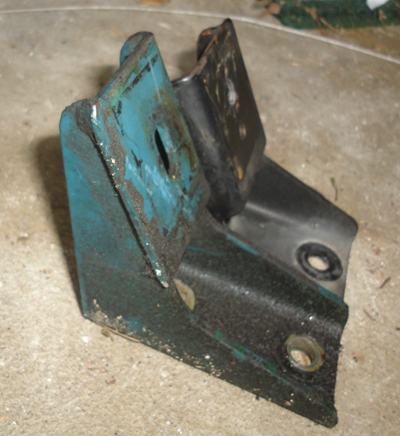
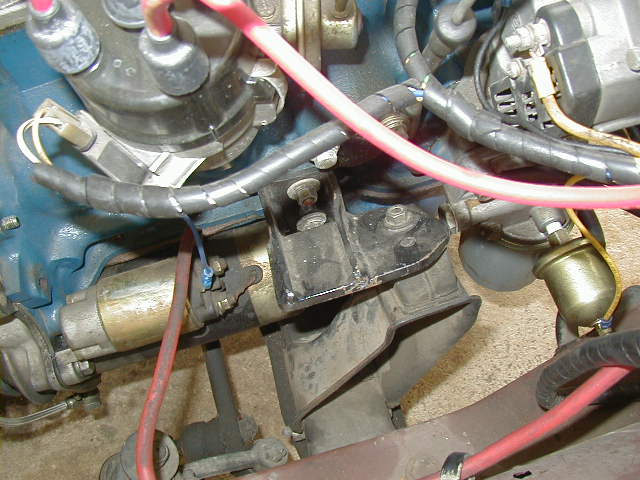
Alternatively, you can put the mount on the last accessory boss, which is 26mm (1") farther forward than early blocks. With this choice, you will need to redrill the lower hole on the engine mount bracket, 8mm over. And you will still need to slot the mounts and use a flat plate. Nothing gained, but it takes a little more work this way.
Alternative mount location
Re-drill the lower bracket hole, and re-drill the crossmember horn hole 26mm farther forward (no plate needed). Rubber sits to one side of horn. Aircon cannot be used with this choice, as the bolt boss is for the A/C compressor.

Right Side Mount
Right side (spark-plug/oil pump/starter side) engine mount bracket is practically the same Late vs Early.
Two types of right-side brackets: B210 vs B310 Right Bracket
end result with flat plate
The only thing you might need to do is Measure engine installed angle and if you need to lower it a little bit:
- try the other RH side bracket (not sure which one is best), OR
- slot the bracket bolt holes (where it bolts to the engine) so you can bolt it slightly higher on the block
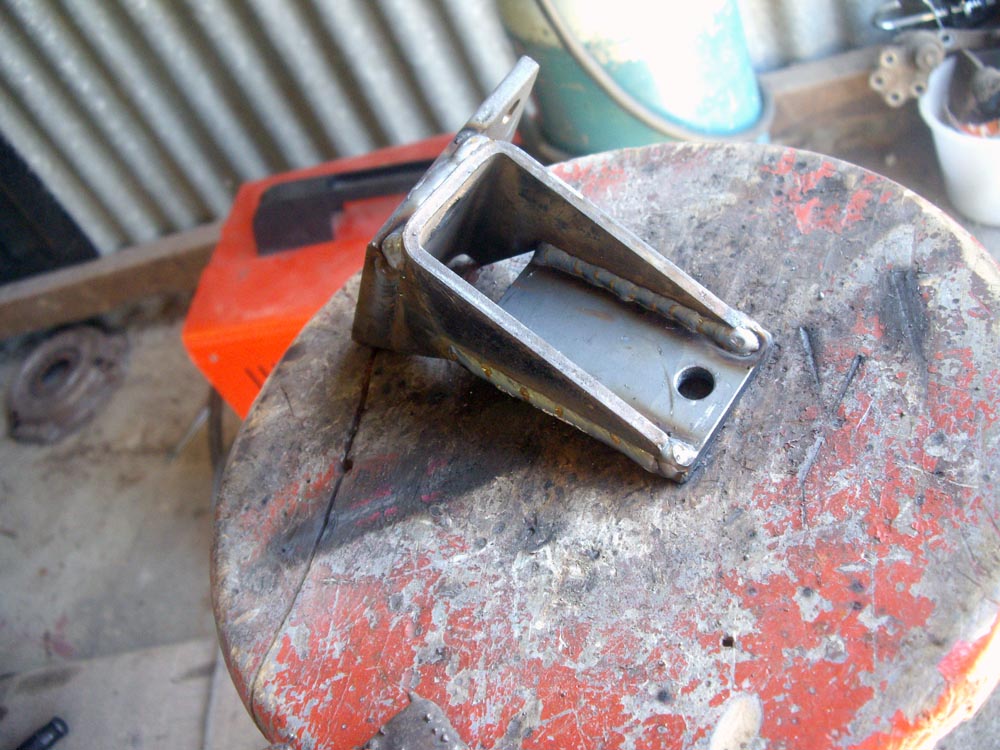
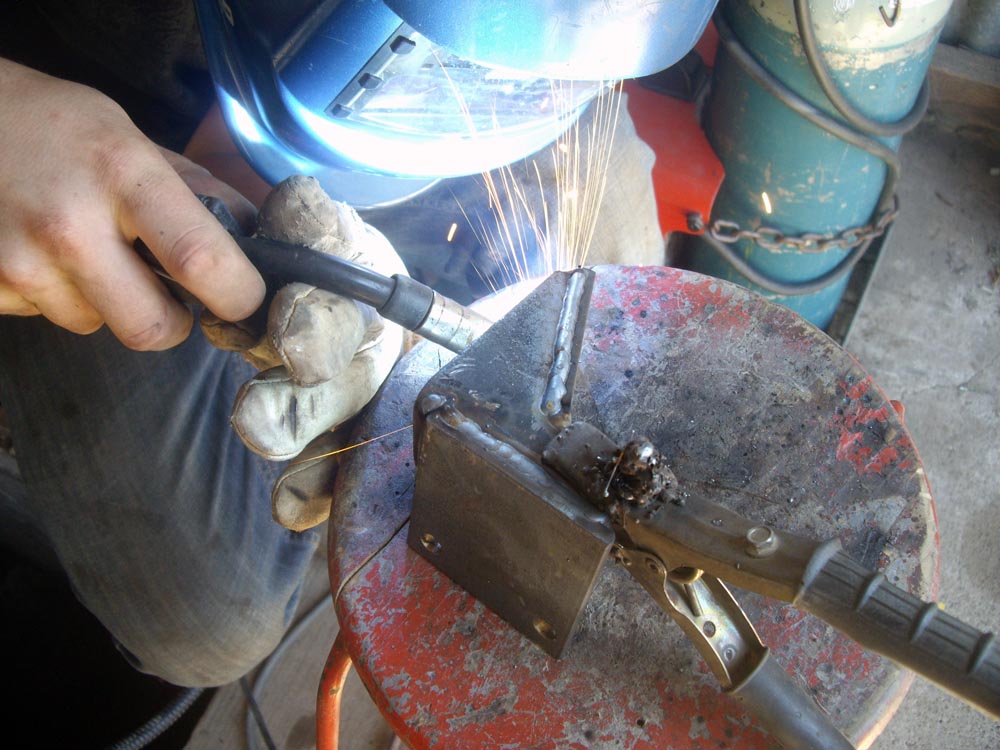
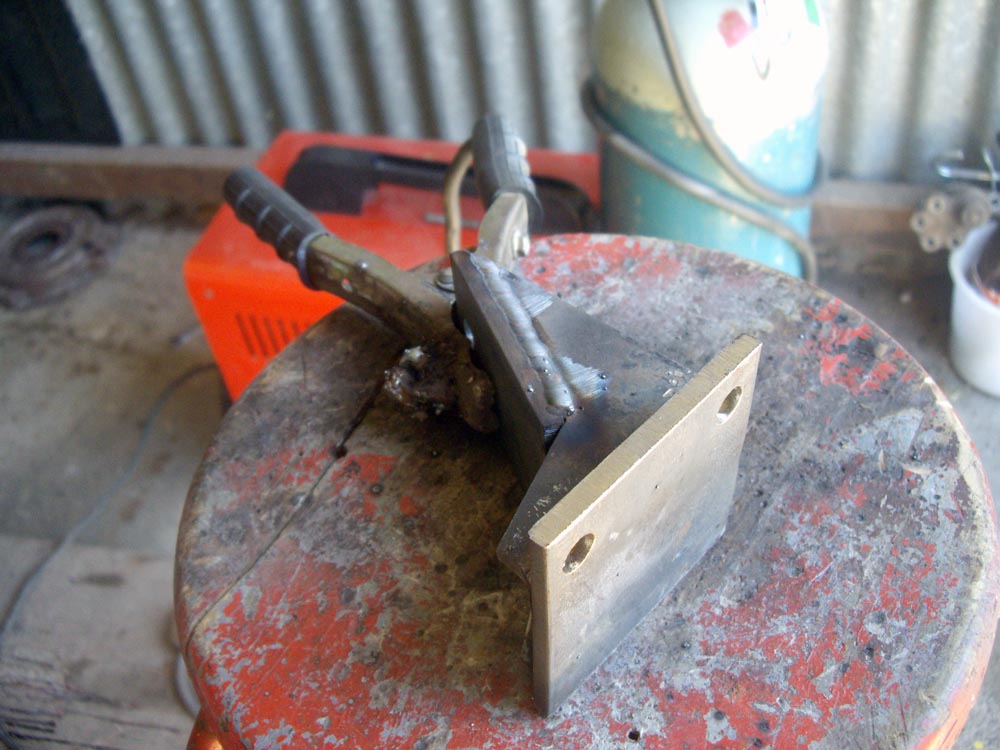
Custom Brackets
For the cleanest look, instead of using adaper plates, you may cut and re-weld the brackets so they fit just so. You can fabricate the LH and RH brackets to have the 35mm offset and be a bit lower.


Discussions and Details
The simplest way to fit the motor mounts is a flat plate:
If you use the correct engine bracket it will be very close to level, maybe about 4mm higher.
Three different Right Side engine brackets. Which is best for a swap?
- cheater_5 wrote up a detailed conversion here: Cheaters a15 into 1200 conversion
- An A14 installation Mildman undertook has been quite significantly detailed at the following web link: Mildman's A14 Installation
Early Engine onto Late Crossmember
To fit an early (1970-1973) engine into a later 1200, you can either swap crossmembers, OR just use simple adapter plates on each side as explained below.
Use Newer Mounts
Or use newer engine mounts? You can modify the engine mount brackets to fit an early A12 engine (GX, anyone?) into your later 1200. The only trick is to drill a flat plate to bridge the 35mm difference in back-to-front location.
- Use Datsun 1200 RH mount
- Use 120Y A12 or B210 A14, or any B310 LH mount with a longer bolt
- Drill two holes in 4mm flat plates
4mm thick plates. The mount bracket overlaps the insulator so it is partially supported by it -- in other words, it is plenty strong and doesn't stress the rubber insulator.
Right Side
Left Side
Use the B110 lower radiator hose to clear the alternator. The new A12 places the alternator on the other side of the engine compared to the original A12. You'll also need to extend the alternator wires to go to the other side.
Right Mount Bracket
The original A12 RH bracket is very similar to the newer bracket -- but the newer RH bracket doesn't fit the original A12 engine. So use the RH bracket that matches the engine.
Left Mount Bracket
On the LH side, use a LH engine bracket from a late engine. The newer LH bracket will match the newer or older LH crossmember horn. The height is perfect and no adjustment is needed.
Old A12 uses stepped bracket (upper boss is set back). To fit New A12 bracket, remove the stud and use a longer stud, or a bolt.
To fit the new A12 bracket, use 19mm worth of washers and a longer bolt or stud. Bolt centers are the same for the original A12 stepped bracket and the revised A12 flat bracket, so it fits just right
Swap Notes
- 1200 wiring will reach either Distributor (under #1 or under #3)
- Alternator fits on opposites sides. Late engines have right-side alternator.
- Can refit alternator to other side, but not necessary
- use extension wires to reach across (Ground, Battery, and FN/LS wires). Be sure to use the same thickness (gauge) wire as original.
- Newer engine may have an alternator marked S-L. If so, simple wiring mods can be done.
- Radiator hoses are different for the original 1200 low-mount alternator.
Datsun 1000
When fitting an A12 into Datsun 1000, use 3mm spacer on the engine mounts so that the deeper pan will clear the 1000 crossmember. Reference: POST 1000 vs 1200 oil pans

HB210
North American B210 came with A14 fitted with mid-sump engine pan.
- if swapping this HB210 engine into 1200, swap the pan and pickup tube with the newer B310 A14 pan and pickup tube.
- If swapping an engine into a North America B210, see B210 Engine Swaps#North America
B310
B310 fits all A-series engines from 1974 on. There is no bolt-in crossmember for the early A-series engine.

Questions
- What's Better? A14 or A15?
- But isn't the A15 stroke too long to rev high?
- Aren't the rods too short in the A14?
For answers, see: Engine Swaps, section "A-series Nissan Engines"